
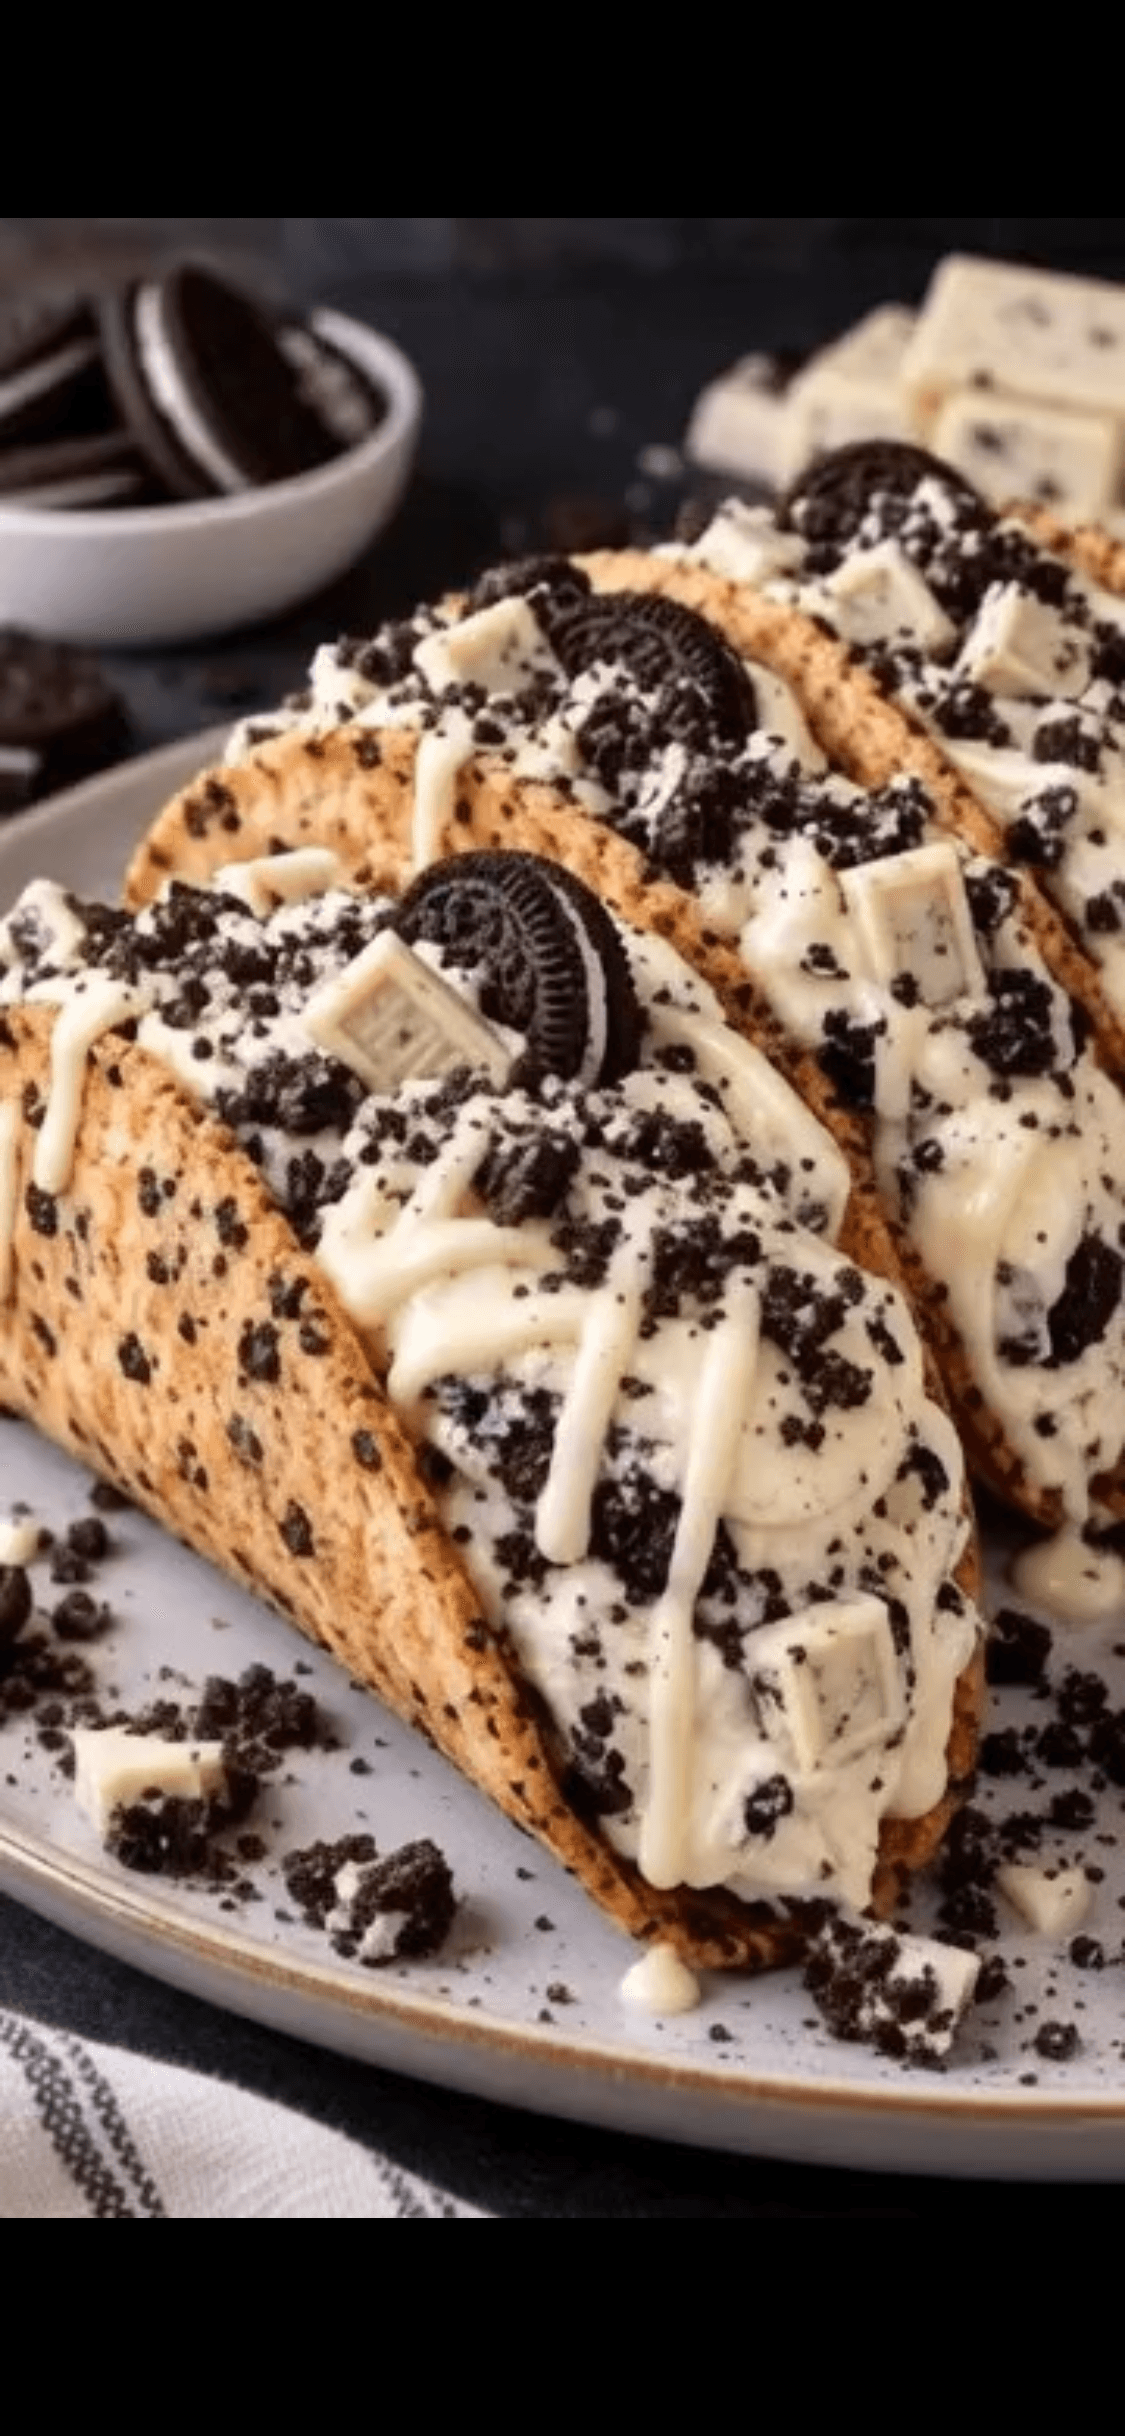
Cookies & Cream Cheesecake Tacos
Introduction
What if you could combine the crispy crunch of a taco shell with the rich, velvety smoothness of a classic cheesecake? That is exactly what happens when you make Cookies & Cream Cheesecake Tacos. This dessert is a playful twist on two beloved favorites, and it is guaranteed to be the star of any gathering. The contrast between the buttery cookie-coated tortilla and the chilled, fluffy cheesecake filling is simply irresistible. If you love Oreo desserts and are looking for a fun, no-fuss treat that looks impressive but comes together quickly, this recipe is about to become your new go-to. It delivers all the nostalgic flavor of cookies and cream in a hand-held format that is perfect for parties, potlucks, or a special weekend indulgence at home.
Ingredients
This recipe uses simple pantry staples to create something truly spectacular. Here is everything you need to whip up a batch of these delightful dessert tacos.
For the Cookie Shells
- 6 small flour tortillas (soft taco size works best)
- 2 tbsp melted butter
- 2 tbsp sugar
- 6 Oreo cookies, finely crushed
For the Cheesecake Filling
- 225 g cream cheese, softened to room temperature
- ½ cup powdered sugar
- 1 tsp vanilla extract
- ½ cup heavy whipping cream, cold
- 8 Oreo cookies, roughly crushed
For the Topping
- 100 g white chocolate, melted
- 4–6 Oreo cookies, crushed
- White chocolate chunks
- Extra Oreo pieces
A quick note on ingredients: Make sure your cream cheese is fully softened before you start mixing. Cold cream cheese will leave lumps in your filling, and nobody wants a lumpy cheesecake taco. For the heavy cream, keep it cold right up until you whip it. Cold cream whips up fluffier and holds its shape much better than warm cream. If you do not have white chocolate chunks on hand, you can simply chop up a white chocolate bar.
Step-by-Step Instructions
Follow these steps closely, and you will have bakery-worthy Cookies & Cream Cheesecake Tacos in no time.
- Preheat your oven to 175°C / 350°F. While the oven heats, prepare the cookie coating. In a small bowl, mix the melted butter, sugar, and finely crushed Oreo cookies until they form a wet, sandy paste.
- Lay out your small flour tortillas on a flat surface. Use a pastry brush to coat both sides of each tortilla evenly with the Oreo and butter mixture. You want a nice, even layer so every bite has that signature cookies and cream flavor.
- To shape the taco shells, drape each coated tortilla over the grates of your oven rack. Let the sides hang down naturally to form a taco shape. Place a baking sheet on the lower rack to catch any drips. Alternatively, you can turn a muffin tin upside down and nestle the tortillas between the cups to hold their shape.
- Bake the shaped tortillas for 8–10 minutes, or until they are golden brown and crisp to the touch. Keep an eye on them during the last two minutes because the sugar can burn quickly. Once done, remove them from the oven and let them cool completely on the rack or the inverted muffin tin. They will harden as they cool.
- While the shells cool, prepare the cheesecake filling. In a large mixing bowl, beat the softened cream cheese, powdered sugar, and vanilla extract with an electric mixer until the mixture is completely smooth and creamy. Scrape down the sides of the bowl as needed.
- In a separate bowl, pour in the cold heavy whipping cream. Whip it on high speed until stiff peaks form. This means the cream will hold its shape firmly when you lift the beaters.
- Gently fold the whipped cream into the cream cheese mixture using a spatula. Use a light hand here. You want to keep the mixture airy and fluffy rather than stirring out all the air you just whipped in.
- Add the roughly crushed Oreo cookies to the cheesecake mixture and fold them in until they are evenly distributed. A few larger chunks are perfect for texture.
- Now it is time to assemble. Fill each crispy cookie shell generously with the cheesecake mixture. You can pipe it in for a neater look or simply spoon it in and let it mound slightly over the top.
- Drizzle each filled taco with the melted white chocolate. Immediately sprinkle with the remaining crushed Oreos and a few white chocolate chunks or extra Oreo pieces for a beautiful finish.
- Place the finished tacos on a plate or tray and chill them in the refrigerator for 30–60 minutes. This step helps the filling set and makes the entire dessert wonderfully cold and creamy before serving.
Nutritional Information
Here is an estimated nutritional breakdown per serving. This information is based on one taco from a batch of six.
- Serving Size: 1 taco
- Calories: 410 kcal
- Protein: 6 g
- Carbohydrates: 45 g
- Fat: 24 g
- Fiber: 1 g
Please note that exact values will vary depending on the specific brands of tortillas, cookies, and chocolate you use.
Preparation Time
This recipe is surprisingly quick to pull together, making it ideal for last-minute entertaining.
- Prep time: 20 minutes
- Cook time: 10 minutes
- Total time: 1 hour 30 minutes (including chilling)
The hands-on portion takes less than half an hour. While the tacos chill, you can easily clean up the kitchen or prepare other parts of your meal. This is much faster than a traditional baked cheesecake, which often requires an hour in the oven and several hours to cool and set.
Healthier Alternatives
If you are looking to lighten things up or adapt Cookies & Cream Cheesecake Tacos for different dietary needs, there are several simple swaps you can make. For a lower-fat version, use reduced-fat cream cheese instead of full-fat. You can also replace half of the heavy whipping cream with plain Greek yogurt. The yogurt adds a pleasant tang that balances the sweetness nicely.
For a gluten-free option, look for certified gluten-free flour tortillas. Many grocery stores now carry them in the frozen or bread aisle. Also, swap the regular Oreo cookies for a gluten-free chocolate sandwich cookie. For a dairy-free and vegan version, use a plant-based cream cheese alternative, coconut cream in place of heavy whipping cream, and vegan butter. Use a dairy-free sandwich cookie and vegan white chocolate to complete the transformation. The texture will be slightly different, but the dessert will still be absolutely delicious.
Serving Suggestions
These dessert tacos are a showstopper on their own, but you can take your presentation to the next level with a few creative touches. Arrange them on a platter standing upright in shallow glasses or propped against each other to show off the swirled filling. Drizzle the plate with extra melted chocolate or a swirl of caramel sauce for a restaurant-quality look.
For drink pairings, a tall glass of cold milk is the classic choice and echoes the childhood joy of dunking cookies. If you are serving adults, these tacos pair beautifully with a rich espresso martini or a sweet dessert wine like Moscato. For a cozy option, serve them alongside hot coffee or a peppermint hot chocolate. The contrast between a warm drink and the cold, creamy filling is incredibly satisfying.
Common Mistakes to Avoid
Even simple recipes can go wrong, so here are the most common pitfalls and how to steer clear of them when making Cookies & Cream Cheesecake Tacos.
One big mistake is using cold cream cheese. If your cream cheese is not softened, your filling will be lumpy and uneven. Let it sit at room temperature for at least 30 minutes before you start.
Another issue is over-whipping the heavy cream. If you beat it too long, it will turn grainy and eventually separate into butter. Stop beating as soon as stiff peaks form.
Overbaking the shells is another frequent problem. The sugar in the butter mixture burns quickly at high heat. Remove the tortillas from the oven as soon as they are crisp and golden, usually right around the 10-minute mark.
Finally, avoid filling the shells too far in advance if you are not serving them immediately. The moisture from the cheesecake filling will eventually soften the crispy cookie shell. For the best texture, fill and top them no more than a few hours before serving, and store them in the fridge until ready to eat.
Storage Tips
If you have leftovers, you can store Cookies & Cream Cheesecake Tacos in an airtight container in the refrigerator for up to two days. Keep in mind that the shells will lose some of their crispiness over time and become softer, similar to a cake cone. They will still taste wonderful, but the texture will change.
Freezing is not recommended for the assembled tacos. The tortilla shells do not thaw well and tend to become soggy and mushy. However, you can freeze the cheesecake filling on its own in a separate container for up to one month. When you are ready to use it, let it thaw overnight in the refrigerator, then give it a gentle stir before piping or spooning it into freshly baked shells.
Reheating is not advised for this dessert. These tacos are meant to be enjoyed cold and creamy straight from the fridge. If you have stored unfilled shells separately, you can re-crisp them by placing them in a 175°C / 350°F oven for two to three minutes. Let them cool completely before adding the filling.
Conclusion
Cookies & Cream Cheesecake Tacos are proof that the most memorable desserts do not have to be complicated. With a handful of everyday ingredients and a little creativity, you can create a treat that feels festive, tastes incredible, and delights both kids and adults. The crunchy cookie-coated shell, the mousse-like cheesecake center, and the sweet white chocolate drizzle all come together in perfect harmony. Whether you make them for a birthday party, a game day snack, or simply because you are craving something sweet, these tacos are sure to impress.
I would love to hear how your batch turns out. Leave a comment below and share your experience, or tag me in your photos on social media. Happy baking, and enjoy every delicious bite.
Frequently Asked Questions
Can I make these dessert tacos ahead of time?
Yes, you can prepare the components ahead of time. Bake the shells and store them in an airtight container at room temperature for up to a day. Store the filling in the fridge separately. Assemble the tacos a few hours before serving for the best texture.
Can I use a different type of cookie?
Absolutely. Golden Oreos, chocolate peanut butter sandwich cookies, or even vanilla wafers would work beautifully. Simply crush them the same way and adjust the sugar in the shell coating if your chosen cookie is already very sweet.
What if I do not have white chocolate?
You can drizzle the tacos with melted dark chocolate, milk chocolate, or even a simple glaze made from powdered sugar and milk. The white chocolate offers a lovely contrast, but any chocolate will taste great with the cookies and cream filling.
My tortillas collapsed in the oven. What did I do wrong?
The tortillas likely were not draped securely enough. Make sure they are snugly wedged between the inverted muffin tin cups or balanced carefully on the oven rack wires. Using smaller tortillas also helps them hold their taco shape better.
Is there a no-bake option for the shells?
Yes, you can skip the baking step by purchasing pre-made waffle bowls or taco-shaped dessert shells from the store. While the flavor will differ slightly, it saves time and works well if you prefer not to turn on the oven.
How far in advance can I freeze the cheesecake filling?
The filling can be frozen for up to one month. Thaw it in the refrigerator overnight and stir gently before using. Avoid freezing the assembled tacos, as the shells will become soggy.
What is the best way to crush Oreos for this recipe?
A food processor gives you the finest, most even crumb for the shell coating. For the filling and topping, place the cookies in a zip-top bag and gently crush them with a rolling pin. This gives you those nice varied chunks that add great texture.
Cookies & Cream Cheesecake Tacos

Ingredients
For the Cookie Shells
- 6 small flour tortillas soft taco size works best
- 2 tbsp melted butter
- 2 tbsp sugar
- 6 Oreo cookies finely crushed
For the Cheesecake Filling
- 225 g cream cheese softened to room temperature
- 1/2 cup powdered sugar
- 1 tsp vanilla extract
- 1/2 cup heavy whipping cream cold
- 8 Oreo cookies roughly crushed
For the Topping
- 100 g white chocolate melted
- 4-6 Oreo cookies crushed
- White chocolate chunks
- Extra Oreo pieces
Instructions
- Preheat your oven to 175°C / 350°F. While the oven heats, prepare the cookie coating. In a small bowl, mix the melted butter, sugar, and finely crushed Oreo cookies until they form a wet, sandy paste.
- Lay out your small flour tortillas on a flat surface. Use a pastry brush to coat both sides of each tortilla evenly with the Oreo and butter mixture. You want a nice, even layer so every bite has that signature cookies and cream flavor.
- To shape the taco shells, drape each coated tortilla over the grates of your oven rack. Let the sides hang down naturally to form a taco shape. Place a baking sheet on the lower rack to catch any drips. Alternatively, you can turn a muffin tin upside down and nestle the tortillas between the cups to hold their shape.
- Bake the shaped tortillas for 8-10 minutes, or until they are golden brown and crisp to the touch. Keep an eye on them during the last two minutes because the sugar can burn quickly. Once done, remove them from the oven and let them cool completely on the rack or the inverted muffin tin. They will harden as they cool.
- While the shells cool, prepare the cheesecake filling. In a large mixing bowl, beat the softened cream cheese, powdered sugar, and vanilla extract with an electric mixer until the mixture is completely smooth and creamy. Scrape down the sides of the bowl as needed.
- In a separate bowl, pour in the cold heavy whipping cream. Whip it on high speed until stiff peaks form. This means the cream will hold its shape firmly when you lift the beaters.
- Gently fold the whipped cream into the cream cheese mixture using a spatula. Use a light hand here. You want to keep the mixture airy and fluffy rather than stirring out all the air you just whipped in.
- Add the roughly crushed Oreo cookies to the cheesecake mixture and fold them in until they are evenly distributed. A few larger chunks are perfect for texture.
- Now it is time to assemble. Fill each crispy cookie shell generously with the cheesecake mixture. You can pipe it in for a neater look or simply spoon it in and let it mound slightly over the top.
- Drizzle each filled taco with the melted white chocolate. Immediately sprinkle with the remaining crushed Oreos and a few white chocolate chunks or extra Oreo pieces for a beautiful finish.
- Place the finished tacos on a plate or tray and chill them in the refrigerator for 30-60 minutes. This step helps the filling set and makes the entire dessert wonderfully cold and creamy before serving.