Step 1: Set Up the Dipping Station
Pour the milk into a shallow bowl wide enough to fit a ladyfinger lengthwise. Set it aside and have it ready before you begin assembling — you want to work quickly once the dipping starts to prevent the ladyfingers from becoming too saturated.
Step 2: Make the Strawberry Cream Cheese Filling
In a large mixing bowl, combine the softened cream cheese, powdered sugar, vanilla extract, and 2 tablespoons of finely crushed freeze-dried strawberries. Beat with an electric mixer on medium speed until the mixture is completely smooth, fluffy, and free of any lumps. The freeze-dried strawberry powder dissolves into the cream cheese, infusing it with an intensely concentrated strawberry flavor and a beautiful natural pink color.
Step 3: Add the Heavy Cream
With the mixer running on low speed, slowly pour the heavy whipping cream into the cream cheese mixture in a steady stream. Once all the cream is incorporated, increase the speed to high and beat until the filling is thick, fluffy, and holds its shape firmly when the beaters are lifted — similar to stiff peaks. This step transforms the dense cream cheese base into a light, mousse-like filling that is the heart of the entire dessert.
Step 4: Fold in the Fresh Strawberries
Using a spatula, gently fold the diced fresh strawberries into the filling, distributing them evenly throughout. Work with slow, deliberate strokes to avoid deflating the airy texture you just created. Set the filling aside.
Step 5: Dip and Layer the Ladyfingers — First Layer
Working one at a time, briefly dip each ladyfinger into the milk — a quick one-second dip on each side is all that is needed. Do not soak them. Over-soaked ladyfingers become mushy and collapse under the weight of the filling, ruining the structure of the finished dessert. Arrange the dipped ladyfingers in a single, even layer across the bottom of a 7×10 inch baking dish, fitting them closely together and breaking pieces as needed to fill any gaps.
Step 6: Add the First Filling Layer
Spread exactly half of the strawberry cream cheese filling evenly over the first layer of ladyfingers, smoothing it all the way to the edges with a spatula. Work gently to avoid disturbing the ladyfinger layer beneath.
Step 7: Add the Second Ladyfinger Layer
Dip the remaining ladyfingers in the milk the same way — briefly, without soaking — and arrange them in an even layer directly on top of the filling, just as you did with the first layer.
Step 8: Add the Second Filling Layer
Spread the remaining strawberry cream cheese filling evenly over the second layer of ladyfingers, smoothing the surface completely flat.
Step 9: Add the Whipped Cream Topping
Spread the whipped cream in an even, generous layer over the top of the filling, covering it completely from edge to edge. Smooth it with a spatula for a clean finish.
Step 10: Add the Finishing Topping
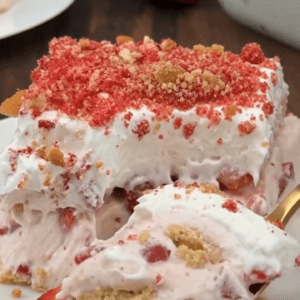
Sprinkle the crushed vanilla wafers and the remaining 2 tablespoons of crushed freeze-dried strawberries evenly across the whipped cream surface. The vanilla wafer crumble adds a delicate crunch that echoes the texture of classic strawberry shortcake, while the freeze-dried strawberry dust adds a final burst of concentrated flavor and a beautiful pink finish.
Step 11: Chill
Cover the dish tightly with plastic wrap and refrigerate for a minimum of 4 hours — 6 hours or overnight is strongly recommended. During chilling, the ladyfingers absorb moisture from the filling and soften into a tender, cake-like layer that holds the dessert together and makes every slice clean and cohesive. This transformation is what defines the finished dessert.
Step 12: Slice and Serve
Remove from the refrigerator, uncover, and slice into portions with a sharp knife. For the cleanest cuts, dip the knife in hot water and wipe it dry between each slice. Serve immediately, straight from the refrigerator.