

Peanut Butter Dream Bars
Introduction
What happens when you cross a peanut butter cookie with silky chocolate pudding and an airy peanut butter mousse? You get Peanut Butter Dream Bars, a no-bake dessert that disappears from the dessert table faster than you can slice it. If you love the classic combination of chocolate and peanut butter, this recipe is about to become your new favorite.
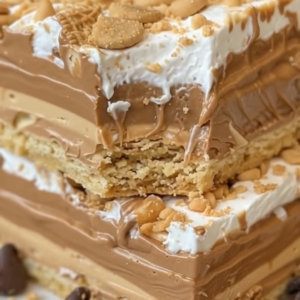
These Peanut Butter Dream Bars layer a crunchy peanut butter cookie crust, a smooth chocolate pudding center, and a cloud-like peanut butter cream topping. The finishing touch is a scattering of chocolate chips and peanut butter chips that add a little bite to every forkful. Even better, the recipe requires no oven time, making it perfect for warm weather gatherings, potlucks, or any moment when a serious chocolate peanut butter craving strikes.
Ingredients
Here is everything you need to assemble these layered Peanut Butter Dream Bars.
For the crust:
- 24 peanut butter sandwich cookies, such as Nutter Butters, crushed fine
- 8 tablespoons unsalted butter, melted
For the chocolate pudding layer:
- 1 1/2 cups cold milk
- 1 package instant chocolate pudding mix, 3.9 ounces
For the peanut butter cream layer:
- 4 ounces cream cheese, softened
- 1/2 cup powdered sugar
- 1/2 cup creamy peanut butter
- 1 tub frozen whipped topping, 8 ounces, thawed
For the topping:
- 1/2 cup milk chocolate chips
- 1/2 cup peanut butter chips
Ingredient tips:
- If you cannot find peanut butter sandwich cookies, use chocolate sandwich cookies blended with 2 tablespoons of creamy peanut butter in the crust mixture.
- Full-fat cream cheese creates the richest texture, but reduced-fat cream cheese works in a pinch.
- For a firmer crust, chill it for at least 15 minutes before adding the pudding layer.
- Make sure the frozen whipped topping is fully thawed before folding it into the peanut butter mixture.
Step-by-Step Instructions
Follow these simple steps to build your Peanut Butter Dream Bars.
Make the crust. Place the peanut butter sandwich cookies in a food processor and pulse until fine crumbs form. You can also crush them in a zip-top bag using a rolling pin. Combine the crumbs with the melted butter and stir until the mixture looks like wet sand. Press the mixture firmly into the bottom of a lightly greased or parchment-lined 9×13-inch baking dish. Chill the crust while you prepare the next layer.
Prepare the chocolate pudding layer. In a medium bowl, whisk the instant chocolate pudding mix with the cold milk for about 2 minutes, or until the mixture thickens. Spread the pudding evenly over the chilled crust, using an offset spatula to reach the corners. Return the dish to the refrigerator so the pudding can set while you make the peanut butter cream layer.
Create the peanut butter cream layer. In a large mixing bowl, beat the softened cream cheese, powdered sugar, and creamy peanut butter until smooth and lump-free. Gently fold in the thawed whipped topping. Use a light hand here because folding too aggressively will deflate the mixture. Spread the peanut butter cream over the chilled pudding layer.
Add the topping. Sprinkle the milk chocolate chips and peanut butter chips evenly over the top. Press them in just slightly so they adhere to the creamy layer.
Chill and serve. Cover the dish with plastic wrap or a lid and refrigerate for at least 4 hours. Overnight chilling is even better because it allows the layers to firm up completely. When ready to serve, cut into 12 bars and keep chilled until serving time.
Nutritional Information
Each serving is based on one bar when the pan is cut into 12 equal pieces.
- Calories: approximately 350 kcal per bar
- Protein: 6 grams
- Carbohydrates: 34 grams
- Fat: 21 grams
- Fiber: 1 gram
The exact values will vary depending on the brands of cookies, peanut butter, pudding mix, and whipped topping you choose.
Preparation Time
- Prep time: 20 minutes
- Chill time: 4 hours
- Total time: 4 hours 20 minutes
Since the active work only takes about 20 minutes, these Peanut Butter Dream Bars are an excellent make-ahead dessert. You can assemble them in the morning and have them ready for an evening gathering, or prepare them the night before for stress-free entertaining.
Healthier Alternatives
If you want to lighten up these Peanut Butter Dream Bars, consider these swaps.
- Use reduced-fat peanut butter and reduced-fat cream cheese to lower the fat content.
- Choose sugar-free instant chocolate pudding and skim milk to reduce sugar and calories.
- Replace the frozen whipped topping with 2 cups of lightly sweetened stabilized whipped cream made from heavy whipping cream.
- Select lower-sugar peanut butter sandwich cookies or a thin chocolate wafer crust with a small amount of peanut butter mixed in.
- For a dairy-free version, use dairy-free cream cheese, plant-based milk, dairy-free whipped topping, and vegan chocolate chips.
- For a gluten-free option, use gluten-free peanut butter sandwich cookies or gluten-free chocolate cookies.
Serving Suggestions
Peanut Butter Dream Bars are rich, so smaller slices work well for parties. Cut the pan into 15 or 18 squares when serving a crowd.
Serve ideas:
- Drizzle warm chocolate sauce over each square just before serving.
- Add a small scoop of vanilla ice cream beside each bar.
- Sprinkle a pinch of flaky sea salt over the top to enhance the chocolate and peanut butter flavors.
- Place bars on a chilled serving platter for an extra refreshing bite.
Drink pairings:
- Cold milk is a classic match.
- A dark roast coffee balances the sweetness beautifully.
- For an adults-only pairing, try a small glass of bourbon or a creamy stout.
Common Mistakes to Avoid
Even a simple no-bake dessert can go wrong. Here is how to keep your Peanut Butter Dream Bars flawless.
- Do not skip the chill time. The layers need time to set, or the bars will fall apart when sliced.
- Do not overfold the whipped topping. Folding too much deflates the air, leaving the peanut butter layer dense instead of light.
- Do not use warm pudding. Make sure the pudding has thickened and cooled slightly in the refrigerator before spreading the peanut butter cream on top.
- Do not forget to press the crust firmly. A loose crust will crumble and separate from the bars.
- Use cold milk for the pudding. Warm milk will not activate instant pudding properly.
Storage Tips
Store Peanut Butter Dream Bars covered tightly in the refrigerator for up to 4 days. Keep them chilled until just before serving because the creamy layers soften quickly at room temperature.
To freeze, wrap the entire dish or individual bars in plastic wrap, then add a layer of aluminum foil. Freeze for up to 1 month. Thaw overnight in the refrigerator before serving. The texture may soften slightly after freezing, but the flavor remains excellent.
These bars do not require reheating. In fact, they are best served straight from the fridge.
Conclusion
Peanut Butter Dream Bars deliver everything you want in a no-bake dessert. A crunchy cookie crust, a creamy chocolate pudding layer, and a billowy peanut butter topping come together for a treat that tastes like a peanut butter cup in bar form. Whether you make them for a summer barbecue, a holiday tray, or a simple weeknight indulgence, this recipe is one you will return to again and again.
Have you tried these Peanut Butter Dream Bars? Leave a comment below and share how they turned out. I would love to hear about any variations you tried or serving ideas that worked for your family.
Frequently Asked Questions
Can I use homemade whipped cream instead of frozen whipped topping?
Yes. Use 2 cups of heavy whipping cream beaten to stiff peaks, and add 2 tablespoons of powdered sugar to stabilize it. Fold it into the peanut butter mixture gently.
How far in advance can I make Peanut Butter Dream Bars?
You can make them up to 2 days in advance. Cover the dish tightly and refrigerate. In fact, the bars slice more cleanly after an overnight chill.
Can I use crunchy peanut butter instead of creamy?
Yes. Crunchy peanut butter adds a nice texture to the cream layer. Keep in mind that the filling will have small peanut pieces throughout.
Why are my bars falling apart when I slice them?
The bars likely need more chill time. Refrigerate for at least 4 hours, but overnight is best. Use a sharp knife and wipe it clean between cuts for the neatest slices.
Can I make these in a smaller pan?
Yes. For a thicker bar, use an 8×8-inch pan. The layers will be taller, so increase the chill time slightly to make sure the center sets properly.
Are Peanut Butter Dream Bars freezer-friendly?
Yes. Wrap them well and freeze for up to 1 month. Thaw in the refrigerator overnight before serving for the best texture.
Can I use a different pudding flavor?
Absolutely. Vanilla pudding or butterscotch pudding both taste delicious with the peanut butter layers. The chocolate peanut butter combo is classic, but feel free to experiment.
Peanut Butter Dream Bars

Ingredients
For the crust
- 24 peanut butter sandwich cookies, such as Nutter Butters, crushed fine
- 8 tablespoons unsalted butter, melted
For the chocolate pudding layer
- 1 1/2 cups cold milk
- 1 package instant chocolate pudding mix, 3.9 ounces
For the peanut butter cream layer
- 4 ounces cream cheese, softened
- 1/2 cup powdered sugar
- 1/2 cup creamy peanut butter
- 1 tub frozen whipped topping, 8 ounces, thawed
For the topping
- 1/2 cup milk chocolate chips
- 1/2 cup peanut butter chips
Instructions
- Make the crust. Place the peanut butter sandwich cookies in a food processor and pulse until fine crumbs form. You can also crush them in a zip-top bag using a rolling pin. Combine the crumbs with the melted butter and stir until the mixture looks like wet sand. Press the mixture firmly into the bottom of a lightly greased or parchment-lined 9x13-inch baking dish. Chill the crust while you prepare the next layer.
- Prepare the chocolate pudding layer. In a medium bowl, whisk the instant chocolate pudding mix with the cold milk for about 2 minutes, or until the mixture thickens. Spread the pudding evenly over the chilled crust, using an offset spatula to reach the corners. Return the dish to the refrigerator so the pudding can set while you make the peanut butter cream layer.
- Create the peanut butter cream layer. In a large mixing bowl, beat the softened cream cheese, powdered sugar, and creamy peanut butter until smooth and lump-free. Gently fold in the thawed whipped topping. Use a light hand here because folding too aggressively will deflate the mixture. Spread the peanut butter cream over the chilled pudding layer.
- Add the topping. Sprinkle the milk chocolate chips and peanut butter chips evenly over the top. Press them in just slightly so they adhere to the creamy layer.
- Chill and serve. Cover the dish with plastic wrap or a lid and refrigerate for at least 4 hours. Overnight chilling is even better because it allows the layers to firm up completely. When ready to serve, cut into 12 bars and keep chilled until serving time.

