

Espresso Brownie Ice Cream
Introduction
What happens when you combine rich espresso, fudgy brownies, and creamy caramel into one frozen dessert? You get Espresso Brownie Ice Cream—a decadent treat that satisfies coffee lovers and dessert enthusiasts alike.
This no-churn ice cream recipe is perfect for those who crave the bold flavors of coffee paired with the sweetness of homemade brownies. With just a few simple steps, you can create a gourmet-quality dessert without needing an ice cream maker.
Ready to indulge? Let’s dive into this irresistible Espresso Brownie Ice Cream recipe.
Ingredients
Ice Cream Base
- 1 (14-ounce) can sweetened condensed milk
- 2 cups cold heavy whipping cream
- 2 teaspoons vanilla bean paste (or pure vanilla extract)
- 1 double shot espresso, cooled
- Pinch of salt
Mix-Ins
- 2 cups brownie chunks (homemade or store-bought)
- ½ cup caramel sauce, plus extra for drizzling (optional)
Ingredient Tips & Substitutions
- For a stronger coffee flavor, use a dark roast espresso or add ½ teaspoon instant coffee powder.
- Swap the caramel sauce for chocolate fudge or dulce de leche if preferred.
- Use gluten-free brownies for a gluten-free version.
- Dairy-free? Substitute coconut cream for heavy whipping cream and use dairy-free sweetened condensed milk.
Step-by-Step Instructions
Whip the Cream
In a large mixing bowl, whip the cold heavy whipping cream until stiff peaks form.Make the Ice Cream Base
Gently fold in the sweetened condensed milk, cooled espresso, vanilla bean paste, and salt until fully combined. Be careful not to overmix—keeping it airy ensures a creamy texture.Layer the Ice Cream
Spread a layer of the ice cream mixture into a 9×5-inch loaf pan. Drizzle with caramel sauce and sprinkle brownie chunks evenly. Repeat the layers, ending with a final layer of ice cream.Finish & Freeze
Swirl extra caramel on top and add more brownie chunks if desired. Cover tightly with plastic wrap or foil and freeze for 6–8 hours, or overnight for best results.
Pro Tips
- Chill your mixing bowl and beaters before whipping the cream for faster, fluffier results.
- Let the espresso cool completely to prevent melting the whipped cream.
Nutritional Information
Per Serving (Based on 8 servings)
- Calories: 420
- Protein: 5g
- Carbohydrates: 45g
- Fat: 25g
- Fiber: 1g
Preparation Time
- Prep Time: 15 minutes
- Freeze Time: 6–8 hours
- Total Time: 6–8 hours (mostly inactive)
Unlike traditional ice cream recipes, this no-churn method saves you hours of churning while delivering a luxuriously smooth texture.
Healthier Alternatives
- Use reduced-fat sweetened condensed milk or a sugar-free version to cut calories.
- Opt for low-fat whipped topping instead of heavy cream.
- Swap in homemade date caramel for a refined sugar-free option.
- Choose whole grain or protein-packed brownies for added nutrients.
Serving Suggestions
- Scoop into waffle cones for a nostalgic touch.
- Top with crushed espresso beans for extra crunch.
- Pair with an affogato-style drizzle of hot espresso.
- Garnish with a sprinkle of sea salt for a sweet-salty contrast.
Common Mistakes to Avoid
- Overmixing the cream and condensed milk—this can deflate the mixture, making it dense instead of creamy.
- Using warm espresso—this may cause the whipped cream to break down.
- Skipping the freezing time—the ice cream needs at least 6 hours to set properly.
- Adding dry brownie chunks—lightly moisten them with caramel or espresso to prevent a crumbly texture.
Storage Tips
- Keep covered in the freezer for up to 2 weeks.
- Place parchment paper on the surface before sealing to prevent ice crystals.
- For easy scooping, let it sit at room temperature for 5–10 minutes before serving.
Conclusion
Espresso Brownie Ice Cream is a showstopping dessert that’s surprisingly simple to make. With layers of coffee-infused cream, chewy brownies, and luscious caramel, every bite is pure bliss.
Have you tried this recipe? Leave a comment below sharing your experience, or tag us in your creations on social media. We’d love to see your twist on this delicious treat!
Frequently Asked Questions
Can I use instant coffee instead of espresso?
Yes, dissolve 1 tablespoon instant coffee in 1 tablespoon hot water. Let it cool before adding.How do I prevent freezer burn?
Ensure the ice cream is tightly covered with plastic wrap pressed directly onto the surface.Can I make this ahead for a party?
Absolutely! Prepare it up to 2 days in advance for the best texture.Why is my ice cream too hard?
It may need a few extra minutes at room temperature to soften before scooping.Are there nut-free alternatives?
Use store-bought brownies without nuts or make your own nut-free version.What’s the best way to cut brownies for chunks?
Freeze them for 10 minutes first—they’ll hold their shape better when folded in.Can I add other mix-ins?
Try chocolate chips, toasted pecans, or marshmallows for extra indulgence.Is this recipe kid-friendly?
The espresso flavor is bold, so reduce the amount if serving to children.
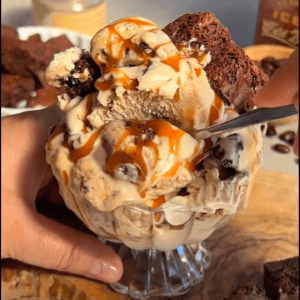
Espresso Brownie Ice Cream

Ingredients
Ice Cream Base
- 1 can sweetened condensed milk 14-ounce
- 2 cups cold heavy whipping cream
- 2 teaspoons vanilla bean paste or pure vanilla extract
- 1 double shot espresso cooled
- Pinch of salt
Mix-Ins
- 2 cups brownie chunks homemade or store-bought
- ½ cup caramel sauce plus extra for drizzling (optional)
Instructions
Whip the Cream
- In a large mixing bowl, whip the cold heavy whipping cream until stiff peaks form.
Make the Ice Cream Base
- Gently fold in the sweetened condensed milk, cooled espresso, vanilla bean paste, and salt until fully combined. Be careful not to overmix—keeping it airy ensures a creamy texture.
Layer the Ice Cream
- Spread a layer of the ice cream mixture into a 9x5-inch loaf pan. Drizzle with caramel sauce and sprinkle brownie chunks evenly. Repeat the layers, ending with a final layer of ice cream.
Finish & Freeze
- Swirl extra caramel on top and add more brownie chunks if desired. Cover tightly with plastic wrap or foil and freeze for 6–8 hours, or overnight for best results.

