Chocolate Mint Oreo Cheesecake Casserole
Introduction
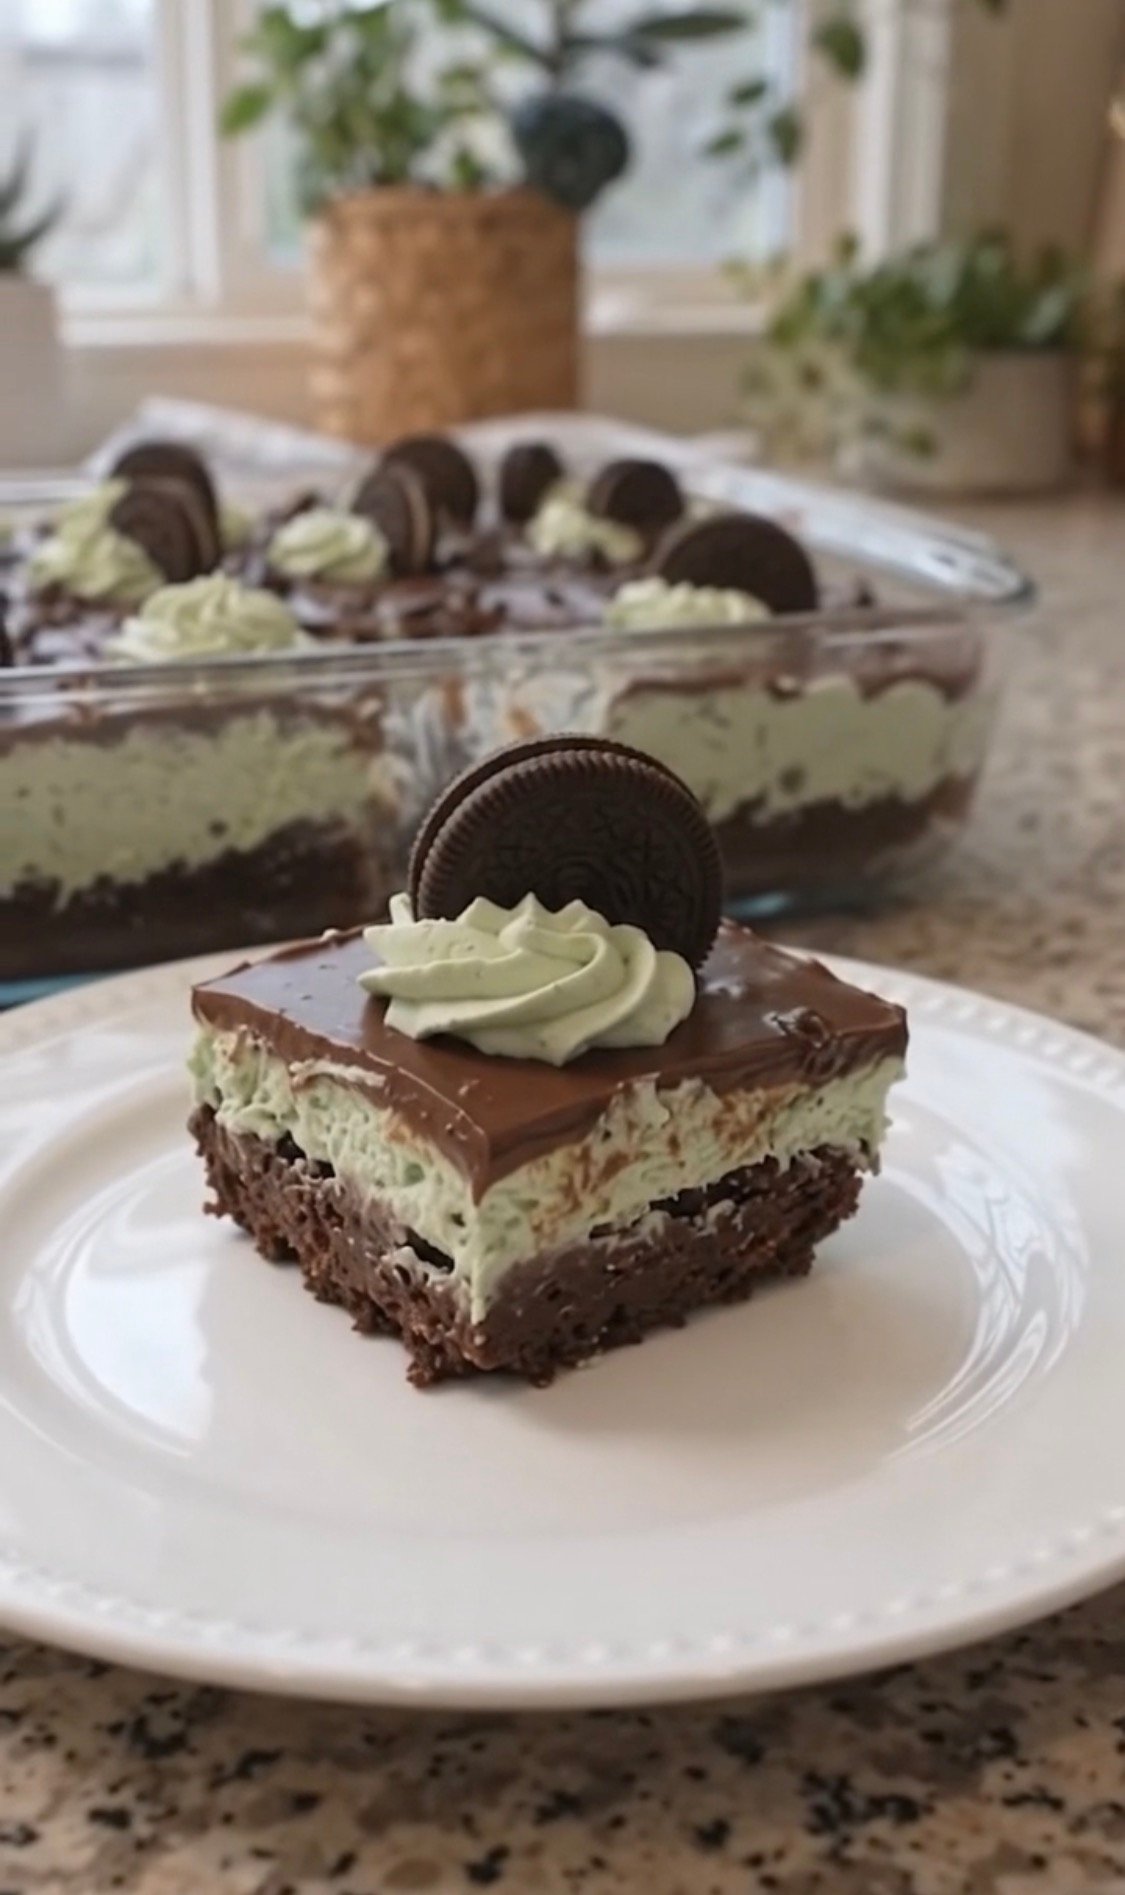
What if you could capture the refreshing coolness of a mint chocolate chip ice cream cone and the rich, tangy depth of a New York cheesecake in a single, no-bake dish? That is exactly what this Chocolate Mint Oreo Cheesecake Casserole delivers. It is a showstopper dessert that combines layers of crushed chocolate sandwich cookies, an airy mint cheesecake mousse, and a glossy chocolate ganache.
This is not just a dessert; it is an experience. The texture is surprisingly light thanks to the whipped cream folded into the cream cheese base. Yet the flavor is profoundly indulgent. The black cocoa of the Oreo cookies cuts through the sweetness, while the subtle pop of peppermint extract keeps the palate refreshed. Whether you are hosting a St. Patrick’s Day party, a Christmas gathering, or simply craving a family-friendly treat, this recipe is designed to be reliable and straightforward. You do not need a water bath or a springform pan for this one. A simple 9×13 casserole dish is all it takes to create a dessert that looks like it came from a professional bakery display case.
Ingredients
This recipe relies on straightforward grocery store items. Here is what you will need to build the ultimate Chocolate Mint Oreo Cheesecake Casserole.
For the Oreo Crust
- 30 Oreo cookies (regular, not Double Stuf, to keep the butter ratio correct)
- 5 tablespoons melted butter
For the Mint Cheesecake Filling
- 24 ounces (3 blocks) cream cheese, softened to room temperature
- 1 cup powdered sugar
- ½ teaspoon peppermint extract
- 2 drops green food coloring
- 2 cups cold heavy whipping cream
- 12 Oreo cookies, roughly chopped
For the Chocolate Topping
- 1 cup semisweet chocolate chips
- ⅔ cup heavy cream
- 8 Oreo cookies, halved, for decoration
- 2 tablespoons Oreo crumbs, for decoration
Ingredient Tips and Substitutions
- Peppermint vs. Mint: Ensure you are using peppermint extract, not spearmint. Spearmint can sometimes resemble the flavor of toothpaste. Also, quality varies; start with less and taste as you go.
- Food Coloring: The green tint is optional. If you prefer a pure white filling, omit the coloring entirely. For a natural alternative, use a tiny pinch of matcha powder or spinach powder.
- Sugar: Powdered sugar is essential here because it dissolves entirely into the cream cheese without leaving a gritty mouthfeel. Do not substitute granulated sugar without reducing it in a processor first.
Step-by-Step Instructions
Creating this layered dessert is simple, but refrigeration time is key. Follow these steps carefully to achieve the neatest layers.
Prepare the crust. Take the 30 Oreo cookies and crush them until they resemble coarse sand. You can use a food processor for speed, or place the cookies in a zip-top bag and crush with a rolling pin. Mix the crumbs with the melted butter. Pour this mixture into a 9 x 13-inch glass baking dish. Press firmly into the bottom using the back of a measuring cup to ensure an even, compact base. Chill for 20 minutes to set the butter.
Build the filling. Using a large bowl and a hand mixer, beat the softened cream cheese, powdered sugar, peppermint extract, and green food coloring until the mixture is completely smooth and no lumps remain. In a separate bowl, whip the 2 cups of cold heavy whipping cream on high speed until stiff peaks form. This is crucial; do not overwhip or it will turn into butter. Gently fold the whipped cream into the cream cheese mixture using a rubber spatula. The goal is to keep the air in the mixture. Once combined, fold in the 12 roughly chopped Oreos. The chunks should be irregular for texture.
Layer and chill. Spread the mint filling evenly over the chilled crust. It will be fluffy and thick. Smooth the top with an offset spatula. Cover the dish loosely and refrigerate for at least 2 hours, so the filling sets up slightly before you add the warm topping.
Make the chocolate ganache. Heat the ⅔ cup of heavy cream in a small saucepan over medium heat until it is just steaming. Do not let it boil. Pour the hot cream over the semisweet chocolate chips in a heatproof bowl. Wait 2 minutes, then stir slowly from the center outward until the mixture becomes a shiny, dark chocolate sauce. Let this cool for 15 minutes. You want it pourable but not hot enough to melt the middle layer.
Top and finish. Pour the cooled ganache over the chilled filling. Tilt the pan gently to let the chocolate find its level. While the chocolate is still slightly tacky, arrange the 8 halved Oreos in a decorative pattern on top. Sprinkle with the remaining 2 tablespoons of Oreo crumbs. Place the entire casserole in the fridge for at least 4 more hours, or preferably overnight. This allows the layers to fuse and makes slicing much cleaner.
Nutritional Information
This dessert is rich. The servings are small but mighty. The nutritional breakdown below is a rough estimate for a standard serving.
- Serving Size: 1 square (1/15 of the casserole)
- Calories: 520 per serving
- Protein: 6 grams
- Carbohydrates: 45 grams
- Fat: 37 grams
- Fiber: 1 gram
- Sugar: 30 grams
Preparation Time
This is a "make-ahead" dessert. you are making it for a holiday or a birthday, timing is essential. The actual hands-on labor is minimal, but the resting period is non-negotiable. Prep Time: 30 minutes
- Cook Time: 0 minutes
- Total Time: 6 hours 30 minutes (including the chill time)
Compared to a traditional baked cheesecake that requires a water bath and roasting, this casserole version saves you roughly 2 hours of active work. It is the perfect choice for school graduations or summer cookouts when you do not want to turn on the oven.
Healthier Alternatives
While this Chocolate Mint Oreo Cheesecake Casserole is designed for indulgence, you can make a few swaps to fit different dietary lifestyles.
Dairy-Free Option: You can make this recipe dairy-free by using plant-based bricks of cream cheese from brands like Violife or Kite Hill. In the filling, use a dairy-free whipping cream, such as coconut cream or oat-based whipped cream. Coconut cream must be whipped chilled to achieve the same fluffy, stiff peak. For the ganache, full-fat coconut milk also works wonderfully.
Gluten-Free Option: The primary source of flour here is the Oreo cookies. Use a gluten-free chocolate sandwich cookie brand. Glutino and Goodie Girl both make excellent crunch that mimics the texture of traditional Oreos.
Lower Sugar: Choose a sugar-free cookie brand. For the filling, you can use a granulated monk fruit blend. The ganache can be made with unsweetened 70% or 85% dark chocolate to cut down on carbs and sugar.
If you are managing lactose intolerance, using Lactaid heavy cream and cream cheese will significantly help, though it will still contain milk proteins for some individuals.
Serving Suggestions
Presentation matters as much as taste. Because this dessert is rich, the squares are best served cold and individually.
For clean slices, run a large knife under hot water, wipe it dry, and slice. The heat allows the blade to glide through the chocolate layer, preventing it from cracking. Repeat this between cuts.
Drink Pairings:
- Coffee: A strong espresso or a latte balances the creaminess beautifully.
- Cocktails: A chocolate mint martini or a glass of Baileys over ice pairs deliciously.
- For Kids: A glass of very cold milk is a classic to offset the rich sandwich cookies.
Creative Twists: Garnish each piece of platter with a dollop of whipped cream and a fresh mint. You can also drizzle a little white chocolate over the top, creating a monochromatic contrast to the green layer beneath.
Common Mistakes to Avoid
Even the best home chefs will hit a snag. Here are the most frequent pitfalls to avoid.
- Melting the Ganache: If you pour the hot chocolate over the cold filling too early, it will melt and little rivers will run from the sides. Always let it cool to room temperature or touch the bowl to check it is only warm, not hot.
- Too Much Peppermint: This is a casserole, not a candy cane. Using too much extract makes it taste like mouthwash. Start with 1/4 teaspoon, taste, and add slowly.
- Flat Whipped Cream: If your heavy cream is not very cold, or your bowl is warm, the whipping cream will never form stiff peaks. Chill your mixing bowl and beaters in the freezer for 10 minutes before you start.
Storage Tips
This dessert is actually better the next day, making it an excellent prep-ahead candidate.
Refrigeration:
Tightly cover the dish with plastic wrap or a lid. Store in the fridge for up to 5 days. The crust will soften slightly over time, but it remains sturdy enough to hold together.
Freezing:
Wrap the cold casserole (or leftover squares) in a layer of plastic wrap, followed by a layer of aluminum foil. You can store it for up to 3 months. When you are ready to serve, transfer the frozen squares to the fridge and thaw slowly for a few hours. Do not thaw at room temperature, as condensation will ruin the texture.
Reheating: This dessert is. There is no reason to heat it. However, if you want a hot chocolate effect, briefly wave an individual slice in the microwave for 5 seconds, but keep an eye on it.
Conclusion
This Chocolate Mint Oreo Cheesecake Casserole is more than just a recipe; it is a statement. It brings together the nostalgic cookies of childhood with an elegant, creamy finish that adults appreciate. It is incredibly satisfying to make because there is no baking, no complicated water bath, and no stress about cracks on the surface. The casserole format makes it easy to slice into 15 perfect squares, making it the ideal dessert for a crowd, a family dinner, or a week of late-night snacks.
I really hope you give this a try. It is one of those recipes that people ask for again and again. If you make it, please drop your thoughts in the comments below. Did you go heavy or light on the mint? Share your variations and tag us with your photo! I always love seeing how your creations turn out in your own kitchens.
Frequently Asked Questions
Can I use double-stuffed Oreos for the crust?
Yes, but you may need to. The extra filling adds sugar and moisture. You can use them, but increase the butter to 6 tablespoons and press the crumbs quite tightly to prevent the base from crumbling. For the filling, doubt you use single-stuffed.
Why is my mint filling runny?
This usually happens if the head cream was not words to stiff peaks, or it was folded too, causing the air to collapse. Ensure the mixture is very thick before spreading. If it is too runny, do not pour it; instead, serve it as a parfait with the crumbles.
Can I make this without food coloring?
Absolutely. The green color is purely visual. The peppermint extract is clear. If you want to keep it white, just skip the food coloring. If you want a subtle color, a tiny amount of matcha visible gives it a pale green hue.
What if I don't have pure peppermint extract?
You can use peppermint oil in a pinch, but beware, oil is much stronger. Use only 1/4 teaspoon of good for food-grade peppermint oil. You can also use crème de menthe in the filling for a more complex flavor, but that may require adding a little extra sugar to balance the alcohol.
firmly. Can I use the refrigerator instead of the freezer to set the crust?
The fridge will work, but if you are in a hurry, the freezer is faster. In the freezer, 10 minutes in the refrigerator is enough. In times just 20 minutes or until it is hard to open. The freezer helps ensure the butter is completely solid before you add the wet filling.
Is this casserole okay to bring to a potluck?
It is one of the best. You can make it the evening before and transport it in a cooler or insulated bag. The layers need to be cold to stay in place. Do not leave it out at a summer potluck for more than 2 hours, as the dairy will start to soften and sour quickly.