

5-Ingredient No-Bake Crunchie Slice
Introduction
Have you ever craved something sweet, crunchy, and deeply chocolatey but could not face turning on the oven? That is exactly where this 5-Ingredient No-Bake Crunchie Slice saves the day. It combines crushed digestive biscuits, golden syrup, melted milk chocolate, butter, and chunks of Crunchie bar into a chewy, honeycomb-studded traybake. The result is a no-bake honeycomb slice that tastes far more impressive than the ten minutes of prep suggests.
This easy no-bake traybake is ideal for busy weeks, last-minute gatherings, or whenever you need a quick dessert with very little washing up. Because the recipe relies on pantry staples, you can keep the ingredients on hand for spontaneous sweet cravings.
Ingredients for the 5-Ingredient No-Bake Crunchie Slice
- 200 g (7 oz) digestive biscuits or Graham crackers, crushed
- 1 cup milk chocolate chips
- 1/2 cup golden syrup or light corn syrup
- 1/2 cup unsalted butter, melted
- 1/2 cup Crunchie chocolate bars, roughly chopped, or any honeycomb chocolate bar
Use a mix of fine biscuit crumbs and larger chunks to give the slice its signature crunch. If you only have salted butter, it will still work, but you may want to skip any extra salt. Golden syrup gives a soft, chewy texture and helps the mixture hold together. Light corn syrup is a good swap, though the flavour will be slightly less caramelised. You can also use dark chocolate chips or white chocolate for a different flavour profile.
Step-by-Step Instructions for the 5-Ingredient No-Bake Crunchie Slice
Prepare the base. Crush the digestive biscuits into small pieces using your hands, a zip-top bag, or a food processor. You want a combination of fine crumbs and larger chunks for maximum crunch. In a large mixing bowl, combine the crushed biscuits and chopped Crunchie bars.
Melt the chocolate mixture. In a heatproof bowl, combine the milk chocolate chips, golden syrup, and melted butter. Heat in the microwave in 20-second intervals, stirring after each one, or use a double boiler over low heat. Stir until the mixture is completely smooth. Be careful not to overheat the chocolate, as it can seize or turn grainy.
Mix the ingredients. Pour the melted chocolate mixture over the crushed biscuit and Crunchie mixture. Fold everything together with a spatula until every piece is evenly coated. The mixture should look glossy and sticky, not dry.
Shape the slice. Transfer the mixture into a lined 8×8-inch baking dish or square pan. Press it down gently with a spatula or the back of a spoon to create an even layer. Avoid pressing too firmly, or the slice can become dense and hard.
Chill, slice, and serve. Refrigerate for at least 2 hours, or until fully set. Once firm, lift the slice out using the paper lining and cut it into squares or bars. For clean edges, run a sharp knife under hot water and wipe it dry between cuts.
Nutritional Information
The values below are approximate and based on 16 servings.
- Calories: 220 kcal per slice
- Protein: 2 g
- Carbohydrates: 27 g
- Fat: 11 g
- Fiber: 1 g
- Serving size: 1 slice from a 16-slice batch
Nutritional content will vary depending on the exact brands of chocolate, biscuits, and syrup you use.
Preparation Time
- Prep time: 10 minutes
- Cook time: 0 minutes
- Chill time: 2 hours
- Total time: 2 hours 10 minutes
Compared with baked traybakes and brownies, this no-bake honeycomb slice is incredibly quick to assemble. The only waiting time is the chilling, which is completely hands-off.
Healthier Alternatives
This 5-Ingredient No-Bake Crunchie Slice is a treat, but a few simple swaps can suit different dietary needs.
- Use dark chocolate with at least 70 percent cocoa instead of milk chocolate to reduce sugar.
- Swap half the butter for coconut oil or a light buttery spread.
- Replace golden syrup with honey or brown rice syrup, though the texture may change slightly.
- Choose gluten-free digestive biscuits or Graham crackers if needed.
- For a dairy-free version, use vegan butter, dairy-free milk chocolate chips, and a vegan honeycomb chocolate bar.
- Add a handful of almonds, seeds, or oats to boost protein and fibre.
Keep in mind that changing the sweetener or fat can alter how well the slice sets. If the mixture feels too dry, add a little extra melted chocolate or syrup.
Serving Suggestions
- Drizzle extra melted chocolate over the top before chilling for a bakery-style look.
- Sprinkle with a little flaky sea salt to balance the sweetness.
- Serve chilled squares with a scoop of vanilla ice cream for an easy dessert.
- Crumble leftovers over Greek yogurt or vanilla pudding.
- Pair with a cup of tea, strong coffee, or an iced latte.
This easy chocolate biscuit slice is also great on a dessert platter with fresh berries and a pot of cream.
Common Mistakes to Avoid
- Crushing the biscuits too finely. This removes the crunch and creates a softer, cake-like texture.
- Overheating the chocolate. Heat in short bursts and stir often to prevent burning or seizing.
- Skipping the pan lining. Lining the dish with parchment paper makes the slice much easier to remove.
- Pressing the mixture too hard. Firm pressure can make the chilled slice tough and difficult to bite.
- Rushing the chilling time. If you cut it too early, the bars may crumble and lose their shape.
- Adding too many extras. Large amounts of nuts, marshmallows, or dried fruit can stop the mixture from binding together.
Storage Tips
Refrigerate the slice in an airtight container for up to 5 days. Place parchment paper between layers to stop the pieces from sticking together. For longer storage, wrap individual slices in parchment and freeze them in a freezer-safe bag or container for up to 1 month. Thaw frozen slices in the fridge overnight or at room temperature for 10 to 15 minutes.
There is no need to reheat this slice. It is best served chilled or at room temperature. Avoid microwaving it, as the honeycomb pieces can melt and the chocolate may lose its snap.
Conclusion
This 5-Ingredient No-Bake Crunchie Slice is proof that simple pantry ingredients can create a genuinely irresistible dessert. It takes only ten minutes of active prep, needs no oven, and delivers honeycomb crunch in every bite. Whether you make it for a party, a family treat, or a quick afternoon snack, it is sure to disappear fast.
Have you tried this recipe? Leave a comment below and let me know how your no-bake honeycomb slice turned out. Feel free to share your own twists, mix-ins, or topping ideas.
Frequently Asked Questions
Can I make this 5-Ingredient No-Bake Crunchie Slice ahead of time?
Yes. This slice is perfect for making a day ahead. Keep it in the fridge, and slice it just before serving for the cleanest edges.
What can I use instead of golden syrup?
Light corn syrup, honey, or brown rice syrup can work. Golden syrup gives the most traditional flavour and a soft, chewy texture, but the alternatives will still hold the slice together.
Can I freeze this no-bake honeycomb slice?
Absolutely. Wrap individual slices in parchment paper and place them in a freezer-safe bag. Freeze for up to 1 month and thaw in the fridge overnight.
How long does this slice keep in the fridge?
It stays fresh in an airtight container in the fridge for up to 5 days. The texture remains chewy and slightly firm when chilled.
Can I use dark chocolate instead of milk chocolate?
Yes. Dark chocolate gives a richer, less sweet result. You can use dark chocolate chips or a chopped dark chocolate bar in the same quantity.
Is this recipe gluten-free?
It can be if you use gluten-free digestive biscuits or gluten-free Graham crackers. Always check the labels on all packaged ingredients, including chocolate bars.
Why is my slice too hard?
The mixture was likely pressed into the pan too firmly, or the chocolate was overheated. Press gently when shaping, and melt the chocolate slowly over low heat or in short microwave bursts.
Can I use other chocolate bars instead of Crunchie?
Yes. Any honeycomb chocolate bar works well. You can also use chocolate-covered honeycomb pieces or add plain honeycomb candy to the biscuit mixture for a similar effect.
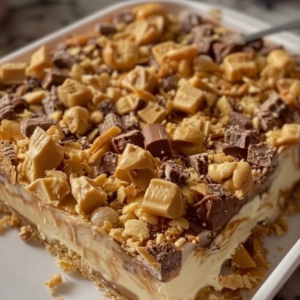
5-Ingredient No-Bake Crunchie Slice

Ingredients
Ingredients for the 5-Ingredient No-Bake Crunchie Slice
- 200 g digestive biscuits or Graham crackers 7 oz; crushed; use a mix of fine biscuit crumbs and larger chunks for signature crunch.
- 1 cup milk chocolate chips You can also use dark chocolate chips or white chocolate for a different flavour profile.
- 1/2 cup golden syrup or light corn syrup Golden syrup gives a soft, chewy texture and helps the mixture hold together. Light corn syrup is a good swap, though the flavour will be slightly less caramelised.
- 1/2 cup unsalted butter Melted; if you only have salted butter, it will still work, but you may want to skip any extra salt.
- 1/2 cup Crunchie chocolate bars Roughly chopped; or any honeycomb chocolate bar.
Instructions
Step-by-Step Instructions for the 5-Ingredient No-Bake Crunchie Slice
- Crush the digestive biscuits into small pieces using your hands, a zip-top bag, or a food processor. You want a combination of fine crumbs and larger chunks for maximum crunch. In a large mixing bowl, combine the crushed biscuits and chopped Crunchie bars.
- In a heatproof bowl, combine the milk chocolate chips, golden syrup, and melted butter. Heat in the microwave in 20-second intervals, stirring after each one, or use a double boiler over low heat. Stir until the mixture is completely smooth. Be careful not to overheat the chocolate, as it can seize or turn grainy.
- Pour the melted chocolate mixture over the crushed biscuit and Crunchie mixture. Fold everything together with a spatula until every piece is evenly coated. The mixture should look glossy and sticky, not dry.
- Transfer the mixture into a lined 8x8-inch baking dish or square pan. Press it down gently with a spatula or the back of a spoon to create an even layer. Avoid pressing too firmly, or the slice can become dense and hard.
- Refrigerate for at least 2 hours, or until fully set. Once firm, lift the slice out using the paper lining and cut it into squares or bars. For clean edges, run a sharp knife under hot water and wipe it dry between cuts.

