

Tiramisu Crinkle Cookies
Introduction
What if you could capture the soul of Italy’s most beloved dessert in a single, palm-sized cookie? Imagine the deep, roasted notes of espresso, the tangy richness of mascarpone, and a dramatic, snowy exterior that shatters softly when you take a bite. These Tiramisu Crinkle Cookies are not just a treat; they are an experience. They deliver the familiar comfort of a classic crinkle cookie with an elegant, coffeehouse twist. If you love the ritual of dunking ladyfingers into strong coffee, this recipe is about to become your new favorite way to enjoy those flavors. It bridges the gap between a rustic homemade cookie and a sophisticated pastry.
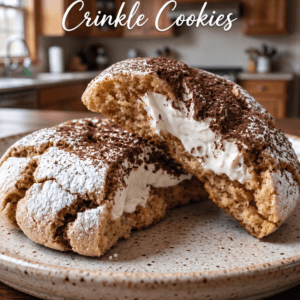
The appeal lies in the contrast. The cookie itself is fudgy, deeply flavored with cocoa and espresso. Yet, hidden inside its center is a frozen nugget of sweetened mascarpone. As the cookies bake, the filling softens into a creamy pocket that mimics the luxurious layer of a traditional tiramisu. The generous coating of powdered sugar cracks as the dough spreads, creating a stunning mosaic that looks like a fresh winter landscape. It is visually striking and surprisingly simple to execute.
This guide will walk you through every step of making these remarkable treats. From freezing the filling properly to mastering the perfect crinkle, you will find all the tips needed for success. Whether you are preparing for a holiday cookie swap, a special occasion, or simply a weekend baking project, these Tiramisu Crinkle Cookies are sure to impress everyone who tries them.
Ingredients
Gathering the right components is the first step toward baking perfection. This recipe uses a two-part process: the creamy center and the espresso-rich dough. Using high-quality ingredients here makes a significant difference in the final flavor profile.
For the Mascarpone Filling:
- 6 oz mascarpone cheese, softened
- ¼ cup powdered sugar
- 1 tsp pure vanilla extract
For the Espresso Crinkle Dough:
- ½ cup unsalted butter, softened
- 1 cup granulated sugar
- 2 large eggs, room temperature
- 2 tbsp instant espresso powder
- 1 tbsp coffee liqueur or warm water
- 1 ¾ cups all-purpose flour
- ¼ cup unsweetened cocoa powder, sifted
- 1 ½ tsp baking powder
- ¼ tsp fine sea salt
- ½ cup powdered sugar, sifted, for rolling
Extra cocoa powder is useful for a final dusting before serving.
Ingredient Tips:
Mascarpone is an Italian cream cheese known for its high fat content and mild, slightly sweet flavor. If you cannot find it, full-fat cream cheese works as a solid substitute. However, mascarpone provides a silkier texture that is hard to beat. Make sure it is softened so it blends without lumps.
Instant espresso powder is crucial. Do not use ground coffee beans, as they will not dissolve and will leave a gritty texture. If you only have strong brewed espresso, reduce the liquid elsewhere in the dough, but powder is best for intense flavor.
The unsweetened cocoa powder should be Dutch-processed if possible. It offers a darker color and smoother flavor that pairs beautifully with the coffee. Always sift it to avoid dry pockets in your dough.
Step-by-Step Instructions
This process requires a bit of planning because the filling must freeze solid. Do not rush the chilling times; they are the secret to the cookie’s structure and appearance.
Prepare the filling first. In a medium bowl, beat the softened mascarpone, ¼ cup powdered sugar, and vanilla extract until perfectly smooth. Use a hand mixer or a whisk. The mixture should look like thick frosting.
Scoop the filling into 12 small portions. Place them on a parchment-lined plate or small baking sheet. The portions should be about the size of a hazelnut. Freeze for at least 30 minutes, or until completely solid. If you freeze them longer, they will be even easier to handle.
Create the espresso mixture. In a small bowl, dissolve the instant espresso powder into the coffee liqueur or warm water. Stir until the granules are completely gone and the liquid looks like a thick syrup. Set this aside to cool slightly.
Cream the butter and sugar. In a large mixing bowl, beat the softened butter and granulated sugar for 2 to 3 minutes. You want the mixture to be light and fluffy. This incorporates air, which helps the cookies bake with a nice texture.
Add the wet ingredients. Beat in the eggs one at a time, mixing well after each addition. Scrape down the sides of the bowl. Then, blend in the dissolved espresso mixture until it is fully integrated. The batter will look a bit silky at this stage.
Mix the dry ingredients. In a separate bowl, whisk together the all-purpose flour, sifted cocoa powder, baking powder, and fine sea salt. Whisking ensures the leavening agent is evenly distributed.
Combine wet and dry. Gradually mix the dry ingredients into the wet ingredients on low speed. Mix just until the dough comes together and no dry streaks remain. Overmixing can make the cookies tough, so stop as soon as it looks uniform.
Chill the dough. Cover the bowl with plastic wrap and refrigerate for at least 1 hour. The dough will be very soft right now. Chilling it solidifies the butter, which prevents the cookies from spreading too much in the oven. It also makes the assembly process much cleaner.
Preheat the oven. When you are ready to bake, preheat your oven to 350°F (175°C). Line two baking sheets with parchment paper. Pour the ½ cup of sifted powdered sugar into a shallow bowl. This is the coating station.
Assemble the cookies. Scoop 2 tablespoons of the chilled dough. Flatten it gently in the palm of your hand to create a disc. Place one frozen mascarpone ball in the center. Wrap the dough completely around the ball, pinching the edges tightly to seal. Roll it between your palms until it is a smooth sphere.
Coat in sugar. Roll the stuffed dough ball generously in the powdered sugar. You want a thick, opaque layer of sugar to cover every inch. This coating is what creates the iconic crackle effect. Place the ball on the prepared baking sheet.
Bake. Repeat for the remaining cookies, spacing them about 2 inches apart. Bake for 11 to 13 minutes. You will see the dramatic crinkles form as the dough expands. The edges should look set, but the centers will still look soft and slightly underdone. That is exactly what you want for a fudgy texture.
Cool and finish. Let the cookies cool on the baking sheet for 5 minutes. This allows them to set up before you move them. Transfer to a wire rack to cool completely. Just before serving, finish with a light dusting of cocoa powder through a fine mesh sieve.
Nutritional Information
These cookies are a decadent indulgence. The nutritional values below are estimates based on the ingredients listed. Serving size is one cookie.
- Calories: 265
- Protein: 4g
- Carbohydrates: 36g
- Fat: 12g
- Fiber: 1g
Keep in mind that the calorie count can fluctuate based on the specific brands of mascarpone and butter you use. The primary source of energy comes from the granulated sugar and the all-purpose flour. The fat content is a mixture of the butter and the rich mascarpone center. While not a low-calorie food, these Tiramisu Crinkle Cookies are meant to be a special treat rather than an everyday snack.
Preparation Time
Time management is essential when baking these cookies. The total time is spread out over a few hours, but much of it is hands-off chilling.
- Prep time: 30 minutes
- Cook time: 13 minutes
- Total time: 2 hours 45 minutes
The total time includes the mandatory 30 minutes for freezing the filling and the 1 hour for chilling the dough. You can easily stretch this out over two days. Prepare the filling and the dough the night before, then assemble and bake the next morning. This actually improves the flavor, allowing the espresso and cocoa to meld together beautifully.
Healthier Alternatives
If you want to enjoy these flavors with a slightly better nutritional profile, a few smart swaps can help. You do not have to sacrifice all the texture to make the recipe a little lighter.
For a lower-fat option, use light cream cheese instead of mascarpone. It has a tangier flavor but still offers the creamy texture necessary for the center filling. Just ensure it is very cold and frozen solid before baking, as it contains more water.
To reduce refined sugar, you can use a granular sugar substitute that measures like sugar. However, keep in mind that sugar contributes to the texture and moisture of the cookie. Using a blend of coconut sugar and a sugar substitute can work, but the crinkle effect relies on the white powdered sugar on the outside.
For a gluten-free version, substitute the all-purpose flour with a 1-to-1 gluten-free baking flour that contains xanthan gum. The cookies may be slightly more delicate, so allow them to cool on the baking sheet for a few extra minutes before moving.
To make it dairy-free, use a plant-based butter substitute and a dairy-free cream cheese alternative. The texture of the filling might be slightly softer, so freeze the filling balls for at least an hour to ensure they hold up in the oven.
Serving Suggestions
These Tiramisu Crinkle Cookies are delightful on their own, but they can be elevated with a few thoughtful pairings. The intense coffee flavor pairs exceptionally well with warm, creamy beverages.
Serve them alongside a freshly pulled shot of espresso or a strong cup of black coffee. The bitterness of the coffee cuts through the sweetness of the cookie and amplifies the espresso notes in the dough.
For an after-dinner treat, pair them with a glass of sweet Marsala wine. Marsala is a classic ingredient in traditional tiramisu, and the wine’s nutty, caramelized notes bring out the chocolate in the cookie.
If you are serving them for a brunch or an afternoon tea, present them on a platter dusted with cocoa powder and a few dark chocolate shavings. The visual appeal of the snowy white cracks next to the dark chocolate is irresistible. A small bowl of whipped mascarpone on the side can also act as a dip for those who want extra creaminess.
Common Mistakes to Avoid
Baking stuffed cookies can be tricky if you skip a step. Here are the most common pitfalls and how to prevent them for perfect results every time.
The biggest mistake is not freezing the mascarpone filling. If the filling is soft, it will melt instantly in the oven. It will leak out of the dough, burn on the pan, and leave the center of the cookie empty. Ensure the balls are rock hard before wrapping them.
Another issue is skipping the dough chilling time. Warm dough spreads into a flat pancake. Cold dough hits the hot oven and holds its shape, forcing the surface to crack against the rigid powdered sugar shell. If your kitchen is warm, work quickly during assembly and return the unbaked cookies to the fridge for 10 minutes before baking.
Overbaking is also a problem. These cookies should look soft in the middle when you take them out. If you wait until they look dry, they will be hard and crumbly once they cool. The residual heat from the baking sheet continues to cook them.
Finally, ensure the edges are sealed tightly. If there are any gaps in the dough, the filling will find a way out. Roll the ball thoroughly and inspect it before coating in powdered sugar.
Storage Tips
These cookies are best enjoyed fresh when the edges are slightly crisp and the center is soft. However, you can store them to enjoy over the next few days.
Room Temperature: Place the cooled cookies in an airtight container. They will keep for 1 to 2 days at room temperature. The powdered sugar might absorb some moisture from the air, so they are best consumed quickly.
Refrigeration: Due to the mascarpone filling, it is safer to store them in the refrigerator for longer periods. Place them in an airtight container separated by parchment paper. They will last up to 5 days in the fridge.
Freezing: You can freeze the baked cookies for up to 2 months. Wrap them individually in plastic wrap and place them in a freezer bag. Thaw them in the refrigerator overnight.
Reheating: To revive the texture, you can microwave a refrigerated cookie for 5 to 8 seconds. Be very careful, as the mascarpone can get too hot and runny. It is usually best to let them come to room temperature.
Conclusion
These Tiramisu Crinkle Cookies are a true celebration of flavor and texture. They transform the classic elements of a beloved Italian dessert into a stunning, handheld treat. The process is straightforward, but the results are spectacular. The rich espresso dough, the hidden mascarpone core, and the dramatic snowy exterior come together to create a cookie that is both nostalgic and novel.
Baking these is a wonderful way to impress your family or guests. The anticipation of waiting for the dough to chill and the filling to freeze is well worth the payoff when you bite into the creamy center. I hope you enjoy making these as much as you enjoy eating them. If you try this recipe, please leave a comment below and let me know how your crinkles turned out. Share your experience and any twists you added to make them your own.
Frequently Asked Questions
Can I use cream cheese instead of mascarpone?
Yes, you can substitute full-fat cream cheese. The flavor will be slightly tangier and less sweet, but the texture will still be creamy. Make sure it is frozen solid before wrapping the dough around it, as cream cheese can melt even faster than mascarpone.Why did my cookies flatten and lose their shape?
This usually happens because the dough was not chilled long enough, or the butter was too soft. Ensure you refrigerate the dough for a full hour and keep the raw assembled balls cold before they go into the oven. A hot oven is also necessary to set the shape quickly.What if I don't have coffee liqueur?
You can simply use warm water to dissolve the espresso powder. The liqueur adds a subtle depth and sweetness, but it is not essential. You could also use strong brewed coffee or a splash of vanilla extract mixed with water.How do I get the perfect crinkle cracks?
The cracks happen when the cold dough meets the hot oven. The dough expands, but the thick coating of powdered sugar stays rigid and breaks apart. Ensure your oven is fully preheated and do not roll the dough balls too tightly before coating them.Can I make the dough ahead of time?
Yes, this is a great make-ahead recipe. The dough can be refrigerated for up to 2 days before baking. You can also freeze the unbaked, sugar-coated dough balls on a tray and transfer them to a freezer bag for up to 3 months. Bake directly from frozen, adding 1 to 2 minutes to the bake time.Why is my filling leaking out?
If the filling leaks, either the frozen balls were too large, the dough was too thin, or the seams were not sealed properly. Use slightly less filling next time and ensure you pinch the dough very tightly. Also, check the oven temperature; if it is too low, the dough sets too slowly.How do I store the leftover cookies?
Keep them in an airtight container in the refrigerator for up to 5 days. Bring them to room temperature before serving for the best flavor and texture. You can also freeze them, but the powdered sugar might become slightly sticky when thawing.
Tiramisu Crinkle Cookies

Ingredients
For the Mascarpone Filling
- 6 oz mascarpone cheese softened
- 1/4 cup powdered sugar
- 1 tsp pure vanilla extract
For the Espresso Crinkle Dough
- 1/2 cup unsalted butter softened
- 1 cup granulated sugar
- 2 large eggs room temperature
- 2 tbsp instant espresso powder
- 1 tbsp coffee liqueur or warm water
- 1 3/4 cups all-purpose flour
- 1/4 cup unsweetened cocoa powder sifted
- 1 1/2 tsp baking powder
- 1/4 tsp fine sea salt
- 1/2 cup powdered sugar sifted, for rolling
For Serving
- unsweetened cocoa powder for final dusting before serving
Instructions
- Prepare the filling first. In a medium bowl, beat the softened mascarpone, 1/4 cup powdered sugar, and vanilla extract until perfectly smooth. Use a hand mixer or a whisk. The mixture should look like thick frosting.
- Scoop the filling into 12 small portions. Place them on a parchment-lined plate or small baking sheet. The portions should be about the size of a hazelnut. Freeze for at least 30 minutes, or until completely solid. If you freeze them longer, they will be even easier to handle.
- Create the espresso mixture. In a small bowl, dissolve the instant espresso powder into the coffee liqueur or warm water. Stir until the granules are completely gone and the liquid looks like a thick syrup. Set this aside to cool slightly.
- Cream the butter and sugar. In a large mixing bowl, beat the softened butter and granulated sugar for 2 to 3 minutes. You want the mixture to be light and fluffy. This incorporates air, which helps the cookies bake with a nice texture.
- Add the wet ingredients. Beat in the eggs one at a time, mixing well after each addition. Scrape down the sides of the bowl. Then, blend in the dissolved espresso mixture until it is fully integrated. The batter will look a bit silky at this stage.
- Mix the dry ingredients. In a separate bowl, whisk together the all-purpose flour, sifted cocoa powder, baking powder, and fine sea salt. Whisking ensures the leavening agent is evenly distributed.
- Combine wet and dry. Gradually mix the dry ingredients into the wet ingredients on low speed. Mix just until the dough comes together and no dry streaks remain. Overmixing can make the cookies tough, so stop as soon as it looks uniform.
- Chill the dough. Cover the bowl with plastic wrap and refrigerate for at least 1 hour. The dough will be very soft right now. Chilling it solidifies the butter, which prevents the cookies from spreading too much in the oven. It also makes the assembly process much cleaner.
- Preheat the oven. When you are ready to bake, preheat your oven to 350°F (175°C). Line two baking sheets with parchment paper. Pour the 1/2 cup of sifted powdered sugar into a shallow bowl. This is the coating station.
- Assemble the cookies. Scoop 2 tablespoons of the chilled dough. Flatten it gently in the palm of your hand to create a disc. Place one frozen mascarpone ball in the center. Wrap the dough completely around the ball, pinching the edges tightly to seal. Roll it between your palms until it is a smooth sphere.
- Coat in sugar. Roll the stuffed dough ball generously in the powdered sugar. You want a thick, opaque layer of sugar to cover every inch. This coating is what creates the iconic crackle effect. Place the ball on the prepared baking sheet.
- Bake. Repeat for the remaining cookies, spacing them about 2 inches apart. Bake for 11 to 13 minutes. You will see the dramatic crinkles form as the dough expands. The edges should look set, but the centers will still look soft and slightly underdone. That is exactly what you want for a fudgy texture.
- Cool and finish. Let the cookies cool on the baking sheet for 5 minutes. This allows them to set up before you move them. Transfer to a wire rack to cool completely. Just before serving, finish with a light dusting of cocoa powder through a fine mesh sieve.

