

Butter Based Red Velvet Cake
Introduction
Did you know that the original red velvet cake was not bright red at all? Early versions relied on a chemical reaction between cocoa and buttermilk to create a subtle reddish-brown tint. Today, a butter based red velvet cake offers something even better: a rich, tender crumb with a buttery depth that oil-based recipes simply cannot match. This recipe uses real butter as the foundation, creating a cake that feels both nostalgic and indulgent. If you have been searching for a dependable, bakery-style dessert at home, this guide walks you through every step.
This version starts with simple pantry ingredients, but the method matters. Creaming the butter properly, using room temperature eggs, and alternating dry and wet ingredients all contribute to a soft, moist cake. Whether you are baking for a birthday, a holiday, or a quiet weekend treat, this butter based red velvet cake deserves a spot in your recipe box.
What Makes This Butter Based Red Velvet Cake Special
Most modern red velvet cakes rely on oil or a combination of oil and butter. Oil keeps cakes moist, but it can mute flavor. A butter based red velvet cake brings a richer mouthfeel and a more complex taste. Butter also helps create a slightly denser crumb that pairs beautifully with tangy cream cheese frosting.
Another advantage is control. When you start with butter, you can aerate the batter during creaming. That process creates tiny air pockets that expand in the oven. The result is a cake with a delicate structure and a soft, even crumb. The buttermilk in the recipe adds acidity, which reacts with the cocoa and softens the gluten for a tender slice.
Ingredients for a Butter Based Red Velvet Cake
This recipe yields enough batter for two 9-inch round cake layers.
Core ingredients:
- Butter: 250g (1 cup plus 2 tablespoons), softened
- Sugar: 300g (1 and a half cups)
- Eggs: 4 large eggs, at room temperature
- Flour: 300g (2 and a half cups)
- Cocoa powder: 2 tablespoons
- Buttermilk or liquid milk: 240ml (1 cup)
Optional but recommended for classic red velvet character:
- Red food coloring: 1 to 2 teaspoons gel or liquid
- Vanilla extract: 1 teaspoon
- Baking soda: 1 teaspoon
- White vinegar: 1 tablespoon
Ingredient tips:
Use room temperature butter. It should feel cool but leave a slight indent when pressed. If you only have liquid milk, add one teaspoon of lemon juice or white vinegar to the milk and let it rest for five minutes. This mimics the tang of buttermilk. For the deepest red color, gel food coloring works better than liquid because it adds less extra liquid.
Step-by-Step Instructions for a Butter Based Red Velvet Cake
Preheat your oven to 350 degrees Fahrenheit or 175 degrees Celsius. Grease two 9-inch round cake pans and line the bottoms with parchment paper.
In a medium bowl, whisk together the flour and cocoa powder until no lumps remain. Set this dry mixture aside.
In a large mixing bowl, beat the softened butter and sugar on medium speed for about 3 to 5 minutes. The mixture should become pale and fluffy. Stop and scrape down the sides of the bowl once or twice.
Add the eggs one at a time, beating well after each addition. If you are using vanilla extract, add it now. The batter may look slightly curdled, but it will come together once the flour is added.
Add the dry ingredients in three parts, alternating with the buttermilk in two parts. Start and end with the flour mixture. Mix on low speed just until the streaks disappear.
If you are using red food coloring, add it now and mix gently until the color is evenly distributed.
If you are using baking soda and vinegar, combine them in a small cup. They will fizz immediately. Fold this mixture into the batter by hand with a spatula. Do not overmix.
Divide the batter evenly between the prepared pans. Smooth the tops gently.
Bake for 30 to 35 minutes. The cakes are done when a toothpick inserted into the center comes out clean or with a few moist crumbs.
Let the layers cool in the pans for 10 minutes. Run a knife around the edges, then invert onto wire racks to cool completely before frosting.
A practical tip: rotating the pans halfway through baking helps the layers rise evenly. Also, resist opening the oven door during the first 20 minutes, as the rush of cooler air can cause the cakes to sink.
Nutritional Information for Butter Based Red Velvet Cake
This nutritional breakdown is an estimate for one slice when the cake is divided into 12 servings. Values may vary depending on the exact brands and optional add-ins used.
- Serving size: 1 slice, about 1/12 of a 9-inch layer cake
- Calories: 373 kcal
- Protein: 5.4 grams
- Carbohydrates: 45.6 grams
- Fat: 18.8 grams
- Fiber: 1 gram
Keep in mind that adding cream cheese frosting will increase calories, fat, and sugar. A typical two-tablespoon serving of frosting adds about 120 to 150 calories.
Preparation Time
This butter based red velvet cake comes together in under an hour of active work, but cooling time is essential before frosting.
- Prep time: 20 minutes
- Cook time: 30 to 35 minutes
- Total time: 50 to 55 minutes plus cooling
Compared to an oil-based red velvet cake, this version takes a similar amount of time. The main difference is the creaming step, which adds a few minutes but is worth the improved texture.
Healthier Alternatives
You can adjust this butter based red velvet cake without losing its charm.
- Replace up to half of the butter with unsweetened applesauce. This reduces saturated fat while keeping moisture.
- Use whole wheat pastry flour for up to half of the all-purpose flour. Pastry flour is finer than regular whole wheat and produces a softer crumb.
- Reduce the sugar by 50 grams. The cake will be slightly less sweet, which works well if your frosting is sweet.
- Choose low-fat buttermilk instead of full-fat liquid milk.
- For a dairy-free version, use a plant-based butter stick and unsweetened almond milk with a splash of lemon juice.
- For a gluten-free version, use a one-to-one gluten-free flour blend that contains xanthan gum.
- For a vegan version, swap the eggs with flax eggs and use vegan butter, plant milk, and gel-free red food coloring.
Serving Suggestions
A butter based red velvet cake shines with a tangy, creamy topping. Classic cream cheese frosting is the traditional choice. Beat softened cream cheese, butter, powdered sugar, and a splash of vanilla until smooth, then spread it generously between the layers and over the top.
Other serving ideas include whipped mascarpone, a light dusting of powdered sugar, or a drizzle of dark chocolate ganache. Fresh berries add a bright contrast to the rich crumb. For a crunchy finish, scatter toasted pecans or chopped pistachios around the top edge.
Drink pairings work well with the cake's buttery cocoa notes. A cold glass of milk is a classic. Black coffee or espresso balances the sweetness. For an evening gathering, try a glass of dry red wine or a small pour of bourbon. If you prefer non-alcoholic options, hibiscus tea or a vanilla latte also complement the cake.
Common Mistakes to Avoid
Avoid these common issues to get the best butter based red velvet cake.
- Using cold butter. Cold butter will not cream properly, so the cake can turn out dense.
- Adding cold eggs. Room temperature eggs blend more evenly into the batter.
- Overmixing after adding flour. Overmixing develops gluten and makes the crumb tough.
- Skipping the buttermilk. The acidity is important for tenderness and that subtle tang.
- Overbaking. Even a few extra minutes can dry out the layers. Check early and use a toothpick.
- Measuring flour incorrectly. Spoon the flour into the measuring cup and level it off instead of scooping directly.
- Frosting warm layers. The frosting will slide and melt. Let the cake cool completely first.
Storage Tips
Store a frosted butter based red velvet cake in the refrigerator for up to five days. Cover it loosely with plastic wrap or place it in an airtight cake carrier. If the cake is unfrosted, wrap the layers tightly in plastic wrap and keep them at room temperature for up to two days.
To freeze, wrap unfrosted layers individually in plastic wrap and then in aluminum foil. They will keep in the freezer for up to three months. Thaw the layers overnight in the refrigerator while still wrapped.
To reheat individual slices, microwave them for 10 to 15 seconds if they are unfrosted. If the cake has cream cheese frosting, it is best to let a refrigerated slice sit at room temperature for 15 minutes instead of reheating, since the frosting can melt and lose its texture.
Conclusion
This butter based red velvet cake is proof that a simple list of pantry staples can become something special. The rich butter flavor, tender crumb, and subtle cocoa notes make it a standout dessert for any occasion. Once you master the creaming method and handle the batter gently, you will have a reliable recipe that feels both classic and rewarding.
I hope you bake this cake soon and make it your own. If you try this recipe, leave a comment below and share your results. I would love to hear about the frosting you chose or any personal twists you added. Share a photo with friends and tag your creation so others can see your beautiful layers.
Frequently Asked Questions
Can I use liquid milk instead of buttermilk?
Yes, liquid milk works, but the cake will lose some of the classic tang and may be slightly less tender. To mimic buttermilk, add one teaspoon of lemon juice or white vinegar to one cup of milk and let it sit for five minutes before using.
Why is my butter based red velvet cake not red?
The red color comes from food coloring, not from the cocoa alone. If you want a traditional red velvet look, add one to two teaspoons of gel or liquid red food coloring. Natural alternatives like beet powder can create a more muted red hue.
Do I need baking soda and vinegar?
They are optional in this ingredient list, but they help the cake rise and create a lighter crumb. If you leave them out, the cake will be denser and more pound-cake-like. For a classic texture, use both.
How do I know when the cake is done?
Insert a toothpick into the center of a layer. If it comes out clean or with a few moist crumbs, the cake is ready. The edges should also pull away slightly from the sides of the pan.
Can I make this cake ahead of time?
Yes. Bake the layers a day ahead, wrap them tightly in plastic wrap, and store them at room temperature. You can also freeze the layers for up to three months. Frost the cake on the day you plan to serve it for the freshest presentation.
What is the best frosting for this cake?
Cream cheese frosting is the classic pairing because its tang balances the sweet, buttery crumb. Whipped mascarpone or a light vanilla buttercream also work well if you prefer a different flavor.
Can I turn this recipe into cupcakes?
Yes. Divide the batter into a lined muffin tin and bake at the same temperature for 18 to 22 minutes. Start checking at 18 minutes with a toothpick.
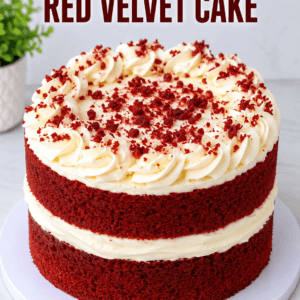
Butter Based Red Velvet Cake

Ingredients
Core ingredients
- 250 g butter softened; use room temperature butter
- 300 g sugar 1 and a half cups
- 4 large eggs at room temperature
- 300 g flour 2 and a half cups
- 2 tablespoons cocoa powder
- 240 ml buttermilk or liquid milk 1 cup; if using liquid milk, add 1 teaspoon lemon juice or white vinegar and let rest 5 minutes
Optional but recommended for classic red velvet character
- 1 to 2 teaspoons red food coloring gel or liquid; gel works better for deeper color
- 1 teaspoon vanilla extract
- 1 teaspoon baking soda
- 1 tablespoon white vinegar
Instructions
Step-by-Step Instructions
- Preheat your oven to 350 degrees Fahrenheit or 175 degrees Celsius. Grease two 9-inch round cake pans and line the bottoms with parchment paper.
- In a medium bowl, whisk together the flour and cocoa powder until no lumps remain. Set this dry mixture aside.
- In a large mixing bowl, beat the softened butter and sugar on medium speed for about 3 to 5 minutes. The mixture should become pale and fluffy. Stop and scrape down the sides of the bowl once or twice.
- Add the eggs one at a time, beating well after each addition. If you are using vanilla extract, add it now. The batter may look slightly curdled, but it will come together once the flour is added.
- Add the dry ingredients in three parts, alternating with the buttermilk in two parts. Start and end with the flour mixture. Mix on low speed just until the streaks disappear.
- If you are using red food coloring, add it now and mix gently until the color is evenly distributed.
- If you are using baking soda and vinegar, combine them in a small cup. They will fizz immediately. Fold this mixture into the batter by hand with a spatula. Do not overmix.
- Divide the batter evenly between the prepared pans. Smooth the tops gently.
- Bake for 30 to 35 minutes. The cakes are done when a toothpick inserted into the center comes out clean or with a few moist crumbs.
- Let the layers cool in the pans for 10 minutes. Run a knife around the edges, then invert onto wire racks to cool completely before frosting.

