



Mini Cheesecake Santa Hats
Introduction
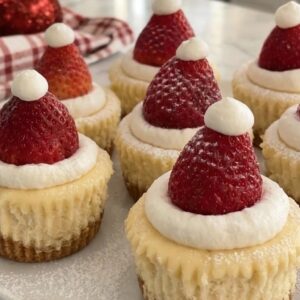
Have you ever wondered how to make a Christmas dessert that looks impressive but takes less than half the effort of a traditional holiday cake? These mini cheesecake Santa hats are exactly that. They combine a buttery graham cracker crust, a silky smooth cheesecake filling, and a fresh strawberry topping that resembles a tiny Santa hat. The result is a festive treat that disappears from the dessert table within minutes.
Whether you are hosting a holiday party, attending a cookie exchange, or simply looking for a fun baking project with kids, these mini cheesecakes deliver. They bake in a standard muffin pan, so there is no need for a springform pan or a water bath. The individual portions are naturally adorable, and the bright red strawberries paired with whipped cream make them instantly recognizable. Let’s walk through everything you need to know.
Ingredients

Here is what you will need for the crust and the cheesecake filling. This recipe makes twelve mini cheesecake Santa hats.
For the crust:
- 120 g crushed graham crackers
- 50 g melted butter
For the cheesecake filling:
- 450 g soft cream cheese
- 50 g sour cream
- 90 g sugar
- 1 tsp vanilla
- 2 eggs
For the toppings:
- 12 fresh strawberries, hulled and with the tops sliced flat
- Whipped cream, homemade or store bought
Ingredient tips and substitutions:
If you cannot find graham crackers, digestive biscuits work as a great alternative for the crust. You could also use speculoos cookies for a spiced holiday flavor. Make sure your cream cheese is at room temperature before mixing. Cold cream cheese tends to create lumps in the batter. Full fat cream cheese gives the creamiest texture, but reduced fat cream cheese works if needed. The sour cream adds tanginess and balances the sweetness. Plain Greek yogurt can replace it in equal amounts.
Step-by-Step Instructions
Follow these steps carefully for the best results. The process is simple, but a few details make a big difference.
Preheat your oven to 325 F. Line a regular muffin pan with twelve paper liners. Using liners makes it much easier to remove the cheesecakes once they have chilled.
In a small bowl, combine the crushed graham crackers and melted butter. Stir until every crumb looks moistened. The mixture should resemble wet sand.
Evenly portion the crust mixture between the twelve liners. You want about one packed tablespoon per liner. Press down firmly with the back of a spoon or the bottom of a small glass. A firm crust prevents it from crumbling when you eat them.
Bake the crust for five minutes. Remove the pan from the oven and let the crust cool while you prepare the filling. This quick bake helps the crust hold together.
In a stand mixer fitted with the paddle attachment, combine the soft cream cheese and sour cream. Mix on medium low speed until completely smooth. Scrape down the sides of the bowl with a spatula to prevent lumps.
Add the sugar and vanilla extract. Mix again until combined. Taste a tiny bit of the batter at this stage because the eggs are not in yet. Adjust the sweetness slightly if you prefer, although the final dessert is balanced by the tart strawberry.
Add the eggs one at a time. Mix just until each egg disappears into the batter. Do not over mix. Over mixing incorporates too much air and can cause the cheesecakes to puff up and then sink dramatically in the middle.
Portion the filling evenly between the twelve liners. Each cup should be about three quarters full. The cheesecakes do not rise much, so this amount works well.
Bake for sixteen to twenty minutes. The tops should look set but still have a slight jiggle in the very center when you gently shake the pan. They will continue to set as they cool.
Remove the pan from the oven and let the cheesecakes cool on the counter for about thirty minutes. Then transfer the pan to the fridge to chill for at least one hour and up to four hours. Chilling firms up the texture and makes them taste like classic cheesecake.
Once completely chilled, remove the paper liners if desired. Slice the leafy top off each strawberry so it sits flat. Place one strawberry, flat side down, on top of each cheesecake. Pipe a small ring of whipped cream around the base of the strawberry and a tiny ball on the pointed tip.
Nutritional Information
Each mini cheesecake Santa hat contains approximately 210 calories. Here is the breakdown per serving, assuming one cheesecake with one strawberry and a modest amount of whipped cream.
- Calories: 210
- Protein: 4 g
- Carbohydrates: 18 g
- Fat: 14 g
- Fiber: 1 g
These numbers vary slightly depending on the exact brands you use and how much whipped cream you add.
Preparation Time
Prep time: 20 minutes
Cook time: 22 minutes including the crust bake
Chill time: 1 to 4 hours
Total time: roughly 1 hour and 45 minutes to 4 hours and 45 minutes
Most of the total time is hands off chilling. You can easily make these in the morning and decorate them right before serving. Alternatively, bake them the night before and keep them in the fridge overnight.
Healthier Alternatives
This recipe is already fairly reasonable for a cheesecake, but you can make a few swaps to lighten it further.
For a lower fat version, use reduced fat cream cheese and light sour cream. Keep in mind the texture will be slightly less rich. You can reduce the sugar to seventy grams without affecting the structure. The natural sweetness of the strawberries helps compensate.
For a gluten free option, use certified gluten free graham crackers or crushed gluten free vanilla wafers. Most cheesecake fillings are naturally gluten free, but always check labels on vanilla extract.
For a dairy free alternative, use a plant based cream cheese substitute and a thick dairy free yogurt instead of sour cream. Coconut whipped cream works beautifully as a topping. The baking time may be slightly longer, so watch for the same visual cues of a set edge and a slight jiggle in the center.
A vegan version would require replacing the eggs with a suitable binder such as cornstarch or a commercial egg replacer. The texture will differ from traditional cheesecake but can still be delicious.
Serving Suggestions
These mini cheesecake Santa hats are perfect on their own, but you can dress them up in several creative ways.
Arrange them on a white platter dusted with powdered sugar to look like snow. Add a few fresh mint leaves around the plate for a pop of green. If you are serving a larger holiday spread, pair them with hot cocoa, peppermint tea, or a glass of cold milk. For adults, a small glass of sparkling wine or a coffee with a splash of Irish cream complements the richness nicely.
Another idea is to serve them alongside a bowl of extra strawberries and a can of whipped cream so guests can customize their own hats. Kids especially love this interactive element.
Common Mistakes
One of the most frequent issues with any cheesecake is cracking. Cracks happen when the cheesecake bakes too quickly or cools too fast. To prevent this, avoid opening the oven door during baking. Also resist the urge to turn up the heat. Low and slow is the cheesecake rule.
Over mixing the batter is another mistake. Once the eggs are added, mix gently and stop as soon as they disappear. Too much air in the batter leads to puffing and sinking.
Another common error is under chilling. Warm cheesecakes taste overly soft and do not hold the strawberry decoration well. Give them the full chill time. If you are short on time, place them in the freezer for thirty minutes after an initial thirty minutes in the fridge.
Finally, do not press the crust too lightly. A loose crust falls apart when you peel off the liner. Press firmly and evenly.
Storage Tips
Store leftover mini cheesecake Santa hats in an airtight container in the refrigerator. They stay fresh for up to four days. If you have already added the whipped cream and strawberries, consume them within two days because the strawberries release moisture over time.
For longer storage, freeze the undecorated cheesecakes. Place them on a baking sheet in the freezer until solid, then wrap each one tightly in plastic wrap and place in a freezer bag. They keep for up to two months. Thaw overnight in the fridge and decorate fresh.
Avoid reheating these cheesecakes. They are meant to be served cold. If you freeze them, thaw slowly in the refrigerator rather than at room temperature to maintain the texture.
Conclusion
Mini cheesecake Santa hats are a joyful addition to any holiday table. They combine a crisp graham cracker base, a creamy and tangy cheesecake center, and a fresh strawberry cap that brings natural sweetness. The presentation is charming, but the process is straightforward enough for beginner bakers.
I hope you give this recipe a try this season. It is one of those desserts that looks far more complicated than it actually is, which makes it perfect for sharing with friends and family. If you make these, leave a comment below and tell me how they turned out. I would love to hear about your decorations and any personal twists you added.
FAQs
Can I make these mini cheesecake Santa hats ahead of time?
Yes. Prepare the cheesecakes up to two days in advance and store them undecorated in the fridge. Add the strawberries and whipped cream on the day you plan to serve them.
Why did my cheesecakes sink in the middle?
Sinking usually comes from over mixing the eggs or opening the oven door too early. Mix gently and keep the oven closed until the minimum baking time has passed.
Can I use frozen strawberries?
Fresh strawberries work best for the Santa hat look because they hold their shape and color. Frozen strawberries become soft and watery when thawed and do not sit upright.
Do I need a water bath for this recipe?
No. Because these are small and bake in a muffin pan, they do not require a water bath. The smaller size helps them bake evenly without the extra steam.
How do I get clean edges when removing the liners?
Chill the cheesecakes thoroughly before peeling off the liners. Cold cheesecakes release from paper much more cleanly than warm or room temperature ones.
Can I use a hand mixer instead of a stand mixer?
Yes. A hand mixer works fine. Just mix on low speed and scrape the bowl often to ensure a smooth batter.
What can I use instead of whipped cream on top?
You can pipe cream cheese frosting or mascarpone cream instead. Both hold their shape well and add extra richness.
Mini Cheesecake Santa Hats

Ingredients
For the crust
- 120 g crushed graham crackers
- 50 g melted butter
For the cheesecake filling
- 450 g soft cream cheese
- 50 g sour cream
- 90 g sugar
- 1 tsp vanilla
- 2 eggs
For the toppings
- 12 fresh strawberries hulled and with the tops sliced flat
- whipped cream homemade or store bought
Instructions
- Preheat your oven to 325 F. Line a regular muffin pan with twelve paper liners. Using liners makes it much easier to remove the cheesecakes once they have chilled.
- In a small bowl, combine the crushed graham crackers and melted butter. Stir until every crumb looks moistened. The mixture should resemble wet sand.
- Evenly portion the crust mixture between the twelve liners. You want about one packed tablespoon per liner. Press down firmly with the back of a spoon or the bottom of a small glass. A firm crust prevents it from crumbling when you eat them.
- Bake the crust for five minutes. Remove the pan from the oven and let the crust cool while you prepare the filling. This quick bake helps the crust hold together.
- In a stand mixer fitted with the paddle attachment, combine the soft cream cheese and sour cream. Mix on medium low speed until completely smooth. Scrape down the sides of the bowl with a spatula to prevent lumps.
- Add the sugar and vanilla extract. Mix again until combined. Taste a tiny bit of the batter at this stage because the eggs are not in yet. Adjust the sweetness slightly if you prefer, although the final dessert is balanced by the tart strawberry.
- Add the eggs one at a time. Mix just until each egg disappears into the batter. Do not over mix. Over mixing incorporates too much air and can cause the cheesecakes to puff up and then sink dramatically in the middle.
- Portion the filling evenly between the twelve liners. Each cup should be about three quarters full. The cheesecakes do not rise much, so this amount works well.
- Bake for sixteen to twenty minutes. The tops should look set but still have a slight jiggle in the very center when you gently shake the pan. They will continue to set as they cool.
- Remove the pan from the oven and let the cheesecakes cool on the counter for about thirty minutes. Then transfer the pan to the fridge to chill for at least one hour and up to four hours. Chilling firms up the texture and makes them taste like classic cheesecake.
- Once completely chilled, remove the paper liners if desired. Slice the leafy top off each strawberry so it sits flat. Place one strawberry, flat side down, on top of each cheesecake. Pipe a small ring of whipped cream around the base of the strawberry and a tiny ball on the pointed tip.

