



Soft Christmas Peppermints
Introduction
Have you ever wondered why store-bought peppermints break with a hard snap while homemade ones often melt in your mouth? The secret lies in a simple ingredient swap. Most commercial candies are cooked to a high temperature, but that step is completely unnecessary for a truly memorable treat. These Soft Christmas Peppermints are the perfect no-bake solution for busy holidays. They require no candy thermometer, no stove, and very little effort. The result is a creamy, tender mint that dissolves slowly, leaving a refreshing coolness on the tongue. If you are looking for a homemade candy that feels nostalgic yet surprisingly easy to execute, this recipe belongs in your kitchen this season.
Ingredients

- 3 ¾ cups powdered sugar, plus extra for dusting
- ⅓ cup sweetened condensed milk
- ½ teaspoon peppermint extract
- Red gel food coloring
- Green gel food coloring
- Granulated sugar, for coating
Before you begin, make sure your powdered sugar is fresh. If it has been sitting in the pantry for a while, it may have absorbed moisture and become lumpy. Sifting it first ensures a smooth dough. For the mint flavor, always use peppermint extract rather than mint extract. Mint extract is a blend of spearmint and peppermint, which will give these candies a taste closer to toothpaste than candy canes. If you do not have sweetened condensed milk, do not substitute evaporated milk. The sugars in condensed milk are essential for the texture and shelf stability of the dough. Regarding the coloring, gel food coloring is strongly preferred. Liquid drops can make the dough too wet and sticky, requiring you to add more powdered sugar, which can dull the flavor.
Step-by-Step Instructions
Prepare the Base Mixture: In a large mixing bowl, combine the powdered sugar, sweetened condensed milk, and peppermint extract. Stir with a sturdy wooden spoon until a crumbly, soft dough begins to form. It might look dry at first, but keep mixing.
Knead Until Smooth: Lightly dust your work surface with powdered sugar. Turn the mixture out and knead it with your hands. The warmth of your hands will melt the sugar and milk together. Knead until the dough is perfectly smooth and pliable, similar to fondant. If the dough feels too sticky, work in a little more powdered sugar. If it is dry and cracking, add half a teaspoon of condensed milk at a time.
Divide and Color: Divide the peppermint dough evenly into three portions. Leave one portion white. Tint one portion with a few drops of red gel food coloring and the last portion with green gel. Knead each ball until the color is evenly distributed with no streaks. If the colors look too light, add a tiny bit more gel.
Shape the Mints: Roll each colored portion into a long rope about ½ inch thick. Try to keep the ropes uniform in size so the candies finish at the same time. Cut the ropes into small, bite-sized pieces, about ¾ inch each. For a different look, you can roll the pieces into small balls. You can also press them gently with the tines of a fork to create the classic ridged peppermint shape.
Coat and Dry: Pour some granulated sugar into a small bowl. Roll each piece lightly in the sugar to prevent them from sticking together. Arrange the Soft Christmas Peppermints on a parchment-lined tray in a single layer. Ensure they are not touching each other. Let them dry at room temperature for 24 hours, uncovered. They should form a slight crust on the outside but remain soft and creamy inside.
Store and Enjoy: Once cured, they are ready to eat. Package them for gifts or pile them onto a dessert tray.
Nutritional Information
This recipe yields approximately 60 small candies, depending on how large you cut them. The serving size is about 4 pieces.
- Calories: 110 kcal
- Protein: 0.5 g
- Carbohydrates: 27 g
- Fat: 0.5 g
- Fiber: 0 g
- Sugar: 25 g
These numbers are estimates and will vary based on the exact size of your mints and the final amount of coating sugar used.
Preparation Time
- Prep time: 30 minutes
- Cook time: 0 minutes
- Drying time: 24 hours
- Total time: 24 hours 30 minutes
The hands-on work here is quite short. Most of the total time is simply waiting for the candies to set. This makes it an excellent recipe to start in the evening so the mints are ready to gift the next morning. Compared to traditional hard tack candy, which requires boiling sugar and careful temperature monitoring, this method eliminates the risk of burns and crystallization. It is a much more relaxed holiday activity, perfect for doing with children.
Healthier Alternatives
While these are a candy, there are a few ways to adjust the recipe to suit different dietary needs. For a vegan version, you can replace the sweetened condensed milk with a coconut-based sweetened condensed milk. The fat content differs slightly, so you might need to add a little extra powdered sugar to firm it up. The recipe is naturally gluten-free, but you should always check the labels on your powdered sugar and food coloring to ensure no starches or anti-caking agents contain gluten. If you want to reduce the sweetness slightly, you can use a sugar-free powdered sweetener, but the texture will be less creamy and more prone to drying out. Using natural food coloring derived from beets or spinach is another great swap for those avoiding artificial dyes, though the colors will be more muted and earthy.
Serving Suggestions
These Soft Christmas Peppermints are versatile. Place a few in a small dish next to a cup of hot cocoa or a peppermint mocha. The creamy texture pairs beautifully with hot coffee and espresso. They are also a lovely addition to a holiday cookie box, providing a pop of color among the browns of gingerbread and chocolate chip cookies. For a party, arrange them on a tiered tray with other no-bake treats like chocolate truffles and coconut snowballs. You can even crush them slightly and sprinkle them over vanilla ice cream or a chocolate tart for a festive garnish. During gift-giving season, fill small mason jars with these mints, tie a ribbon around the lid, and add a handwritten label. It is a simple, homemade gift that feels thoughtful and personal.
Common Mistakes
One frequent mistake is using too much liquid food coloring. This introduces excess moisture, making the dough a sticky mess. If this happens, do not panic. Simply knead in additional powdered sugar, a quarter cup at a time, until the dough firms up again. Another issue is drying the candies in a humid environment. If your kitchen is very steamy, the mints will not form a crust and will remain tacky. To solve this, place them in a cool, dry room or near a dehumidifier. Many people also make the mistake of skipping the granulated sugar coating. Without it, the mints will stick together in the container, becoming one solid lump. Finally, be careful not to over-knead the colored dough. Overworking it can make the texture gummy and dense rather than soft and melt-in-your-mouth tender.
Storage Tips
Store the finished Soft Christmas Peppermints in an airtight container at room temperature. They will stay fresh for up to two weeks. Place a piece of parchment paper between layers if you are stacking them. Do not refrigerate these candies. The cold air introduces moisture, which can make the sugar coating dissolve and turn the mints sticky. If you want to make them further in advance, you can freeze them. Arrange the dried mints in a single layer on a baking sheet and freeze until solid. Transfer them to a freezer-safe zip-top bag. They will keep for up to three months. To serve, remove the bag from the freezer and let it come to room temperature before opening. This prevents condensation from forming directly on the candies.
Conclusion
Making your own candy does not have to be a stressful, sugar-burning ordeal. This recipe for Soft Christmas Peppermints proves that a few simple ingredients and a little patience can yield something truly special. They look beautiful on a holiday table, taste better than anything from a wrapper, and make your house smell like a candy shop while you prepare them. Whether you are making them for a cookie exchange, a family gathering, or just a quiet night by the fire, they are sure to become a new tradition.
I would love to hear how your mints turned out. Did you stick with the classic red and green, or did you try different colors? Leave a comment below and share your experience. If you shared a photo on social media, tag me so I can see your beautiful creations.
FAQs
Can I use regular food coloring instead of gel?
Yes, you can, but use it sparingly. Liquid food coloring is water-based and can make the dough sticky. If you use it, add only one or two drops and be prepared to add a little extra powdered sugar to restore the right consistency.
Why is my dough too sticky to handle?
This usually comes from humidity or too much extract or coloring. Dust your hands with powdered sugar first. If it is still sticky, gradually knead in more powdered sugar until the dough stops sticking to the work surface.
My mints are still sticky after 24 hours. What went wrong?
The environment is likely too humid. Move the tray to a cooler, drier room. You can also place a small fan nearby on a low setting to increase air circulation, which helps the exterior form a crust.
Can I make these dairy-free?
Yes. Substitute the sweetened condensed milk with a full-fat canned coconut milk version specifically designed for baking. The flavor will have a slight coconut undertone, but the mint and sugar cover most of it.
How do I get a twisted candy cane look?
Instead of rolling three separate ropes, twist a small piece of white dough together with a small piece of red or green dough. Roll the combined piece gently into a ball or a hook shape. This creates a marbled effect without using three colors.
Can I freeze these mints?
Absolutely. Once they are fully dried, freeze them in an airtight container for up to three months. Thaw them at room temperature without opening the container to prevent condensation from making them soggy.
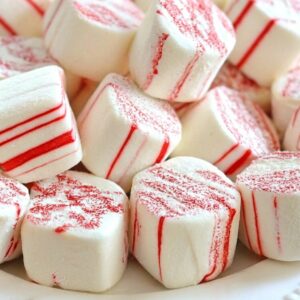
Soft Christmas Peppermints

Ingredients
- 3 ¾ cups powdered sugar plus extra for dusting
- ⅓ cup sweetened condensed milk
- ½ teaspoon peppermint extract
- Red gel food coloring
- Green gel food coloring
- Granulated sugar for coating
Instructions
- In a large mixing bowl, combine the powdered sugar, sweetened condensed milk, and peppermint extract. Stir with a sturdy wooden spoon until a crumbly, soft dough begins to form. It might look dry at first, but keep mixing.
- Lightly dust your work surface with powdered sugar. Turn the mixture out and knead it with your hands. The warmth of your hands will melt the sugar and milk together. Knead until the dough is perfectly smooth and pliable, similar to fondant. If the dough feels too sticky, work in a little more powdered sugar. If it is dry and cracking, add half a teaspoon of condensed milk at a time.
- Divide the peppermint dough evenly into three portions. Leave one portion white. Tint one portion with a few drops of red gel food coloring and the last portion with green gel. Knead each ball until the color is evenly distributed with no streaks. If the colors look too light, add a tiny bit more gel.
- Roll each colored portion into a long rope about ½ inch thick. Try to keep the ropes uniform in size so the candies finish at the same time. Cut the ropes into small, bite-sized pieces, about ¾ inch each. For a different look, you can roll the pieces into small balls. You can also press them gently with the tines of a fork to create the classic ridged peppermint shape.
- Pour some granulated sugar into a small bowl. Roll each piece lightly in the sugar to prevent them from sticking together. Arrange the Soft Christmas Peppermints on a parchment-lined tray in a single layer. Ensure they are not touching each other. Let them dry at room temperature for 24 hours, uncovered. They should form a slight crust on the outside but remain soft and creamy inside.
- Once cured, they are ready to eat. Package them for gifts or pile them onto a dessert tray.

