

High-Protein Chocolate Peanut Butter Swirl Cheesecake Cups
Introduction
Have you ever craved a dessert that feels completely indulgent but still aligns with your fitness goals? It sounds like a fantasy, yet it is entirely possible. Most traditional cheesecake recipes pack sugar and saturated fat into every bite, leaving you tired and guilty afterward. But what if the creamy texture and rich flavor you love could come from ingredients that actually support your body? That is where these High-Protein Chocolate Peanut Butter Swirl Cheesecake Cups come in. They are not just a lighter alternative; they are a genuinely delicious way to satisfy your sweet tooth while stacking up the protein.
This recipe transforms humble Greek yogurt and cottage cheese into a mousse-like filling that rivals the real thing. By combining a crunchy cookie base with peanut butter and chocolate layers, you create a sophisticated dessert that looks gorgeous in a glass. Whether you are meal prepping for the week or serving guests, these cups are a showstopper. You get the artisanal look of a swirled cheesecake without ever turning on the oven. It is the perfect no-bake solution for hot days and busy schedules. Let’s dive into how you can create these high-protein treats.
Ingredients
The ingredient list for this recipe is divided into four distinct components: the base, the fillings, the topping, and the drizzle. You can find most of these items at your standard grocery store. The key is to look for quality protein sources and zero-calorie sweeteners that blend well.

For the Cookie Crumb Base
- 3/4 cup crushed graham crackers or vanilla wafer cookies (75 g)
- 2 tablespoons unsalted butter, melted (28 g)
- 1 tablespoon powdered zero-calorie sweetener, optional
- 1/2 teaspoon ground cinnamon, optional
- 1 to 2 teaspoons unsweetened almond milk, only if needed
For the Peanut Butter Cheesecake Filling
- 1 1/2 cups plain nonfat Greek yogurt (360 g)
- 3/4 cup low-fat cottage cheese (170 g)
- 1/3 cup creamy natural peanut butter (85 g)
- 1/4 cup reduced-fat cream cheese, softened (60 g)
- 2 to 3 tablespoons powdered zero-calorie sweetener, or to taste
- 2 tablespoons sugar-free cheesecake or vanilla instant pudding mix
- 1 teaspoon pure vanilla extract
- 1 tablespoon powdered peanut butter, optional
- 1 to 2 tablespoons unsweetened almond milk or regular milk, only if needed
- 1/8 teaspoon fine sea salt
- 1/4 cup light whipped topping, optional (60 g)
For the Chocolate Cheesecake Swirl
- 3/4 cup plain nonfat Greek yogurt (180 g)
- 1/4 cup reduced-fat cream cheese, softened (60 g)
- 2 tablespoons unsweetened cocoa powder
- 2 tablespoons powdered zero-calorie sweetener
- 1 tablespoon sugar-free chocolate instant pudding mix
- 1/2 teaspoon pure vanilla extract
- 1 tablespoon creamy peanut butter, optional
- 1 to 2 tablespoons unsweetened almond milk, only if needed
- 1/4 cup light whipped topping, optional (60 g)
For the Marbled Mousse Topping and Chocolate Drizzle
- 1/2 cup plain Greek yogurt (120 g)
- 1/4 cup reduced-fat cream cheese, softened (60 g)
- 2 tablespoons powdered zero-calorie sweetener
- 1/2 teaspoon vanilla extract
- 1/4 cup light whipped topping (60 g)
- 1 tablespoon unsweetened cocoa powder
- 1 teaspoon creamy peanut butter, optional
- 1/4 cup dark chocolate chips or sugar-free chocolate chips (45 g)
- 2 tablespoons warm milk or light cream (30 ml)
- 1/2 teaspoon coconut oil, optional, for extra shine
Ingredient Tips
- Cottage cheese texture matters. If you are sensitive to texture, blend the cottage cheese thoroughly before adding other ingredients. A high-speed blender or food processor works best.
- Greek yogurt is your protein powerhouse. Stick with plain, unsweetened varieties to control the sweetness and avoid added sugars.
- Instant pudding mix is essential for thickening. Do not skip it, as it helps stabilize the filling and creates that distinct cheesecake mouthfeel.
- Natural peanut butter can be runny or stiff. Stir it well before measuring. If it is too hard, microwave it for a few seconds to loosen it up.
Step-by-Step Instructions
Creating these cups is straightforward, but you need to pay attention to textures. The goal is a thick, creamy filling that holds layers beautifully. Follow these steps closely for the best results.
Prepare the base. In a medium bowl, mix the crushed graham crackers or vanilla wafer cookies with the melted butter. Add the optional powdered sweetener and cinnamon. Stir until the mixture looks like damp sand. If the crumbs do not hold together when pressed, add unsweetened almond milk one teaspoon at a time. Divide the crumb mixture evenly among eight clear dessert cups. Press lightly into the bottom to create an even base. Do not pack too firmly, or the base will become hard. Refrigerate the cups while you make the filling.
Blend the peanut butter filling. Add the Greek yogurt and cottage cheese to a blender. Blend until completely smooth with no visible lumps. This step is crucial for a creamy texture. Add the peanut butter, softened cream cheese, powdered sweetener, instant pudding mix, vanilla extract, optional powdered peanut butter, and sea salt. Blend again until creamy and evenly combined.
Adjust the consistency. If the peanut butter filling feels too stiff to spoon easily, slowly add almond milk or regular milk. You want a thick but pipeable consistency. Gently fold in the light whipped topping if you are using it. Be careful not to overmix, as this can deflate the whipped topping.
Make the chocolate swirl. In a separate bowl, combine the Greek yogurt, softened cream cheese, cocoa powder, powdered sweetener, chocolate pudding mix, vanilla extract, and optional peanut butter. Use an electric mixer or blend until smooth. Add almond milk gradually if the mixture is too thick. Gently fold in the optional whipped topping. Keep this mixture thick enough to form visible ribbons when swirled.
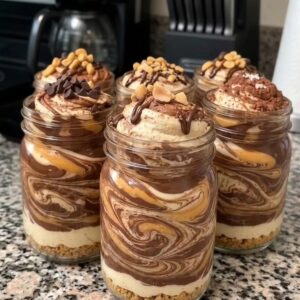
Layer the cups. Remove the cups from the refrigerator. Spoon or pipe the peanut butter cheesecake filling into the eight prepared cups. Follow with portions of the chocolate cheesecake mixture. Alternate the fillings to create layers and ribbons. Use a skewer or a thin knife to make a few gentle strokes through the mixtures. This creates the marbled effect. Avoid overmixing so the colors remain distinct.
Prepare the mousse topping. Blend the Greek yogurt, softened cream cheese, powdered sweetener, and vanilla extract until smooth. Gently fold in the light whipped topping. Add the cocoa powder and optional peanut butter, mixing gently to create a light, creamy marbled mousse. You want a swirled look on top, not a fully blended brown color.
Top the cups. Divide the mousse topping among the eight cups. Spoon it gently over the cheesecake layers or pipe it on using a piping bag fitted with a large tip. Spread evenly or leave small peaks for a rustic look. Refrigerate the cups while you make the chocolate drizzle.
Make the chocolate drizzle. Combine the chocolate chips with the warm milk or light cream in a small bowl. Stir until the chocolate is fully melted and smooth. Add the optional coconut oil for extra shine. Allow the drizzle to cool slightly. It should be fluid but not hot, otherwise it will melt the mousse underneath.
Decorate and chill. Drizzle thin lines of chocolate over the mousse topping. Use a small spoon or a fork for a delicate pattern. Add your choice of optional toppings, such as chopped peanuts, mini chocolate chips, chocolate shavings, crushed cookies, miniature peanut butter cups, or flaky sea salt. Cover the cups and refrigerate for at least 2 hours. Overnight chilling yields the firmest, most cheesecake-like layers. Serve cold.
Nutritional Information
These High-Protein Chocolate Peanut Butter Swirl Cheesecake Cups are designed to be a smarter choice. Exact numbers will vary based on the specific brands of sweetener, yogurt, and chocolate you use. However, here is an approximate breakdown per serving.
- Serving size: 1 cup (1/8 of recipe)
- Calories: 250 to 290
- Protein: 15 to 18 grams
- Carbohydrates: 20 to 25 grams
- Fat: 12 to 15 grams
- Fiber: 1 to 2 grams
The protein content comes primarily from the Greek yogurt, cottage cheese, and peanut butter. Using sugar-free chocolate chips and powdered zero-calorie sweetener keeps the carbohydrate count lower than a traditional dessert. The fat content includes healthy fats from peanut butter, though the whipped topping and cream cheese also contribute. This is a well-balanced treat, especially compared to a standard cheesecake slice, which often delivers less than half this protein and triple the sugar.
Preparation Time
One of the best things about this recipe is the lack of baking. You are mostly mixing, layering, and chilling. Here is the breakdown.
- Prep time: 30 minutes
- Cook time: 0 minutes
- Chill time: 2 hours minimum
- Total time: 2 hours 30 minutes
For context, a traditional baked cheesecake can take upwards of an hour to prepare and another hour to bake. You would also need to cool it gradually to prevent cracking. These no-bake cups eliminate all that hassle. You can prepare them in half an hour and let the refrigerator do the rest of the work. That makes them ideal for meal prep or last-minute entertaining.
Healthier Alternatives
Flexibility is a major advantage of this recipe. You can easily swap ingredients to fit different dietary needs or simply to use what you have on hand.
- Gluten-free option. Use gluten-free graham crackers or crushed almond flour cookies for the base. Most of the other ingredients are naturally gluten-free, but always check labels on pudding mix and sweeteners.
- Dairy-free and vegan option. Replace the Greek yogurt with a thick plant-based yogurt, such as coconut or almond yogurt. Swap the cottage cheese for a dairy-free cream cheese alternative. Use vegan whipped topping. For the chocolate drizzle, ensure your chocolate chips are dairy-free. Note that the protein content will decrease significantly with these swaps.
- Lower fat option. Use fat-free cream cheese instead of reduced-fat. You can also omit the whipped topping entirely, though the texture will be slightly denser. Choose powdered peanut butter mixed with water to replace some of the natural peanut butter, cutting fat while keeping the flavor.
- Lower carb option. Use only sugar-free chocolate chips and a sugar-free syrup if you add one. Ensure your vanilla extract is pure and not imitation, as some imitation versions contain sugar. Use a fiber-rich base, such as crushed nuts mixed with a small amount of butter, to further reduce carbs.
Serving Suggestions
These cups are beautiful on their own, but you can elevate them further with thoughtful presentation and pairing. They work well as a post-dinner dessert or even as a high-protein afternoon snack.
Serve them chilled directly from the refrigerator for the best texture. If you want to create a dessert board, place the cups on a platter surrounded by fresh raspberries and sliced strawberries. The tartness of the berries cuts through the richness of the cheesecake. For drinks, a cold brew coffee or a shot of espresso makes a wonderful pairing. The bitterness of the coffee highlights the chocolate notes. If you prefer tea, a cup of rooibos or chai tea adds warmth without overpowering the peanut butter. For a more indulgent moment, serve with a small glass of almond milk or a chocolate protein shake on the side.
Common Mistakes to Avoid
Even with a simple no-bake recipe, mistakes can happen. Knowing what to avoid helps you get the perfect texture and look every time.
- Over-blending the cottage cheese. You want it smooth, but if you over-process it with the yogurt, the mixture can become too thin. Blend just until the lumps disappear.
- Skipping the chill time. The filling needs time to set. If you serve these immediately, they will be soft and runny. The pudding mix needs cold time to activate and firm up.
- Overmixing the swirl. If you stir too much, the chocolate and peanut butter fillings will blend into a muddy brown color. Use a light hand with the skewer. A few strokes are all you need.
- Packing the base too tightly. If you press the crumbs down too hard, the base becomes rock solid when chilled. A light, even press is all that is required.
- Adding too much liquid. If you add too much almond milk to the fillings, they will not hold their layers. Add liquid one teaspoon at a time and stop as soon as the mixture is easy to spoon.
Storage Tips
Proper storage ensures your High-Protein Chocolate Peanut Butter Swirl Cheesecake Cups stay fresh and delicious.
- Refrigeration. Store in an airtight container or cover each cup tightly with plastic wrap. They will keep well in the refrigerator for up to 3 days. The base will soften slightly over time, but the flavor remains excellent.
- Freezing. You can freeze these cups for up to 1 month. Cover them tightly with plastic wrap and then foil. Thaw overnight in the refrigerator before serving. The texture of the yogurt-based filling may change slightly, becoming a bit icier, but it is still enjoyable. Do not refreeze after thawing.
- Reheating. These cups are meant to be eaten cold. Do not microwave them, as the whipped topping and yogurt will break down into a liquid mess. Simply take them out of the fridge and enjoy.
Conclusion
Creating a dessert that is both nutritious and indulgent is not just about swapping ingredients. It is about understanding how to build flavor and texture from unexpected sources. These High-Protein Chocolate Peanut Butter Swirl Cheesecake Cups prove that you do not need a brick of full-fat cream cheese or a cup of sugar to make something memorable. The Greek yogurt provides a tangy, creamy base, while the peanut butter adds richness and healthy fats. The chocolate swirl delivers that deep, satisfying flavor you crave.
This recipe is perfect for anyone who wants to enjoy a sweet treat without derailing their health goals. It is easy enough for a beginner and impressive enough for a dinner party. The visual appeal of the clear cups, the marbled filling, and the glossy drizzle makes it feel like a fancy bakery purchase. Once you try these, you will likely find yourself making them for every occasion. I would love to hear how yours turn out. Leave a comment below and share your experience, any substitutions you made, or your favorite toppings. Happy no-bake cooking.
Frequently Asked Questions
Can I use regular yogurt instead of Greek yogurt?
Yes, but the texture will be much thinner and the protein content will be lower. If you use regular yogurt, you should strain it through a cheesecloth for a few hours to remove excess liquid. Greek yogurt is recommended for the best results.
Can I make these without a blender?
If you do not have a blender, you can use an electric hand mixer. However, the cottage cheese will remain lumpy. You can push the cottage cheese through a fine mesh sieve before mixing it with the other ingredients. A food processor is another good alternative.
How do I make these sweeter without adding sugar?
You can increase the amount of powdered zero-calorie sweetener to taste. Alternatively, add a few drops of liquid stevia or monk fruit extract. Be careful not to overdo it, as some sweeteners can leave a bitter aftertaste. Start with a small amount and adjust.
Why is my filling runny?
A runny filling is usually caused by adding too much liquid or using low-quality yogurt with high water content. Make sure you are using thick, plain Greek yogurt. Also, the instant pudding mix is essential for thickening. If your mixture is runny, add a little more pudding mix and let it sit in the fridge for 15 minutes to firm up.
Can I use a different nut butter?
Absolutely. Almond butter, cashew butter, or even sunflower seed butter would work beautifully. Sunflower seed butter is a great nut-free option. Keep in mind that different nut butters have different consistencies, so you may need to adjust the amount of liquid.
Are these cups okay for kids?
Yes, they are a fantastic option for kids because they are lower in sugar than traditional desserts. They still taste like a treat. You can even get kids involved in layering the cups and making the swirls. It is a fun, mess-friendly activity.
How far in advance can I make these?
You can make them up to 24 hours in advance, which is actually the best time to let the layers set. If you plan to add crunchy toppings like crushed cookies or peanuts, add those just before serving so they stay crisp.
High-Protein Chocolate Peanut Butter Swirl Cheesecake Cups

Ingredients
For the Cookie Crumb Base
- 3/4 cup crushed graham crackers or vanilla wafer cookies (75 g)
- 2 tablespoons unsalted butter, melted (28 g)
- 1 tablespoon powdered zero-calorie sweetener optional
- 1/2 teaspoon ground cinnamon optional
- 1 to 2 teaspoons unsweetened almond milk only if needed
For the Peanut Butter Cheesecake Filling
- 1 1/2 cups plain nonfat Greek yogurt (360 g)
- 3/4 cup low-fat cottage cheese (170 g)
- 1/3 cup creamy natural peanut butter (85 g)
- 1/4 cup reduced-fat cream cheese, softened (60 g)
- 2 to 3 tablespoons powdered zero-calorie sweetener or to taste
- 2 tablespoons sugar-free cheesecake or vanilla instant pudding mix
- 1 teaspoon pure vanilla extract
- 1 tablespoon powdered peanut butter optional
- 1 to 2 tablespoons unsweetened almond milk or regular milk only if needed
- 1/8 teaspoon fine sea salt
- 1/4 cup light whipped topping optional (60 g)
For the Chocolate Cheesecake Swirl
- 3/4 cup plain nonfat Greek yogurt (180 g)
- 1/4 cup reduced-fat cream cheese, softened (60 g)
- 2 tablespoons unsweetened cocoa powder
- 2 tablespoons powdered zero-calorie sweetener
- 1 tablespoon sugar-free chocolate instant pudding mix
- 1/2 teaspoon pure vanilla extract
- 1 tablespoon creamy peanut butter optional
- 1 to 2 tablespoons unsweetened almond milk only if needed
- 1/4 cup light whipped topping optional (60 g)
For the Marbled Mousse Topping and Chocolate Drizzle
- 1/2 cup plain Greek yogurt (120 g)
- 1/4 cup reduced-fat cream cheese, softened (60 g)
- 2 tablespoons powdered zero-calorie sweetener
- 1/2 teaspoon vanilla extract
- 1/4 cup light whipped topping (60 g)
- 1 tablespoon unsweetened cocoa powder
- 1 teaspoon creamy peanut butter optional
- 1/4 cup dark chocolate chips or sugar-free chocolate chips (45 g)
- 2 tablespoons warm milk or light cream (30 ml)
- 1/2 teaspoon coconut oil optional, for extra shine
Instructions
- Prepare the base. In a medium bowl, mix the crushed graham crackers or vanilla wafer cookies with the melted butter. Add the optional powdered sweetener and cinnamon. Stir until the mixture looks like damp sand. If the crumbs do not hold together when pressed, add unsweetened almond milk one teaspoon at a time. Divide the crumb mixture evenly among eight clear dessert cups. Press lightly into the bottom to create an even base. Do not pack too firmly, or the base will become hard. Refrigerate the cups while you make the filling.
- Blend the peanut butter filling. Add the Greek yogurt and cottage cheese to a blender. Blend until completely smooth with no visible lumps. This step is crucial for a creamy texture. Add the peanut butter, softened cream cheese, powdered sweetener, instant pudding mix, vanilla extract, optional powdered peanut butter, and sea salt. Blend again until creamy and evenly combined.
- Adjust the consistency. If the peanut butter filling feels too stiff to spoon easily, slowly add almond milk or regular milk. You want a thick but pipeable consistency. Gently fold in the light whipped topping if you are using it. Be careful not to overmix, as this can deflate the whipped topping.
- Make the chocolate swirl. In a separate bowl, combine the Greek yogurt, softened cream cheese, cocoa powder, powdered sweetener, chocolate pudding mix, vanilla extract, and optional peanut butter. Use an electric mixer or blend until smooth. Add almond milk gradually if the mixture is too thick. Gently fold in the optional whipped topping. Keep this mixture thick enough to form visible ribbons when swirled.
- Layer the cups. Remove the cups from the refrigerator. Spoon or pipe the peanut butter cheesecake filling into the eight prepared cups. Follow with portions of the chocolate cheesecake mixture. Alternate the fillings to create layers and ribbons. Use a skewer or a thin knife to make a few gentle strokes through the mixtures. This creates the marbled effect. Avoid overmixing so the colors remain distinct.
- Prepare the mousse topping. Blend the Greek yogurt, softened cream cheese, powdered sweetener, and vanilla extract until smooth. Gently fold in the light whipped topping. Add the cocoa powder and optional peanut butter, mixing gently to create a light, creamy marbled mousse. You want a swirled look on top, not a fully blended brown color.
- Top the cups. Divide the mousse topping among the eight cups. Spoon it gently over the cheesecake layers or pipe it on using a piping bag fitted with a large tip. Spread evenly or leave small peaks for a rustic look. Refrigerate the cups while you make the chocolate drizzle.
- Make the chocolate drizzle. Combine the chocolate chips with the warm milk or light cream in a small bowl. Stir until the chocolate is fully melted and smooth. Add the optional coconut oil for extra shine. Allow the drizzle to cool slightly. It should be fluid but not hot, otherwise it will melt the mousse underneath.
- Decorate and chill. Drizzle thin lines of chocolate over the mousse topping. Use a small spoon or a fork for a delicate pattern. Add your choice of optional toppings, such as chopped peanuts, mini chocolate chips, chocolate shavings, crushed cookies, miniature peanut butter cups, or flaky sea salt. Cover the cups and refrigerate for at least 2 hours. Overnight chilling yields the firmest, most cheesecake-like layers. Serve cold.

