



Christmas Gnome Chocolate Cheesecakes
Introduction
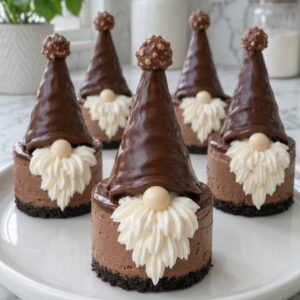
What if your holiday dessert table could feature tiny, edible winter creatures that make both kids and adults smile before the first bite? Christmas Gnome Chocolate Cheesecakes do exactly that. Each jumbo chocolate cheesecake sits on an Oreo cookie crust, wears a chocolate drip, gets a fluffy mascarpone beard, and carries a chocolate-covered cone hat topped with a white pom-pom. These individual desserts combine rich chocolate flavor with whimsical decoration in a way that feels special without requiring expert piping skills. You can assemble them close to serving time, dust them lightly with powdered sugar, and watch them disappear faster than any store-bought cake. This recipe walks you through every layer and gives you plenty of practical tips along the way.
Ingredients
For the Oreo Cookie Crust
- 18 Oreo cookies, finely crushed
- 4 tablespoons unsalted butter, melted
- Crush whole Oreo cookies including the cream filling. The filling helps bind the crumbs and adds a richer cookie flavor.
For the Chocolate Cheesecake Filling
- 12 oz full-fat block cream cheese, softened
- 1/2 cup granulated sugar
- 1/4 cup sour cream, room temperature
- 4 oz semi-sweet chocolate, melted and cooled slightly
- 1 tablespoon unsweetened cocoa powder
- 1 teaspoon vanilla extract
- 2 large eggs, room temperature
- Pinch of salt
- Use full-fat block cream cheese instead of spreadable cream cheese. The firmer texture supports the chocolate drip and gnome decorations.
- Let the melted chocolate cool until it feels warm rather than hot. Hot chocolate can melt the cream cheese and make the filling too loose.
For the Chocolate Drip
- 3 oz semi-sweet chocolate, chopped
- 1/4 cup heavy whipping cream
- Finely chopped chocolate melts more evenly. Let the ganache cool and thicken before spooning it over the cheesecakes.
For the Gnome Decorations
- 6 flat-bottom ice-cream cones or sugar cones
- 8 oz milk or dark chocolate, melted
- 1 tablespoon vegetable oil
- 6 round white chocolate truffles or large malted-milk balls for pom-poms
- 6 round caramel chocolates or vanilla truffles for noses
- 1 cup cold heavy whipping cream
- 4 oz mascarpone cheese, cold
- 1/3 cup powdered sugar
- 1/2 teaspoon vanilla extract
- Powdered sugar, for snow
- Choose cone hats with pointed tips and an opening wide enough to sit securely on each jumbo cheesecake.
Equipment You’ll Need
- 6-cup jumbo muffin pan
- Six jumbo paper liners
- Electric mixer
- Large mixing bowl
- Cold bowl for the mascarpone beard
- Silicone spatula
- Microwave-safe bowl or double boiler
- Small saucepan
- Parchment paper
- Piping bag
- Large open-star piping tip
- Small spoon
- Wire cooling rack
Christmas Gnome Chocolate Cheesecake Variations
- Red Christmas Gnome Hats: Coat the cones in melted red candy wafers instead of chocolate. Confirm the coating is suitable for dipping and let it set completely before assembly.
- White Chocolate Gnome Hats: Use white chocolate for snowy cream-colored hats. Add a little grated white chocolate after dipping for a textured finish.
- Peppermint Chocolate Cheesecakes: Add 1/8 teaspoon peppermint extract to the cheesecake filling. Sprinkle crushed candy canes around the beard shortly before serving.
- Chocolate Hazelnut Gnomes: Replace 2 tablespoons of the melted chocolate in the filling with chocolate hazelnut spread. Decorate the serving plate with toasted hazelnuts.
- Biscoff Gnome Cheesecakes: Replace the Oreo crust with finely crushed Biscoff cookies. Leave out cocoa and melted chocolate for a vanilla-spice version.
- Mini Strawberry Gnomes: Use large strawberries as small red hats instead of cones. This produces shorter gnomes but offers a fresh fruit option.

Step-by-Step Instructions
Step 1: Prepare the Ingredients
Take the cream cheese, sour cream, and eggs out of the refrigerator 30 to 60 minutes before mixing. Room-temperature ingredients blend smoothly. Keep the heavy cream and mascarpone for the beard cold. Melt the 4 ounces of semi-sweet chocolate for the filling and let it cool slightly.
Step 2: Prepare the Oven and Pan
Heat the oven to 325°F or 165°C. Line a 6-cup jumbo muffin pan with jumbo paper liners. Make sure the liners sit flat. A jumbo pan gives each cheesecake enough width and height to support the gnome decoration.
Step 3: Make the Oreo Crust
Process the Oreo cookies into fine crumbs, or crush them in a sealed bag with a rolling pin. Avoid leaving large pieces because they can cause the crust to break. Combine the crumbs with melted butter until evenly moistened. Divide among the six liners and press firmly with the bottom of a small glass.
Step 4: Bake and Cool the Crusts
Bake the Oreo crusts for 5 minutes. Remove the pan and place it on a heat-safe surface. Let the crusts cool while preparing the filling. Keep the oven at 325°F or 165°C.
Step 5: Beat the Cream Cheese and Sugar
Place softened cream cheese and granulated sugar in a large mixing bowl. Beat on low speed until completely smooth. Stop and scrape the sides and bottom. Low-speed mixing keeps excess air out of the filling. Too much air makes the cheesecakes rise quickly and sink as they cool.
Step 6: Add the Chocolate and Remaining Ingredients
Add room-temperature sour cream, melted chocolate, cocoa powder, vanilla extract, and salt. Mix on low speed until evenly combined. Scrape the bowl again. If the cocoa powder has lumps, sift it before adding. The filling should look smooth, dark, and creamy.
Step 7: Add the Eggs Carefully
Add the first egg and mix on low speed only until it disappears. Add the second egg and mix just until combined. Finish mixing gently with a silicone spatula, scraping the bottom of the bowl. Do not overbeat after the eggs are incorporated.
Step 8: Fill the Cheesecake Cups
Divide the chocolate filling evenly among the six crusts. Smooth the tops with the back of a spoon. Tap the muffin pan lightly on the counter once or twice to remove large air pockets. Do not tap hard.
Step 9: Bake the Mini Chocolate Cheesecakes
Bake for 20 to 24 minutes. The edges should look set while the centers still have a small jiggle when the pan moves gently. The centers should not look liquid. Do not insert a knife or toothpick because piercing can cause cracks.
Step 10: Cool the Cheesecakes Slowly
Turn off the oven and crack the door open. Leave the cheesecakes inside for 15 minutes. Remove the pan and let them cool at room temperature. Once the pan is no longer warm, cover it and refrigerate for at least 4 hours. Overnight chilling gives the firmest texture and makes peeling the liners easier.
How to Make the Chocolate Drip
Step 11: Heat the Cream
Place chopped semi-sweet chocolate in a heatproof bowl. Heat the heavy cream in a small saucepan until steaming but not boiling. Pour the hot cream over the chocolate and leave it untouched for 1 minute.
Step 12: Stir and Cool the Ganache
Stir slowly from the center until the mixture becomes smooth and glossy. Let the ganache cool until thick but still spoonable. Test a small drip on the side of a cold bowl. It should move slowly and stop before reaching the bottom. If too warm, it will run down the entire cheesecake. If too thick, warm for a few seconds and stir again.
Step 13: Add the Chocolate Drips
Remove the cold cheesecakes from the pan and peel away the paper liners. Place them on a parchment-lined tray or individual plates. Spoon a little ganache around the outer edge. Push small amounts over the edge to create thick drips. Spread more ganache over the center if needed. Refrigerate for 10 minutes so the drip firms up.
How to Make the Chocolate Gnome Hats
Step 14: Prepare the Chocolate Coating
Melt 8 ounces of milk or dark chocolate. Stir in 1 tablespoon of vegetable oil. The oil thins the chocolate for easier spreading. Let it cool for a few minutes but keep it fluid.
Step 15: Coat the Cones
Hold one cone above the bowl. Spoon chocolate over the entire cone or dip it carefully into a deep container. Rotate until fully covered and let excess drip back. Place the coated cone upright or on its side on parchment paper. Repeat with remaining cones.
Step 16: Add the Hat Pom-Poms
While the chocolate coating is still soft, place one white chocolate truffle or malted-milk ball on the pointed tip of each cone. If it does not stay, chill the cone first and attach with a dot of melted chocolate. Refrigerate all six hats until completely firm. Do not place soft hats on the cheesecakes.
How to Make the Mascarpone Beard
Step 17: Chill the Mixing Equipment
Place the mixing bowl and beaters in the refrigerator for about 10 minutes. Keep mascarpone and heavy cream cold until ready to use.
Step 18: Whip the Beard Frosting
Combine cold mascarpone, cold heavy whipping cream, powdered sugar, and vanilla in the chilled bowl. Mix on low speed to prevent splashing, then increase to medium speed. Whip until stiff peaks form. Stop as soon as the mixture holds firm ridges. Overmixing can make the frosting separate or become grainy. Transfer to a piping bag fitted with a large open-star tip.
How to Decorate Christmas Gnome Chocolate Cheesecakes
Step 19: Pipe the Gnome Beards
Pipe at the outer edge of one cheesecake. Use short, thick star-tip strokes toward the center. Layer the strokes to create a full, ruffled beard. Leave a small open space near the upper middle for the nose. The beard should be thick enough to support the lower edge of the cone hat. Repeat with remaining cheesecakes.
Step 20: Add the Candy Noses
Place one round caramel chocolate or vanilla truffle in the open center of each beard. Press gently into the mascarpone frosting. Keep the nose fully visible between the bottom of the hat and the upper part of the beard.
Step 21: Add the Cone Hats
Place one chilled chocolate cone directly above each nose. Press the bottom edge gently into the piped beard so the hat stays upright. Do not press hard enough to flatten the beard or crack the cheesecake. If unstable, pipe extra mascarpone behind the hat’s lower edge.
Step 22: Add the Powdered Sugar Snow
Shortly before serving, place powdered sugar inside a fine sieve. Dust the hats, beards, cheesecakes, and serving plate lightly. Add the powdered sugar only at the end because moisture from the refrigerator gradually dissolves it.
Nutritional Information
Serving size: 1 Christmas gnome chocolate cheesecake with hat and beard. Calories: approximately 620. Protein: 8 grams. Carbohydrates: 52 grams. Fat: 43 grams. Fiber: 2 grams. Values vary depending on the exact chocolate, cone type, and truffle choices.
Preparation Time
Prep time: 45 minutes. Cook time: 25 minutes. Chilling time: at least 4 hours, overnight preferred. Total time: about 5 hours 10 minutes including chilling. Compared to a full-size baked cheesecake, these individual versions cut baking time nearly in half while keeping the same rich texture.
Healthier Alternatives
Replace full-fat cream cheese with Neufchatel cheese at room temperature. Use reduced-fat sour cream and light butter for the crust. Swap semi-sweet chocolate for dark chocolate with 70 percent cocoa to lower sugar slightly. For a gluten-free option, use gluten-free chocolate sandwich cookies in the crust. For a dairy-free version, choose dairy-free cream cheese, coconut cream for the ganache, and dairy-free chocolate. The gnome hats can remain standard sugar cones or be replaced with small baked meringue hats for a lighter option. A vegan mascarpone alternative or whipped coconut cream works for the beard, though it may soften faster, so assemble right before serving.
Serving Suggestions
Serve these Christmas gnome chocolate cheesecakes on individual dessert plates with a small dusting of powdered sugar snow. Add a few fresh raspberries or pomegranate seeds around the plate for a pop of red. Pair with a cup of hot cocoa, a glass of cold milk, or a warm spiced cider. For an adult twist, offer a small pour of peppermint schnapps or coffee liqueur alongside. Place the finished gnomes on a rustic wooden board with sprigs of rosemary to mimic tiny pine trees. If you want individual presentation for a party, wrap a thin ribbon around each paper liner before peeling? Instead, peel first and set each cheesecake on a small parchment square.
Common Mistakes
Using warm chocolate in the cheesecake filling causes the cream cheese to soften too much and creates a loose batter. Always let melted chocolate cool until it feels warm, not hot. Overbeating the batter after adding eggs traps air and leads to cracks or sunken centers. Mix on low speed and stop as soon as eggs disappear. Baking too long dries the edges and removes the slight jiggle that signals perfect texture. Do not insert a toothpick. Adding the ganache drip while it is too hot makes the chocolate run straight down and pool at the base. Wait until it thickens and test on a cold bowl. Whipping the mascarpone beard past stiff peaks makes it grainy and separated. Stop immediately when ridges hold firmly. Coating the cones with chocolate that is too hot can cause thin spots and dripping. Let the chocolate cool slightly for even coverage. Pressing the cone hat too hard flattens the beard and can crack the cheesecake. Position gently and add extra frosting behind if needed.
Storage Tips
Store decorated Christmas gnome chocolate cheesecakes in the refrigerator for up to 2 days. Keep them loosely covered with plastic wrap or inside a large airtight container so the cone hats do not absorb too much moisture. For best crunch, add the cone hats and powdered sugar just before serving. Undecorated cheesecakes can be refrigerated for up to 5 days. Freeze undecorated cheesecakes by wrapping each one tightly in plastic wrap and placing them in a freezer bag for up to 1 month. Thaw overnight in the refrigerator before adding ganache, beard, hats, and noses. The mascarpone beard and chocolate-coated cones do not freeze well, so avoid freezing assembled gnomes. Reheat leftover cheesecake without the hat and beard in a microwave at 50 percent power for 15-second intervals, or serve cold straight from the fridge.
Conclusion
Christmas Gnome Chocolate Cheesecakes bring together everything a holiday dessert should be. They taste rich and chocolatey, they look handcrafted and whimsical, and they deliver an individual portion that feels generous without being fussy. The Oreo crust gives a sturdy base, the baked cheesecake stays creamy, the ganache drip adds gloss, and the mascarpone beard with a chocolate cone hat transforms each serving into a tiny character. Whether you make the classic chocolate version, try peppermint, or switch to Biscoff, this recipe invites creativity. Have you tried making these little holiday treats? Leave a comment below and share your favorite variation or decoration tip.
FAQs
Can I make Christmas gnome chocolate cheesecakes ahead of time?
Yes. Bake and chill the cheesecakes up to two days in advance. Store them plain in the refrigerator. Make the ganache, beard frosting, and chocolate cone hats on the day you plan to serve. Assemble everything shortly before presenting so the cones stay crisp and the powdered sugar remains visible.
Do I have to use a jumbo muffin pan?
A jumbo pan works best because each cheesecake needs enough width and height to support the cone hat securely. A standard muffin pan will create smaller bases that may tip under the weight of the hats. If you only have a standard pan, use mini sugar cones and reduce baking time by about 5 minutes.
Can I use white chocolate for the ganache drip?
Yes. Replace the semi-sweet chocolate with equal amounts of good-quality white chocolate. White chocolate ganache can be thinner, so let it cool longer before testing a drip. Keep the cheesecakes very cold so the white drip sets quickly.
Why does my mascarpone beard turn watery?
Watery frosting usually means the heavy cream or mascarpone was not cold enough, or the mixture was overwhipped. Chill the bowl and beaters, use ingredients straight from the fridge, and stop as soon as stiff peaks form. If it softens while piping, return the bag to the refrigerator for 10 minutes.
Can I skip the chocolate drip?
You can skip it, but the drip adds flavor and gives the beard a clean edge to hold onto. Without it, the piped mascarpone may slide slightly on the smooth cheesecake top. If you want a simpler version, pipe a thin ring of ganache or melted chocolate around the outer rim and let it set.
How do I keep the cone hats from softening in the fridge?
Fully set the chocolate coating on the cones before assembling. Place the hats on the cheesecakes right before serving and avoid storing fully decorated gnomes in the refrigerator for more than a couple of hours. Moisture from the fridge slowly softens cones even when coated.
Are these suitable for children to help decorate?
Absolutely. Children enjoy placing the candy noses and dusting powdered sugar snow. Adults should handle melting chocolate and piping hot ganache. Set up a decorating station with chilled cheesecakes, piping bag, cones, and truffles, and let kids build their own gnome faces.
Christmas Gnome Chocolate Cheesecakes

Ingredients
For the Oreo Cookie Crust
- 18 Oreo cookies, finely crushed Crush whole Oreo cookies including the cream filling. The filling helps bind the crumbs and adds a richer cookie flavor.
- 4 tablespoons unsalted butter, melted
For the Chocolate Cheesecake Filling
- 12 oz full-fat block cream cheese, softened Use full-fat block cream cheese instead of spreadable cream cheese. The firmer texture supports the chocolate drip and gnome decorations.
- 1/2 cup granulated sugar
- 1/4 cup sour cream, room temperature
- 4 oz semi-sweet chocolate, melted and cooled slightly Let the melted chocolate cool until it feels warm rather than hot. Hot chocolate can melt the cream cheese and make the filling too loose.
- 1 tablespoon unsweetened cocoa powder
- 1 teaspoon vanilla extract
- 2 large eggs, room temperature
- 1 pinch salt
For the Chocolate Drip
- 3 oz semi-sweet chocolate, chopped Finely chopped chocolate melts more evenly. Let the ganache cool and thicken before spooning it over the cheesecakes.
- 1/4 cup heavy whipping cream
For the Gnome Decorations
- 6 flat-bottom ice-cream cones or sugar cones Choose cone hats with pointed tips and an opening wide enough to sit securely on each jumbo cheesecake.
- 8 oz milk or dark chocolate, melted
- 1 tablespoon vegetable oil
- 6 round white chocolate truffles or large malted-milk balls for pom-poms
- 6 round caramel chocolates or vanilla truffles for noses
- 1 cup cold heavy whipping cream
- 4 oz mascarpone cheese, cold
- 1/3 cup powdered sugar
- 1/2 teaspoon vanilla extract
- Powdered sugar for snow
Instructions
Step-by-Step Instructions
- Take the cream cheese, sour cream, and eggs out of the refrigerator 30 to 60 minutes before mixing. Room-temperature ingredients blend smoothly. Keep the heavy cream and mascarpone for the beard cold. Melt the 4 ounces of semi-sweet chocolate for the filling and let it cool slightly.
- Heat the oven to 325°F or 165°C. Line a 6-cup jumbo muffin pan with jumbo paper liners. Make sure the liners sit flat. A jumbo pan gives each cheesecake enough width and height to support the gnome decoration.
- Process the Oreo cookies into fine crumbs, or crush them in a sealed bag with a rolling pin. Avoid leaving large pieces because they can cause the crust to break. Combine the crumbs with melted butter until evenly moistened. Divide among the six liners and press firmly with the bottom of a small glass.
- Bake the Oreo crusts for 5 minutes. Remove the pan and place it on a heat-safe surface. Let the crusts cool while preparing the filling. Keep the oven at 325°F or 165°C.
- Place softened cream cheese and granulated sugar in a large mixing bowl. Beat on low speed until completely smooth. Stop and scrape the sides and bottom. Low-speed mixing keeps excess air out of the filling. Too much air makes the cheesecakes rise quickly and sink as they cool.
- Add room-temperature sour cream, melted chocolate, cocoa powder, vanilla extract, and salt. Mix on low speed until evenly combined. Scrape the bowl again. If the cocoa powder has lumps, sift it before adding. The filling should look smooth, dark, and creamy.
- Add the first egg and mix on low speed only until it disappears. Add the second egg and mix just until combined. Finish mixing gently with a silicone spatula, scraping the bottom of the bowl. Do not overbeat after the eggs are incorporated.
- Divide the chocolate filling evenly among the six crusts. Smooth the tops with the back of a spoon. Tap the muffin pan lightly on the counter once or twice to remove large air pockets. Do not tap hard.
- Bake for 20 to 24 minutes. The edges should look set while the centers still have a small jiggle when the pan moves gently. The centers should not look liquid. Do not insert a knife or toothpick because piercing can cause cracks.
- Turn off the oven and crack the door open. Leave the cheesecakes inside for 15 minutes. Remove the pan and let them cool at room temperature. Once the pan is no longer warm, cover it and refrigerate for at least 4 hours. Overnight chilling gives the firmest texture and makes peeling the liners easier.
How to Make the Chocolate Drip
- Place chopped semi-sweet chocolate in a heatproof bowl. Heat the heavy cream in a small saucepan until steaming but not boiling. Pour the hot cream over the chocolate and leave it untouched for 1 minute.
- Stir slowly from the center until the mixture becomes smooth and glossy. Let the ganache cool until thick but still spoonable. Test a small drip on the side of a cold bowl. It should move slowly and stop before reaching the bottom. If too warm, it will run down the entire cheesecake. If too thick, warm for a few seconds and stir again.
- Remove the cold cheesecakes from the pan and peel away the paper liners. Place them on a parchment-lined tray or individual plates. Spoon a little ganache around the outer edge. Push small amounts over the edge to create thick drips. Spread more ganache over the center if needed. Refrigerate for 10 minutes so the drip firms up.
How to Make the Chocolate Gnome Hats
- Melt 8 ounces of milk or dark chocolate. Stir in 1 tablespoon of vegetable oil. The oil thins the chocolate for easier spreading. Let it cool for a few minutes but keep it fluid.
- Hold one cone above the bowl. Spoon chocolate over the entire cone or dip it carefully into a deep container. Rotate until fully covered and let excess drip back. Place the coated cone upright or on its side on parchment paper. Repeat with remaining cones.
- While the chocolate coating is still soft, place one white chocolate truffle or malted-milk ball on the pointed tip of each cone. If it does not stay, chill the cone first and attach with a dot of melted chocolate. Refrigerate all six hats until completely firm. Do not place soft hats on the cheesecakes.
How to Make the Mascarpone Beard
- Place the mixing bowl and beaters in the refrigerator for about 10 minutes. Keep mascarpone and heavy cream cold until ready to use.
- Combine cold mascarpone, cold heavy whipping cream, powdered sugar, and vanilla in the chilled bowl. Mix on low speed to prevent splashing, then increase to medium speed. Whip until stiff peaks form. Stop as soon as the mixture holds firm ridges. Overmixing can make the frosting separate or become grainy. Transfer to a piping bag fitted with a large open-star tip.
How to Decorate Christmas Gnome Chocolate Cheesecakes
- Pipe at the outer edge of one cheesecake. Use short, thick star-tip strokes toward the center. Layer the strokes to create a full, ruffled beard. Leave a small open space near the upper middle for the nose. The beard should be thick enough to support the lower edge of the cone hat. Repeat with remaining cheesecakes.
- Place one round caramel chocolate or vanilla truffle in the open center of each beard. Press gently into the mascarpone frosting. Keep the nose fully visible between the bottom of the hat and the upper part of the beard.
- Place one chilled chocolate cone directly above each nose. Press the bottom edge gently into the piped beard so the hat stays upright. Do not press hard enough to flatten the beard or crack the cheesecake. If unstable, pipe extra mascarpone behind the hat’s lower edge.
- Shortly before serving, place powdered sugar inside a fine sieve. Dust the hats, beards, cheesecakes, and serving plate lightly. Add the powdered sugar only at the end because moisture from the refrigerator gradually dissolves it.

