

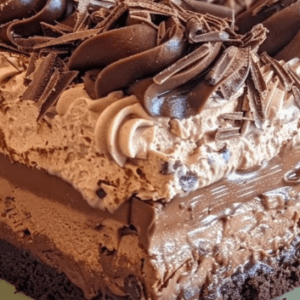
This brownie refrigerator cake is the kind of dessert that silences a room. It starts with a fudgy brownie base, then layers in pillowy chocolate whipped cream and a glossy chocolate ganache poured right over the top — all finished in the fridge so every layer sets into something absolutely luxurious.
The best part: because this is a refrigerator cake, it genuinely gets better overnight. Make it the day before a party and it will be at its peak when you slice it.
What Is a Refrigerator Cake?
A refrigerator cake is any layered dessert that sets and firms up in the fridge rather than in the oven. The chilling time allows the layers to meld together, the cream to firm, and the flavors to deepen. This brownie refrigerator cake uses a baked brownie base, but the assembly and setting are entirely no-bake — making it far easier than a traditional layer cake.
Why You’ll Love This Brownie Refrigerator Cake
- Deep chocolate flavor in every single layer — brownie, cream, and ganache
- Make-ahead — actually tastes better the next day after chilling overnight
- No frosting skills needed — pour the ganache and spread the cream
- Feeds a crowd — 12 generous slices from one 9×13-inch dish
- Impressive presentation with minimal effort
Ingredients
For the Brownie Base
- 1 box brownie mix (plus eggs, oil, and water listed on the box)
- ½ tsp espresso powder (optional — intensifies the chocolate flavor)
For the Chocolate Whipped Cream Layer
- 2 cups heavy whipping cream, cold
- ½ cup powdered sugar
- ¼ cup unsweetened cocoa powder
- 1 tsp vanilla extract
For the Chocolate Ganache Topping
- 1 cup semisweet chocolate chips
- ½ cup heavy whipping cream
For Garnish (Optional)
- Chocolate shavings or a dusting of cocoa powder
- Whipped cream swirls
- Fresh raspberries or strawberries
- Crushed toasted nuts
Tip: Cold heavy cream is essential for the whipped cream layer — it won’t whip properly if it’s warm. Keep it in the fridge right up until you use it.
How to Make Brownie Refrigerator Cake — Step by Step
Step 1: Bake the Brownie Base
Preheat your oven to 350°F (175°C). Prepare the brownie mix according to the package instructions, stirring in the espresso powder if using — it doesn’t make the brownies taste like coffee, it simply deepens the chocolate. Bake in a greased 9×13-inch pan. Let them cool completely before moving to the next step. This is important: warm brownies will melt the whipped cream layer.
Once fully cooled, use a long serrated knife to carefully slice the brownie slab horizontally into two even layers. A slow, sawing motion works better than pressing down.
Step 2: Make the Chocolate Whipped Cream
In a large, chilled mixing bowl, combine the cold heavy whipping cream, powdered sugar, cocoa powder, and vanilla extract. Beat with an electric mixer on medium-high speed until stiff peaks form — about 3–4 minutes. Do not overbeat or it will turn grainy.
Step 3: Assemble the Brownie Refrigerator Cake
Line your 9×13-inch dish with parchment paper (this makes slicing and lifting much cleaner). Place the first brownie layer at the bottom. Spread half of the chocolate whipped cream evenly over it. Place the second brownie layer on top, pressing gently. Spread the remaining whipped cream over the top layer.
Step 4: Make the Ganache Topping
Pour the chocolate chips into a heatproof bowl. Heat the heavy cream in a small saucepan over medium heat until it just begins to steam — do not let it boil. Pour the hot cream over the chocolate chips and leave undisturbed for 2 minutes. Then stir slowly from the center outward until completely smooth and glossy. Let it cool for 5 minutes so it thickens slightly before pouring.
Pour the ganache over the whipped cream layer and spread it gently with an offset spatula.
Step 5: Chill and Serve
Cover the dish tightly with plastic wrap and refrigerate for at least 4 hours — overnight is ideal. Before serving, garnish with chocolate shavings, a dusting of cocoa powder, whipped cream swirls, or fresh berries. Use a sharp knife, wiping it clean between cuts, for neat slices.
Pro Tips for the Best Brownie Refrigerator Cake
- Cool the brownies completely. Any warmth will deflate the whipped cream — even 10 minutes of patience makes a big difference.
- Chill your bowl and beaters in the freezer for 10 minutes before whipping the cream — it whips faster and holds peaks better.
- Use room-temperature ganache. If you pour it too hot, it will melt the whipped cream beneath. Let it cool to a pourable but not runny consistency.
- Make it the night before. The layers fuse together beautifully after 8+ hours of chilling.
- Wipe the knife between slices for clean, layered cuts that show off all those beautiful layers.
Variations and Substitutions
| Variation | How to Do It |
|---|---|
| Extra fudgy | Use a dark chocolate or triple chocolate brownie mix |
| Lighter version | Replace half the whipping cream with Greek yogurt in the cream layer |
| Peanut butter twist | Swirl 3 tbsp peanut butter into the ganache before pouring |
| Mint chocolate | Add ½ tsp peppermint extract to the whipped cream layer |
| Raspberry layer | Spread a thin layer of raspberry jam over the first brownie layer before adding the cream |
| Nut crunch | Press crushed toasted pecans or hazelnuts into the whipped cream layer |
| Dairy-free | Use coconut cream instead of heavy cream and dairy-free chocolate chips |
How to Store Brownie Refrigerator Cake
Store the brownie refrigerator cake covered in the refrigerator for up to 4 days. The texture actually improves between day 1 and day 2 as the layers settle and the flavors meld.
Can you freeze it? You can freeze individual slices (without the ganache topping) for up to 1 month, wrapped tightly in cling film. Add fresh ganache after thawing. Freezing the assembled cake with ganache is not recommended — the cream layer becomes watery when thawed.
Frequently Asked Questions
Can I make this brownie refrigerator cake ahead of time? Absolutely — and it’s the best way to serve it. Make it the evening before your event, refrigerate overnight, and it will be perfectly set, deeply flavored, and easy to slice the next day.
Do I have to use a box brownie mix? Not at all. A homemade brownie recipe works just as well. Just make sure the brownies are on the fudgier, denser side rather than cakey — they hold up better as a base layer.
Why do I add espresso powder to the brownies? Espresso powder is a baker’s secret: it intensifies the chocolate flavor without making the dessert taste like coffee. You won’t taste the espresso — you’ll just notice a deeper, richer chocolate.
My ganache is too thick to pour — what do I do? Warm it briefly in the microwave in 10-second bursts, stirring between each, until it reaches a pourable consistency. Or add a teaspoon of warm cream and stir until smooth.
Can I use a different dish size? A 9×13-inch pan works best for this brownie refrigerator cake. A smaller dish will give you thicker layers — reduce portions proportionally. An 8×8-inch pan will give you a much taller, trickier-to-slice result.
How do I get clean slices? Use a sharp chef’s knife, run it under hot water and wipe it dry before each cut. The warmth glides through the ganache cleanly.
Nutrition Estimate (per serving, based on 12 servings)
| Per Serving | |
|---|---|
| Calories | ~450 kcal |
| Carbohydrates | 52g |
| Fat | 26g |
| Protein | 5g |
| Sugar | ~35g |
| Sodium | ~220mg |
Nutrition is an estimate and will vary based on the brownie mix brand and exact ingredients used.
More No-Bake Desserts You’ll Love
- No-Bake Chocolate Trifle
- No-Bake Chocolate Chip Cookie Peanut Butter Pie
- Crunchy Chocolate Bone Dessert
- Chocolate Peanut Butter Cold Dessert
- Decadent Triple Chocolate Mousse Cake
Made this brownie refrigerator cake? Leave a comment below — we love seeing your photos!
Brownie Refrigerator Cake Recipe – Fudgy, Creamy & No-Bake
Ingredients
- For the Brownie Base
- 1 box brownie mix plus eggs, oil, and water listed on the box
- ½ tsp espresso powder optional — intensifies the chocolate flavor
- For the Chocolate Whipped Cream Layer
- 2 cups heavy whipping cream cold
- ½ cup powdered sugar
- ¼ cup unsweetened cocoa powder
- 1 tsp vanilla extract
- For the Chocolate Ganache Topping
- 1 cup semisweet chocolate chips
- ½ cup heavy whipping cream
- For Garnish Optional
- Chocolate shavings or a dusting of cocoa powder
- Whipped cream swirls
- Fresh raspberries or strawberries
- Crushed toasted nuts
Instructions
- Step 1: Bake the Brownie Base
- Preheat your oven to 350°F (175°C). Prepare the brownie mix according to the package instructions, stirring in the espresso powder if using — it doesn’t make the brownies taste like coffee, it simply deepens the chocolate. Bake in a greased 9×13-inch pan. Let them cool completely before moving to the next step. This is important: warm brownies will melt the whipped cream layer.
- Once fully cooled, use a long serrated knife to carefully slice the brownie slab horizontally into two even layers. A slow, sawing motion works better than pressing down.
- Step 2: Make the Chocolate Whipped Cream
- In a large, chilled mixing bowl, combine the cold heavy whipping cream, powdered sugar, cocoa powder, and vanilla extract. Beat with an electric mixer on medium-high speed until stiff peaks form — about 3–4 minutes. Do not overbeat or it will turn grainy.
- Step 3: Assemble the Brownie Refrigerator Cake
- Line your 9×13-inch dish with parchment paper (this makes slicing and lifting much cleaner). Place the first brownie layer at the bottom. Spread half of the chocolate whipped cream evenly over it. Place the second brownie layer on top, pressing gently. Spread the remaining whipped cream over the top layer.
- Step 4: Make the Ganache Topping
- Pour the chocolate chips into a heatproof bowl. Heat the heavy cream in a small saucepan over medium heat until it just begins to steam — do not let it boil. Pour the hot cream over the chocolate chips and leave undisturbed for 2 minutes. Then stir slowly from the center outward until completely smooth and glossy. Let it cool for 5 minutes so it thickens slightly before pouring.
- Pour the ganache over the whipped cream layer and spread it gently with an offset spatula.
- Step 5: Chill and Serve
- Cover the dish tightly with plastic wrap and refrigerate for at least 4 hours — overnight is ideal. Before serving, garnish with chocolate shavings, a dusting of cocoa powder, whipped cream swirls, or fresh berries. Use a sharp knife, wiping it clean between cuts, for neat slices.

