

Chocolate Caramel Brownie Cheesecake Bars
Introduction
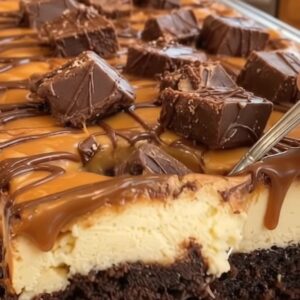
What happens when fudgy brownie, silky cheesecake, sticky caramel, and glossy chocolate ganache meet in a single square? You get Chocolate Caramel Brownie Cheesecake Bars, a decadent layered dessert that turns an ordinary sweet craving into a full experience. These bars bring together the dense chew of a brownie base, the tangy creaminess of a classic cheesecake layer, and a showstopping caramel-chocolate topping with extra brownie chunks. If you love rich, multi-textured desserts, this recipe will quickly become a favorite.
The beauty of this recipe lies in its simplicity. You start with a brownie mix, so the base comes together fast. The cheesecake layer is a straightforward blend of cream cheese, sugar, eggs, and sour cream. The toppings require only a quick ganache and a drizzle of caramel. The result looks bakery-worthy but is completely achievable in a home kitchen. Whether you need a potluck showpiece, a holiday dessert, or a weekend baking project, these layered brownie cheesecake bars deliver big flavor with very little fuss.
Ingredients
Brownie Base
- 1 box brownie mix
- Additional ingredients listed on the brownie mix package, such as eggs, oil, and water
Cheesecake Layer
- 24 oz cream cheese, softened
- 3/4 cup granulated sugar
- 3 large eggs
- 1/2 cup sour cream
- 2 tsp vanilla extract
- 2 tbsp all-purpose flour
Caramel and Chocolate Topping
- 1 cup caramel sauce
- 3/4 cup chocolate chips
- 1/3 cup heavy cream
- Brownie chunks for topping
Equipment
- Baking pan
- Mixing bowls
- Electric mixer
- Measuring cups
- Measuring spoons
- Spatula
- Whisk
- Knife
- Cutting board
You can use a 9×13 inch baking pan for this recipe. If you prefer a thicker bar, use a 9×9 inch pan and increase the baking time slightly. For the brownie base, any standard family-size brownie mix works well. The cheesecake layer benefits from full-fat cream cheese and sour cream for the creamiest texture. If you want a stronger chocolate note in the topping, use semisweet or dark chocolate chips instead of milk chocolate. The brownie chunks for topping can come from a small baked brownie or a few extra spoonfuls of the prepared brownie batter baked separately.
Step-by-Step Instructions for Chocolate Caramel Brownie Cheesecake Bars
Prepare the brownie batter according to the instructions on the brownie mix box, adding all the additional ingredients listed on the package. Mix until evenly combined and ready to bake. Do not overmix the brownie batter, or the base can become tough.
Spread the prepared brownie batter evenly into your baking pan. Bake at 325°F (163°C) for 15–18 minutes to partially bake the brownie base. Do not bake it completely at this stage. You want the top to look set but the center to remain slightly soft so it can finish baking with the cheesecake layer.
In a mixing bowl, combine the cream cheese, granulated sugar, eggs, sour cream, vanilla extract, and flour. Beat until the mixture is smooth and evenly combined. Make sure the cream cheese is fully softened before mixing to avoid lumps in the cheesecake layer.
Pour the prepared cheesecake mixture over the partially baked brownie base. Spread it evenly from edge to edge to create a consistent cheesecake layer. Use a spatula to gently push the mixture into the corners.
Return the pan to the oven and bake for 35–45 minutes, until the cheesecake layer is set enough to hold its shape when cooled. The center may still have a slight jiggle, but it should not be wet. If the edges begin to brown too quickly, loosely cover the pan with foil.
Remove the dessert from the oven and allow it to cool completely before refrigerating. Let the brownie and cheesecake layers settle before adding the toppings. Cooling at room temperature helps prevent condensation from forming on the surface.
Refrigerate the cooled cheesecake dessert for 4 hours, allowing the cheesecake layer to firm up and making the bars easier to slice. For the cleanest cuts, refrigerate overnight if you have the time.
Place the chocolate chips in a heatproof mixing bowl. Warm the heavy cream and combine it with the chocolate chips. Stir until the chocolate melts completely and a smooth, creamy ganache forms. Let the ganache cool for a few minutes before spreading, so it thickens slightly and does not melt the cheesecake layer.
Pour or drizzle the caramel sauce evenly over the chilled cheesecake layer, distributing it across the surface. If your caramel sauce is too thick to pour, warm it gently for a few seconds until it reaches a spreadable consistency.
Spread the prepared chocolate ganache over the caramel layer. Finish by scattering brownie chunks across the top for an extra chocolatey finish. Press the brownie chunks lightly into the ganache so they stay in place when you slice the bars.
Slice the chilled dessert into individual bars using a sharp knife. Serve cold, making sure each portion includes some brownie base, cheesecake filling, caramel, and chocolate topping.
Nutritional Information
This recipe makes approximately 16 bars. Each serving is one bar.
- Calories: Approximately 460 kcal
- Protein: 6 g
- Carbohydrates: 54 g
- Fat: 24 g
- Fiber: 1 g
Nutritional values are estimates and will vary depending on the specific brownie mix, caramel sauce, and chocolate chips you use. If you cut the bars into 20 smaller squares, each serving will have fewer calories and less sugar.
Preparation Time
- Prep time: 25 minutes
- Cook time: 50 to 60 minutes
- Chilling time: 4 hours
- Total time: 5 hours 25 minutes
This recipe is a great make-ahead dessert because most of the total time is hands-off chilling. Compared to a traditional cheesecake, these caramel chocolate cheesecake bars require less water bath fuss and deliver the same creamy satisfaction in a portable bar form.
Healthier Alternatives
You can lighten these Chocolate Caramel Brownie Cheesecake Bars with a few simple swaps. Use a sugar-free brownie mix and sugar-free caramel sauce to reduce the overall sugar content. Replace full-fat cream cheese with reduced-fat cream cheese, and swap sour cream for plain Greek yogurt. The texture will be slightly less rich but still creamy.
For a gluten-free version, choose a certified gluten-free brownie mix and replace the all-purpose flour in the cheesecake layer with a gluten-free all-purpose blend. To make the bars dairy-free, use dairy-free cream cheese, dairy-free sour cream, coconut cream instead of heavy cream, and dairy-free chocolate chips. The brownie mix should also be dairy-free. A vegan version can work with flax eggs, plant-based butter, and vegan caramel sauce, though the cheesecake layer may be softer.
Serving Suggestions for Chocolate Caramel Brownie Cheesecake Bars
These bars are rich, so a little goes a long way. Serve them chilled straight from the refrigerator for the cleanest slices and firmest texture. If you prefer a softer cheesecake layer, let the bars sit at room temperature for 10 minutes before serving.
Pair each bar with a scoop of vanilla bean ice cream or a dollop of lightly sweetened whipped cream. A sprinkle of flaky sea salt over the chocolate ganache brings out the caramel flavor beautifully. For drinks, pair the bars with strong black coffee, a cold glass of milk, or an espresso shot. A dessert wine like a ruby port or a dark stout also complements the deep chocolate and caramel notes.
Common Mistakes When Making Chocolate Caramel Brownie Cheesecake Bars
One common mistake is fully baking the brownie base before adding the cheesecake layer. This causes the brownie to become dry and overbaked during the second bake. Partially bake the base just until the surface looks set.
Another issue is mixing the cheesecake filling too vigorously after adding the eggs. High-speed mixing incorporates too much air, which can cause the cheesecake layer to puff and crack. Mix on low speed once the eggs go in, and stop as soon as the mixture is smooth.
Not chilling the bars long enough is another frequent error. If you try to slice them too soon, the layers will slide and the bars will lose their shape. Give the dessert at least 4 hours in the refrigerator, preferably overnight.
Finally, cutting with a dull knife or without wiping the blade between cuts creates messy edges. Use a sharp knife, run it under hot water, and wipe it clean after each slice.
Storage Tips for Chocolate Caramel Brownie Cheesecake Bars
Refrigerate these bars in an airtight container for up to 5 days. Place a sheet of parchment paper between stacked layers to keep the topping from sticking. The caramel and ganache will soften at room temperature, so keep the bars chilled until ready to serve.
You can freeze the bars for up to 2 months. Arrange the fully chilled bars in a single layer on a baking sheet and freeze until firm. Then wrap each bar individually in plastic wrap and place them in a freezer-safe container. Thaw overnight in the refrigerator before serving. Avoid reheating these bars, as the cheesecake layer can become soft and the chocolate topping may melt. They are best enjoyed cold.
Conclusion
Chocolate Caramel Brownie Cheesecake Bars are the kind of dessert that stops conversation. Every bite has a fudgy brownie base, a tangy cheesecake center, a ribbon of caramel, and a smooth chocolate ganache with brownie chunks on top. The recipe uses a boxed brownie mix to keep things simple, while the cheesecake and toppings feel completely homemade. Make them for a birthday, a holiday table, or just because you need something spectacular on a Tuesday.
I hope you try this layered brownie cheesecake bar recipe and love it as much as I do. Leave a comment below to let me know how your bars turned out, or share a photo of your finished dessert. I love seeing your variations and hearing about the occasions you make them for.
Frequently Asked Questions
Can I use homemade brownie batter instead of a box mix?
Yes, you can use your favorite homemade brownie recipe. You will need enough batter to cover the bottom of a 9×13 inch pan in an even layer. Partially bake the homemade brownie base for about 15 minutes before adding the cheesecake layer.
Why did my cheesecake layer crack?
Cheesecake cracks usually happen when the filling is overmixed, the oven temperature is too high, or the cheesecake cools too quickly. Mix on low speed after adding the eggs, bake at 325°F, and let the bars cool gradually at room temperature before refrigerating.
Can I use store-bought caramel sauce?
Absolutely. A thick store-bought caramel sauce works perfectly. If the sauce is too stiff to drizzle, warm it gently in the microwave for 10 to 15 seconds. You can also make a quick homemade caramel by melting soft caramels with a splash of heavy cream.
How do I get clean, neat slices?
Chill the bars thoroughly, ideally overnight. Use a large sharp chef's knife. Run the knife under hot water, wipe it dry, and slice in one downward motion. Clean the blade between every cut for the neatest edges.
Can I make this recipe gluten-free?
Yes. Use a gluten-free brownie mix and replace the all-purpose flour in the cheesecake layer with a gluten-free all-purpose flour blend. Check that your caramel sauce and chocolate chips are gluten-free as well.
How long do these bars last in the refrigerator?
The bars stay fresh in an airtight container in the refrigerator for up to 5 days. Keep them cold, as the cheesecake layer and caramel topping soften at room temperature.
Can I freeze Chocolate Caramel Brownie Cheesecake Bars?
Yes, these bars freeze well. Wrap individual slices in plastic wrap and place them in a freezer-safe container. Freeze for up to 2 months and thaw in the refrigerator overnight before serving.
Chocolate Caramel Brownie Cheesecake Bars

Ingredients
Brownie Base
- 1 box brownie mix
- Additional ingredients listed on the brownie mix package such as eggs, oil, and water
Cheesecake Layer
- 24 oz cream cheese softened
- 3/4 cup granulated sugar
- 3 large eggs
- 1/2 cup sour cream
- 2 tsp vanilla extract
- 2 tbsp all-purpose flour
Caramel and Chocolate Topping
- 1 cup caramel sauce
- 3/4 cup chocolate chips
- 1/3 cup heavy cream
- brownie chunks for topping
Instructions
- Prepare the brownie batter according to the instructions on the brownie mix box, adding all the additional ingredients listed on the package. Mix until evenly combined and ready to bake. Do not overmix the brownie batter, or the base can become tough.
- Spread the prepared brownie batter evenly into your baking pan. Bake at 325°F (163°C) for 15–18 minutes to partially bake the brownie base. Do not bake it completely at this stage. You want the top to look set but the center to remain slightly soft so it can finish baking with the cheesecake layer.
- In a mixing bowl, combine the cream cheese, granulated sugar, eggs, sour cream, vanilla extract, and flour. Beat until the mixture is smooth and evenly combined. Make sure the cream cheese is fully softened before mixing to avoid lumps in the cheesecake layer.
- Pour the prepared cheesecake mixture over the partially baked brownie base. Spread it evenly from edge to edge to create a consistent cheesecake layer. Use a spatula to gently push the mixture into the corners.
- Return the pan to the oven and bake for 35–45 minutes, until the cheesecake layer is set enough to hold its shape when cooled. The center may still have a slight jiggle, but it should not be wet. If the edges begin to brown too quickly, loosely cover the pan with foil.
- Remove the dessert from the oven and allow it to cool completely before refrigerating. Let the brownie and cheesecake layers settle before adding the toppings. Cooling at room temperature helps prevent condensation from forming on the surface.
- Refrigerate the cooled cheesecake dessert for 4 hours, allowing the cheesecake layer to firm up and making the bars easier to slice. For the cleanest cuts, refrigerate overnight if you have the time.
- Place the chocolate chips in a heatproof mixing bowl. Warm the heavy cream and combine it with the chocolate chips. Stir until the chocolate melts completely and a smooth, creamy ganache forms. Let the ganache cool for a few minutes before spreading, so it thickens slightly and does not melt the cheesecake layer.
- Pour or drizzle the caramel sauce evenly over the chilled cheesecake layer, distributing it across the surface. If your caramel sauce is too thick to pour, warm it gently for a few seconds until it reaches a spreadable consistency.
- Spread the prepared chocolate ganache over the caramel layer. Finish by scattering brownie chunks across the top for an extra chocolatey finish. Press the brownie chunks lightly into the ganache so they stay in place when you slice the bars.
- Slice the chilled dessert into individual bars using a sharp knife. Serve cold, making sure each portion includes some brownie base, cheesecake filling, caramel, and chocolate topping.

