

No-Bake Cookies and Cream Icebox Cake
Introduction
What if the most impressive dessert you make this summer requires zero time in the oven? Imagine a chilled, creamy slice that tastes like a hybrid between cheesecake and cookies and cream ice cream. That is exactly what you get with this No-Bake Cookies and Cream Icebox Cake. It relies on simple layering and refrigeration, not baking, to create a stunning texture that slices beautifully. The cookie crust softens just enough to become tender while the filling stays cool and airy. Whether you need a make-ahead party dessert or simply want to beat the heat, this recipe delivers maximum flavor with minimal effort.
This No-Bake Cookies and Cream Icebox Cake has become a staple in my kitchen during the warmer months. There is something nostalgic about the combination of chocolate sandwich cookies and sweet vanilla cream. It reminds me of childhood treats, yet it feels elegant enough for a dinner party. Best of all, you can assemble it in under thirty minutes and let the refrigerator do the heavy lifting. The hardest part is waiting for it to chill completely. Once you try it, you will understand why this easy no-bake dessert often disappears faster than traditional baked cakes.
Ingredients
Gathering the right ingredients is the first step toward a perfect no-bake cake. The quality of your dairy and the freshness of your cookies will directly affect the final texture and taste.
- 2 14 oz packages chocolate sandwich cookies, divided
- 5 tbsp butter, melted
- 16 oz cream cheese, softened
- 1/2 cup powdered sugar, for cream cheese filling
- 1 tsp vanilla extract
- 2 cups heavy whipping cream, cold
- 1/2 cup powdered sugar, for whipped cream
- 1 cup chocolate sandwich cookies, crushed
- 1/2 cup chocolate chips, optional
For the equipment, you will need a 9×13 inch baking dish, an electric mixer, large mixing bowls, and a rubber spatula. A food processor makes crushing the cookies easier, but a rolling pin and a zip-top bag work just as well.
Ingredient tips: Use full-fat cream cheese for the creamiest result. Low-fat versions contain more water and can make the filling runny. Make sure your heavy whipping cream is very cold before whipping. You can even chill the mixing bowl for a few minutes to help the cream reach stiff peaks faster. If you prefer a stronger chocolate flavor, use chocolate-filled sandwich cookies instead of the classic vanilla cream ones. For a less sweet profile, reduce the powdered sugar in the cream cheese mixture by two tablespoons.
Step-by-Step Instructions
Follow these steps carefully for a dessert that slices cleanly and tastes divine.
- Crush about 24 chocolate sandwich cookies into fine crumbs. You want a texture similar to wet sand. Mix the crumbs thoroughly with the melted butter.
- Press the buttery cookie crumbs firmly into the bottom of a 9×13-inch baking dish. Use the bottom of a measuring cup to compress the crust evenly. Refrigerate for 15 minutes.
- Beat the softened cream cheese, 1/2 cup powdered sugar, and vanilla extract until smooth and creamy. Scrape down the sides of the bowl to avoid lumps.
- In a separate bowl, whip the cold heavy whipping cream with the remaining 1/2 cup powdered sugar until stiff peaks form. The cream should hold its shape when you lift the beaters.
- Gently fold approximately half of the whipped cream into the cream cheese mixture. Use a rubber spatula and a light hand to keep the mixture airy.
- Fold in 1 cup crushed chocolate sandwich cookies. Do not overmix or the cookies will turn the filling gray.
- Spread the cookies-and-cream filling evenly over the chilled chocolate cookie crust.
- Spread the remaining whipped cream evenly over the cookies-and-cream filling. An offset spatula works well here, but a regular spatula is fine.
- Crush several additional cookies and sprinkle them generously over the whipped cream. Add chocolate chips if desired.
- Cover and refrigerate for at least 6 hours, preferably overnight, until thoroughly chilled and firm.
- Slice the chilled icebox cake into squares and serve cold.
Practical tip: For clean slices, dip a sharp knife in hot water and wipe it dry between cuts. This prevents the layers from smearing. Also, if you are short on time, you can chill the crust for only five minutes, but the full six-hour rest for the assembled cake is non-negotiable. The cookies need time to soften and the filling needs time to set.
Nutritional Information
The nutritional values below are estimates based on one serving, assuming the cake is divided into 12 equal squares.
- Calories: 420
- Protein: 5 g
- Carbohydrates: 38 g
- Fat: 28 g
- Fiber: 1 g
- Serving size: 1 slice, about 3×4 inches
Keep in mind that using light cream cheese or reducing the chocolate chips will change these numbers slightly. This is a rich dessert, so a little goes a long way. Many readers find that a smaller square is satisfying, especially after a heavy meal.
Preparation Time
This recipe is a time-saver in the best way.
- Prep time: 25 minutes
- Cook time: 0 minutes
- Total time: 6 hours 25 minutes, including chilling
The active work is minimal. Compare this to a traditional layer cake, which often requires baking, cooling, and building a frosting. Here, you simply mix, layer, and chill. If you need a dessert for a busy weekend, you can assemble the entire No-Bake Cookies and Cream Icebox Cake the night before. In fact, the longer it sits, the better the texture becomes.
Healthier Alternatives
You can modify this no-bake dessert to fit different dietary needs without sacrificing taste.
For a lighter version, use reduced-fat cream cheese and a whipped topping alternative, though the texture will be slightly less firm. You can also swap half of the heavy cream for plain Greek yogurt, which adds protein and a subtle tang. Keep in mind that the filling may be softer, so increase the chilling time slightly.
For a gluten-free option, use gluten-free chocolate sandwich cookies. Many grocery stores now carry excellent gluten-free versions that taste nearly identical to the originals.
For a dairy-free or vegan version, use vegan cream cheese, coconut cream or a dairy-free whipping cream, and vegan chocolate sandwich cookies. Beat the coconut cream until fluffy and proceed with the same folding method. The result is just as creamy, with a hint of coconut flavor that pairs nicely with chocolate. To keep it refined sugar-free, use maple syrup or a powdered monk fruit sweetener instead of powdered sugar, though the texture may change slightly.
Serving Suggestions
While this cake is wonderful on its own, you can take it to the next level with a few simple additions.
Serve each slice with a drizzle of warm chocolate sauce or caramel sauce. A dollop of lightly sweetened whipped cream on the side adds extra richness. For texture contrast, sprinkle a tiny pinch of flaky sea salt over the top. The salt enhances the chocolate and balances the sweetness beautifully.
For drink pairings, a cold glass of milk is classic and satisfying. If you are serving adults, try a small glass of bourbon-spiked iced coffee or a chocolate stout. The roasted, bitter notes complement the sweet cream filling. For a non-alcoholic option, an iced mocha or a vanilla milkshake works perfectly. During the holidays, pair this cake with a hot cup of espresso or dark roast coffee.
This dessert also works as a fun centerpiece for a no-bake dessert bar. Set out bowls of crushed cookies, chocolate chips, toffee bits, and mini marshmallows so guests can customize their own slices.
Common Mistakes to Avoid
Even simple recipes have pitfalls. Here are the most common issues and how to prevent them.
Overwhipping the cream is a frequent problem. If you beat heavy cream too long, it turns grainy and eventually becomes butter. Stop as soon as stiff peaks form. The cream should look smooth and glossy, not clumpy or yellow.
Using warm cream cheese is another issue. Softened cream cheese should be at room temperature, but not melted or hot. If it is too warm, the filling will not set properly. Leave it out for about 30 minutes before mixing.
Rushing the chilling time is the biggest mistake. If you slice the cake too soon, the layers will slide apart. The cookies need at least six hours to absorb moisture and soften. Overnight chilling gives you the cleanest, most cohesive slices.
Also, avoid crushing the cookies too coarsely for the crust. Large chunks will prevent the crust from holding together. Aim for fine, even crumbs. Finally, do not fold the crushed cookies into the filling too vigorously. Gentle folding keeps the filling light and prevents the cookie pieces from breaking down into a paste.
Storage Tips
Proper storage keeps this dessert fresh and delicious for days.
Refrigeration: Cover the dish tightly with plastic wrap or a lid. Store it in the refrigerator for up to four days. The texture will remain creamy, though the cookie pieces on top may soften slightly. For the best appearance, add the final cookie topping just before serving if you plan to store it for more than one day.
Freezing: You can freeze this icebox cake for up to one month. Wrap the entire dish in plastic wrap, then a layer of aluminum foil. When you are ready to serve, thaw it in the refrigerator overnight. The texture will be slightly denser after freezing, but still very enjoyable. Some readers even prefer it semi-frozen, like an ice cream cake.
Reheating: This is a no-bake dessert meant to be served cold. Do not reheat it. If you prefer a softer texture, let the cake sit at room temperature for five to ten minutes before slicing. That brief rest makes it easier to cut while keeping the layers intact.
Conclusion
There is a reason this No-Bake Cookies and Cream Icebox Cake is a go-to for so many home cooks. It requires no oven, no complicated techniques, and no special equipment. Yet the result is a stunning layered dessert that tastes like something from a bakery. The contrast between the buttery cookie crust, the fluffy cookies-and-cream filling, and the cloud-like whipped topping is irresistible. Whether you make it for a birthday, a potluck, or a simple weeknight treat, this recipe is sure to earn a permanent spot in your collection.
I would love to hear how your cake turned out. Did you add chocolate chips or try a different cookie variety? Leave a comment below and share your experience. If you post a photo on social media, tag me so I can see your beautiful creation. Happy no-baking.
Frequently Asked Questions
Can I use homemade whipped cream instead of store-bought whipped topping?
Yes. This recipe uses freshly whipped heavy cream, which gives the dessert a rich, airy texture. Avoid using aerosol whipped cream, as it will deflate and become watery. If you must use a store-bought alternative, use a frozen whipped topping that has been thawed, but know the flavor will be sweeter and less creamy.
Can I make this cake in a different pan size?
Absolutely. A 9×9-inch square pan will create a thicker cake, but you will need to increase the chilling time to at least eight hours. For individual servings, layer the ingredients in small glasses or mason jars. The assembly time increases slightly, but the presentation is charming.
What is the best way to crush cookies without a food processor?
Place the cookies in a zip-top bag, press out the air, and seal it. Use a rolling pin to crush them into fine crumbs. For the crust, you want very fine crumbs. For the filling and topping, a slightly chunkier texture is fine. This method works well and gives you control over the crumb size.
Why did my filling turn out runny?
A runny filling usually means the heavy cream was not whipped to stiff peaks or the cream cheese was too warm. Make sure the cream is very cold and the cream cheese is only slightly softened. If the mixture looks loose before assembling, chill it for 20 minutes, then gently stir before spreading.
Can I use flavored sandwich cookies instead of classic chocolate?
Yes, but the flavor will change significantly. Mint chocolate sandwich cookies create a refreshing peppermint version. Peanut butter sandwich cookies make a nutty, rich alternative. Keep in mind that sweeter cookies may require a slight reduction in powdered sugar.
How far in advance can I make this dessert?
You can prepare the cake up to two days ahead. In fact, the texture improves with a longer chill. Wait to add the final crushed cookie topping until a few hours before serving if you want it to stay crisp. The filling and crust hold up well in the refrigerator for several days.
Is this recipe suitable for kids to help make?
This is a perfect recipe for young helpers. Kids can crush the cookies, sprinkle the topping, and help spread the layers with a spatula. The only step requiring caution is whipping the cream, which is best left to an adult. It is a fun, low-stress baking project that requires no oven safety rules.
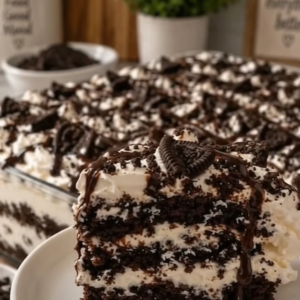
No-Bake Cookies and Cream Icebox Cake

Ingredients
- 2 14 oz packages chocolate sandwich cookies divided
- 5 tbsp butter melted
- 16 oz cream cheese softened
- 1/2 cup powdered sugar for cream cheese filling
- 1 tsp vanilla extract
- 2 cups heavy whipping cream cold
- 1/2 cup powdered sugar for whipped cream
- 1 cup chocolate sandwich cookies crushed
- 1/2 cup chocolate chips optional
Instructions
- Crush about 24 chocolate sandwich cookies into fine crumbs. You want a texture similar to wet sand. Mix the crumbs thoroughly with the melted butter.
- Press the buttery cookie crumbs firmly into the bottom of a 9x13-inch baking dish. Use the bottom of a measuring cup to compress the crust evenly. Refrigerate for 15 minutes.
- Beat the softened cream cheese, 1/2 cup powdered sugar, and vanilla extract until smooth and creamy. Scrape down the sides of the bowl to avoid lumps.
- In a separate bowl, whip the cold heavy whipping cream with the remaining 1/2 cup powdered sugar until stiff peaks form. The cream should hold its shape when you lift the beaters.
- Gently fold approximately half of the whipped cream into the cream cheese mixture. Use a rubber spatula and a light hand to keep the mixture airy.
- Fold in 1 cup crushed chocolate sandwich cookies. Do not overmix or the cookies will turn the filling gray.
- Spread the cookies-and-cream filling evenly over the chilled chocolate cookie crust.
- Spread the remaining whipped cream evenly over the cookies-and-cream filling. An offset spatula works well here, but a regular spatula is fine.
- Crush several additional cookies and sprinkle them generously over the whipped cream. Add chocolate chips if desired.
- Cover and refrigerate for at least 6 hours, preferably overnight, until thoroughly chilled and firm.
- Slice the chilled icebox cake into squares and serve cold.

