

Layered Ice Cream Sandwich Cake
Introduction
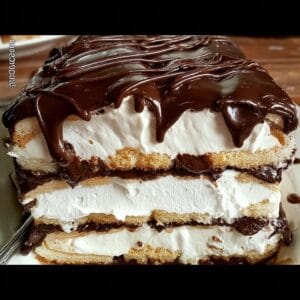
What if you could create an impressive dessert with just three ingredients and minimal effort? The Layered Ice Cream Sandwich Cake is the perfect solution for busy hosts, last-minute gatherings, or anyone craving a decadent treat. This no-bake masterpiece combines creamy ice cream sandwiches, fluffy whipped topping, and rich chocolate syrup into a showstopping dessert that requires barely any prep time.
Whether you're planning a summer barbecue, birthday party, or simply want to indulge, this ice cream cake recipe delivers maximum flavor with minimal work. Keep reading to discover how to assemble this crowd-pleasing dessert and all the creative variations you can try.
Ingredients
For this simple Layered Ice Cream Sandwich Cake, you'll need:
- 24 ice cream sandwiches (standard size)
- Whipped topping (about 16 oz)
- Chocolate syrup (about 1/2 cup)
Optional substitutions and variations:
- Use different ice cream sandwich flavors like mint chocolate chip or strawberry
- Swap chocolate syrup for caramel, strawberry, or butterscotch
- Add crushed cookies or candy between layers for extra texture
- Try light whipped topping or homemade whipped cream
- Use sugar-free ice cream sandwiches and toppings for a lower-calorie version
Ingredient tips:
- Let ice cream sandwiches sit at room temperature for 1-2 minutes before handling to prevent cracking
- Chill your mixing bowl before making homemade whipped cream for better volume
- Have all ingredients ready before starting assembly for easiest preparation
Step-by-Step Instructions
Prepare a 9×13 inch baking dish by lining it with parchment paper or lightly greasing it. This makes removal easier after freezing.
Unwrap 12 ice cream sandwiches and arrange them in a single layer in the prepared dish. You may need to trim some sandwiches to fit perfectly.
Spread an even layer of whipped topping over the ice cream sandwiches. Use about half of your whipped topping for this first layer.
Drizzle chocolate syrup generously over the whipped topping layer. Use about 1/4 cup for this first drizzle.
Repeat the layers with the remaining 12 ice cream sandwiches, arranging them carefully over the first layer.
Spread the remaining whipped topping over the second layer of ice cream sandwiches.
Finish with another generous drizzle of chocolate syrup, using the remaining 1/4 cup.
Cover the dish tightly with plastic wrap or aluminum foil and freeze for at least 2-3 hours, or until completely firm.
When ready to serve, remove from freezer and let sit at room temperature for 5 minutes before slicing.
Use a sharp knife dipped in hot water to cut clean slices. Wipe the knife between cuts for neat presentation.
Nutritional Information
Per serving (1/12 of cake):
- Calories: 320
- Protein: 4g
- Carbohydrates: 45g
- Fat: 14g
- Fiber: 1g
- Sugar: 32g
Note that nutritional values may vary based on specific brands of ingredients used. For more accurate information, calculate using your exact products.
Preparation Time
- Prep time: 10 minutes
- Freeze time: 2-3 hours
- Total time: 2 hours 10 minutes (minimum)
This Layered Ice Cream Sandwich Cake takes less time to prepare than baking a traditional cake from scratch. The hands-on time is minimal, making it ideal for busy schedules. While it does need several hours to freeze completely, you can easily prepare it in the morning for an evening event.
Healthier Alternatives
For those looking for lighter options, consider these substitutions:
- Use low-fat or reduced-sugar ice cream sandwiches
- Opt for light whipped topping or make your own with low-fat cream
- Choose sugar-free chocolate syrup
- Add fresh fruit like sliced strawberries between layers
- Try dairy-free ice cream sandwiches and coconut whipped topping for a vegan version
- Use gluten-free ice cream sandwiches if needed
While these alternatives will change the nutritional profile, they can help accommodate various dietary needs without sacrificing the delicious layered effect.
Serving Suggestions
This versatile Layered Ice Cream Sandwich Cake pairs well with many occasions and accompaniments:
- Serve with fresh berries on the side for a pop of color and freshness
- Top each slice with a dollop of extra whipped cream and a cherry
- Pair with coffee or milk for a classic dessert combination
- Drizzle additional syrup over individual slices when serving
- Crush nuts or sprinkles over the top before freezing for added texture
- Serve alongside other frozen treats for an ice cream buffet
- Present on a chilled platter for outdoor summer parties
Common Mistakes to Avoid
To ensure your Layered Ice Cream Sandwich Cake turns out perfectly:
- Don't let ice cream sandwiches thaw too much before assembling or they'll become messy
- Avoid pressing down too hard when layering to maintain airy texture
- Don't skip the freezing time between steps if adding extra layers
- Prevent freezer burn by wrapping tightly with plastic before freezing
- Don't use thawed whipped topping that has become watery
- Avoid cutting frozen cake with a dull knife which can crush layers
- Don't leave assembled cake at room temperature too long before serving
Storage Tips
Proper storage ensures your Layered Ice Cream Sandwich Cake stays fresh:
- Keep covered tightly in the freezer for up to 2 weeks
- Place parchment paper between slices if storing pre-cut portions
- Thaw at room temperature for 5-10 minutes before serving
- Avoid repeated thawing and refreezing
- Store away from strong-smelling foods to prevent flavor transfer
- For longer storage, wrap individual slices in plastic before freezing
Conclusion
The Layered Ice Cream Sandwich Cake proves that impressive desserts don't require complicated recipes or hours in the kitchen. With just three main ingredients and minimal prep time, you can create a stunning dessert that delights both kids and adults. The combination of creamy ice cream sandwiches, fluffy whipped topping, and rich chocolate syrup creates irresistible layers of flavor and texture.
This versatile recipe invites creativity – try different ice cream sandwich flavors, experiment with various syrups, or add your favorite mix-ins between layers. Whether you're hosting a party or simply treating your family, this no-bake cake delivers maximum satisfaction with minimal effort.
Have you tried making this Layered Ice Cream Sandwich Cake? Share your experience in the comments below and tell us about any creative variations you've discovered!
Frequently Asked Questions
Can I make this cake ahead of time?
Yes, you can prepare it up to 2 weeks in advance and store it tightly wrapped in the freezer.How do I prevent the cake from sticking to the pan?
Line your dish with parchment paper before assembling, leaving some overhang to lift the cake out easily.Can I use homemade whipped cream instead of whipped topping?
Absolutely, though homemade whipped cream may not hold its shape as long in the freezer.What's the best way to cut frozen cake?
Use a sharp knife dipped in hot water and wiped dry between cuts for clean slices.Can I add other ingredients between layers?
Yes, try crushed cookies, chopped nuts, or candy pieces for added texture and flavor.How long can the cake sit out before serving?
Keep it out no longer than 20-30 minutes to prevent melting.Can I make individual portions instead of one large cake?
Yes, assemble in small jars or ramekins for single-serve desserts.What if I can't find standard ice cream sandwiches?
Adjust the quantity based on the size you find – you'll need enough to create two complete layers.
Layered Ice Cream Sandwich Cake

Ingredients
- 24 ice cream sandwiches (standard size) Let ice cream sandwiches sit at room temperature for 1-2 minutes before handling to prevent cracking
- 16 oz whipped topping Chill your mixing bowl before making homemade whipped cream for better volume
- 1/2 cup chocolate syrup
Instructions
- Prepare a 9x13 inch baking dish by lining it with parchment paper or lightly greasing it. This makes removal easier after freezing.
- Unwrap 12 ice cream sandwiches and arrange them in a single layer in the prepared dish. You may need to trim some sandwiches to fit perfectly.
- Spread an even layer of whipped topping over the ice cream sandwiches. Use about half of your whipped topping for this first layer.
- Drizzle chocolate syrup generously over the whipped topping layer. Use about 1/4 cup for this first drizzle.
- Repeat the layers with the remaining 12 ice cream sandwiches, arranging them carefully over the first layer.
- Spread the remaining whipped topping over the second layer of ice cream sandwiches.
- Finish with another generous drizzle of chocolate syrup, using the remaining 1/4 cup.
- Cover the dish tightly with plastic wrap or aluminum foil and freeze for at least 2-3 hours, or until completely firm.
- When ready to serve, remove from freezer and let sit at room temperature for 5 minutes before slicing.
- Use a sharp knife dipped in hot water to cut clean slices. Wipe the knife between cuts for neat presentation.

