

Matilda Fudge Icebox Cake
Introduction
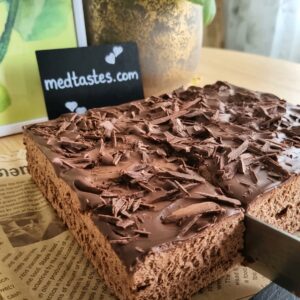
Have you ever watched a movie scene where a dessert looks so impossibly rich that you can almost taste it through the screen? That is exactly what happens when Bruce Bogtrotter faces the chocolate cake in Matilda. This Matilda Fudge Icebox Cake captures that same dramatic, deep chocolate experience without ever turning on your oven. It is a no bake dessert built with cocoa biscuits, a silky mascarpone chocolate cream, and a glossy fudge ganache.
The magic of this recipe lies in the fridge. As the cake chills, the biscuits soften into tender layers that taste remarkably like cake. Meanwhile, the cream sets into a mousse like texture. The result is a slice that is rich, creamy, and deeply satisfying. I have made this dessert for birthdays, movie nights, and simple Sunday dinners. It always disappears quickly, often with people asking for the recipe before they finish their plate.
This guide will walk you through every step, from creating the chocolate cream to getting that perfect ganache shine. You will also find practical tips, serving ideas, and answers to common questions. By the end, you will be ready to make a show stopping dessert that feels far more complicated than it actually is.
Ingredients
Here is everything you need to make this Matilda Fudge Icebox Cake.
For the biscuit layers
- 200 g cocoa biscuits
- 80 ml milk
- 1 tsp cocoa powder
- 1 tsp vanilla extract
For the chocolate cream
- 500 g mascarpone cheese
- 250 ml heavy cream 35 percent fat, divided into 70 ml and 180 ml
- 130 g dark chocolate 55 to 60 percent cocoa
- 60 g powdered sugar
- 20 g cocoa powder
- 1 tsp vanilla extract
- A pinch of salt
For the chocolate fudge ganache
- 75 g dark chocolate
- 45 g milk chocolate
- 80 ml heavy cream
- 5 g butter
For decoration
- Grated dark chocolate as desired

A few ingredient notes help here. Use dark chocolate with around 55 to 60 percent cocoa for the filling. Anything stronger can become bitter. Anything weaker may lose the deep chocolate flavor. For the biscuits, any crisp cocoa biscuit works well. In some regions you might know them as chocolate graham crackers or chocolate tea biscuits. Avoid soft cookies because they will turn mushy. Mascarpone should be cold but softened at room temperature for ten minutes before mixing. This small step prevents lumps.
If you cannot find mascarpone, full fat cream cheese works as a substitute. The texture will be slightly firmer, but still delicious. For a dairy free option, use a thick plant based mascarpone alternative and coconut cream. Dark chocolate is naturally dairy free in many brands, but always check the label.
Step-by-Step Instructions
Follow these steps in order for the best results. The process is simple, but a little patience makes a big difference.
Prepare the chocolate mixture. Finely chop the 130 g of dark chocolate and place it in a heatproof bowl. Take 70 ml from the 250 ml of heavy cream and heat it just until it comes to a boil. Pour it over the chopped chocolate and leave it alone for one minute. This resting time allows the hot cream to melt the chocolate evenly. Stir gently until smooth. Set the mixture aside to cool before adding it to the mascarpone. This cooling step is essential. Warm chocolate can melt the mascarpone and ruin the texture.
Make the chocolate cream. Place the mascarpone, powdered sugar, cocoa powder, vanilla, and salt in a large bowl. Beat briefly on low speed until completely smooth. Add the cooled chocolate mixture and beat just until combined. Do not overmix. You want a thick, smooth, dark chocolate cream with no lumps.
Whip the cold cream. In a separate bowl, whip the remaining 180 ml of cold heavy cream to stiff peaks. Cold cream whips faster and holds its shape better. Carefully fold the whipped cream into the chocolate mixture with a spatula until combined. Use a gentle folding motion to keep the filling light and airy. Divide the finished cream into three approximately equal portions.
Prepare the dipping mixture. Mix the milk, cocoa powder, and vanilla in a shallow bowl. This adds extra chocolate flavor and moisture to the biscuit layers.
Assemble the first layer. Briefly dip each biscuit into the milk mixture. A quick dip is enough. Do not soak the biscuits or they will fall apart. Arrange the first layer in a 20 by 15 cm pan. Spread one third of the chocolate cream over the biscuits.
Continue layering. Add a second layer of briefly dipped biscuits, then spread another third of the chocolate cream over them. Arrange the third and final layer of dipped biscuits on top, then spread with the remaining chocolate cream. Smooth the surface with an offset spatula if you have one.
Chill before topping. Refrigerate the cake for one to two hours before adding the ganache. This helps the cream set so the warm ganache does not sink into the filling.
Make the chocolate fudge ganache. Finely chop the 75 g of dark chocolate and 45 g of milk chocolate and place them in a heatproof bowl. Heat the 80 ml of heavy cream just until it comes to a boil, then pour it over the chocolate. Leave for one minute, then add the butter and stir until smooth. The butter gives the ganache a glossy finish.
Decorate and chill. Pour the prepared fudge ganache over the chilled cake. Tilt the pan gently to spread it evenly. Decorate with grated dark chocolate as desired. Return the cake to the refrigerator for several hours, preferably overnight. This final rest transforms the texture completely.
Nutritional Information
This Matilda Fudge Icebox Cake is a rich dessert meant for special occasions. The following values are approximate per serving, based on ten servings.
- Calories: 510 kcal
- Protein: 8 g
- Carbohydrates: 38 g
- Fat: 38 g
- Fiber: 3 g
- Sugar: 24 g
- Serving size: 1 slice, about one tenth of the recipe
Keep in mind that exact values depend on the specific brands of biscuits, chocolate, and mascarpone you use.
Preparation Time
This recipe is mostly hands off time in the fridge. Here is a simple breakdown.
- Prep time: 35 minutes
- Cook time: 0 minutes
- Chilling time: at least 3 hours, but overnight is best
- Total time: 3 hours 35 minutes, including minimum chilling
Compared to a baked layer cake, this is significantly faster. There is no oven preheating, no cooling racks, and no complicated frosting. The fridge does most of the work while you get on with your day.
Healthier Alternatives
You can lighten this recipe without losing its soul. The key is choosing smart swaps.
- Use reduced fat mascarpone or a blend of mascarpone and thick Greek yogurt. This lowers calories while keeping creaminess.
- Swap half the heavy cream with chilled coconut cream for a lighter filling.
- Choose dark chocolate with 70 percent cocoa or higher. It has less sugar and more antioxidants.
- Replace powdered sugar with a powdered erythritol or monk fruit sweetener for a lower sugar version.
- Use a gluten free cocoa biscuit to make the entire dessert gluten free.
For a vegan version, use plant based mascarpone, coconut cream, and dairy free dark chocolate. Make sure your biscuits are vegan as well. The ganache can be made with full fat coconut milk instead of heavy cream. The texture will be slightly different, but still rich and satisfying.
A dairy free option is easier than it sounds. Choose a thick dairy free cream cheese alternative and coconut whipping cream. The chocolate and cocoa provide so much flavor that most people will not notice the difference.
Serving Suggestions
This cake shines on its own, but a few thoughtful additions can make it even more special.
Serve chilled slices with a dusting of cocoa powder or extra grated chocolate. A dollop of lightly sweetened whipped cream balances the intense chocolate flavor. Fresh raspberries or strawberries add a bright, tart contrast.
For drinks, strong black coffee is a classic pairing. The bitterness cuts through the richness beautifully. A glass of cold milk works wonderfully for kids and adults alike. If you want something more festive, try a small pour of espresso martini or a glass of ruby port. The fruity notes in the port complement the dark chocolate ganache.
For a movie night, serve small squares with bowls of popcorn and fresh fruit. The contrast between salty popcorn and creamy chocolate is surprisingly good. You can also cut the cake into thin slices and serve on a dessert platter for parties.
Common Mistakes to Avoid
Even simple no bake desserts have a few pitfalls. Here is how to avoid them.
Let the chocolate mixture cool. Warm chocolate folded into mascarpone can cause the mascarpone to melt and separate. The result is a grainy or runny filling. Wait until the chocolate mixture feels cool to the touch before mixing.
Do not soak the biscuits. A quick dip in the milk mixture is enough. Over soaked biscuits turn into mush and lose their structure. Aim for one second per side.
Do not overmix the mascarpone. Beating too long or too fast can cause the mascarpone to curdle. Use low speed and stop as soon as the mixture is smooth.
Fold the whipped cream gently. Stirring too hard knocks out the air and makes the filling dense. Use a spatula and a slow, sweeping motion.
Skipping the pre ganache chill. If you pour warm ganache over soft cream, it can melt the top layer. The one to two hour chill sets the cream enough to hold the ganache.
Using warm or room temperature heavy cream for whipping. Cold cream whips to stiff peaks much more easily. Chill your bowl and whisk for extra insurance.
Storage Tips
Refrigeration is the best way to store this Matilda Fudge Icebox Cake. Cover the pan tightly with plastic wrap or transfer slices to an airtight container. The cake will keep well in the refrigerator for up to four days. The texture actually improves after the first day as the biscuits soften further.
Freezing is possible, though the texture changes slightly. Wrap the cake or individual slices tightly in plastic wrap, then in foil. Freeze for up to one month. To serve, thaw overnight in the refrigerator. The mascarpone cream may release a little moisture after thawing, but the flavor remains good.
Reheating is not recommended. This is a chilled dessert. Warming it would melt the cream and destroy the layers. If you prefer a slightly softer texture, let a slice sit at room temperature for five to ten minutes before eating.
Conclusion
This Matilda Fudge Icebox Cake delivers exactly what its name promises. It is rich, fudgy, and packed with deep chocolate flavor. The biscuit layers soften into cake like sheets while the mascarpone cream stays light and mousse like. The glossy ganache on top brings everything together with a dramatic finish.
What I love most about this recipe is how accessible it feels. There is no baking, no complicated equipment, and no tricky techniques. Just a little patience and a good appetite for chocolate. It is the kind of dessert that makes an ordinary Tuesday feel like a celebration.
I hope you give this recipe a try. When you do, I would love to hear how it turned out. Leave a comment below and share your experience. Did you add your own twist? Did you serve it for a special occasion? Your feedback helps other readers and makes this little corner of the internet more delicious.
Frequently Asked Questions
Can I make this cake ahead of time?
Yes. In fact, making it a day ahead is better. The overnight chill gives the biscuits time to soften and the flavors time to meld. Prepare it fully, then keep it covered in the refrigerator until serving.
What can I use instead of cocoa biscuits?
Any crisp chocolate biscuit works. Chocolate graham crackers, chocolate tea biscuits, or even plain digestive biscuits with a little cocoa powder added to the milk mixture. Avoid soft cookies or anything with a cream filling.
Why did my mascarpone mixture turn lumpy?
This usually happens when the mascarpone is too cold or the chocolate mixture is too warm. Let the mascarpone sit at room temperature for ten minutes. Make sure the chocolate mixture is fully cooled before adding it. Sifting the cocoa and powdered sugar also helps.
Can I use milk chocolate instead of dark chocolate in the filling?
You can, but the flavor will be sweeter and less intense. If you use milk chocolate, reduce the powdered sugar slightly. Dark chocolate with 55 to 60 percent cocoa gives the best balance.
Is this cake very sweet?
It is rich but not overly sweet. The dark chocolate and cocoa powder balance the sugar. If you prefer a sweeter dessert, use milk chocolate in the ganache or add an extra tablespoon of powdered sugar to the cream.
How do I get clean slices?
Use a sharp knife and wipe it clean between cuts. For even cleaner slices, dip the knife in hot water, then dry it before slicing. Serve the cake straight from the fridge for the neatest edges.
Can I double the recipe?
Yes. Use a larger pan, such as a 20 by 30 cm dish, and double all ingredients. The chilling time remains the same. This is a great option for a crowd or a potluck.
Matilda Fudge Icebox Cake

Ingredients
For the biscuit layers
- 200 g cocoa biscuits
- 80 ml milk
- 1 tsp cocoa powder
- 1 tsp vanilla extract
For the chocolate cream
- 500 g mascarpone cheese cold but softened at room temperature for ten minutes before mixing
- 250 ml heavy cream 35% fat divided into 70 ml and 180 ml
- 130 g dark chocolate 55 to 60 percent cocoa finely chopped
- 60 g powdered sugar
- 20 g cocoa powder
- 1 tsp vanilla extract
- A pinch salt
For the chocolate fudge ganache
- 75 g dark chocolate finely chopped
- 45 g milk chocolate finely chopped
- 80 ml heavy cream
- 5 g butter
For decoration
- as desired grated dark chocolate
Instructions
- Finely chop the 130 g of dark chocolate and place it in a heatproof bowl. Take 70 ml from the 250 ml of heavy cream and heat it just until it comes to a boil. Pour it over the chopped chocolate and leave it alone for one minute. This resting time allows the hot cream to melt the chocolate evenly. Stir gently until smooth. Set the mixture aside to cool before adding it to the mascarpone. This cooling step is essential. Warm chocolate can melt the mascarpone and ruin the texture.
- Place the mascarpone, powdered sugar, cocoa powder, vanilla, and salt in a large bowl. Beat briefly on low speed until completely smooth. Add the cooled chocolate mixture and beat just until combined. Do not overmix. You want a thick, smooth, dark chocolate cream with no lumps.
- In a separate bowl, whip the remaining 180 ml of cold heavy cream to stiff peaks. Cold cream whips faster and holds its shape better. Carefully fold the whipped cream into the chocolate mixture with a spatula until combined. Use a gentle folding motion to keep the filling light and airy. Divide the finished cream into three approximately equal portions.
- Mix the milk, cocoa powder, and vanilla in a shallow bowl. This adds extra chocolate flavor and moisture to the biscuit layers.
- Briefly dip each biscuit into the milk mixture. A quick dip is enough. Do not soak the biscuits or they will fall apart. Arrange the first layer in a 20 by 15 cm pan. Spread one third of the chocolate cream over the biscuits.
- Add a second layer of briefly dipped biscuits, then spread another third of the chocolate cream over them. Arrange the third and final layer of dipped biscuits on top, then spread with the remaining chocolate cream. Smooth the surface with an offset spatula if you have one.
- Refrigerate the cake for one to two hours before adding the ganache. This helps the cream set so the warm ganache does not sink into the filling.
- Finely chop the 75 g of dark chocolate and 45 g of milk chocolate and place them in a heatproof bowl. Heat the 80 ml of heavy cream just until it comes to a boil, then pour it over the chocolate. Leave for one minute, then add the butter and stir until smooth. The butter gives the ganache a glossy finish.
- Pour the prepared fudge ganache over the chilled cake. Tilt the pan gently to spread it evenly. Decorate with grated dark chocolate as desired. Return the cake to the refrigerator for several hours, preferably overnight. This final rest transforms the texture completely.

