

NO-BAKE KINDER BUENO MINI CHEESECAKES
Introduction
Have you ever craved a dessert that feels completely indulgent but requires absolutely no time in the oven? These No-Bake Kinder Bueno Mini Cheesecakes are the answer to every sweet tooth emergency. Creamy, nutty, and layered with that signature hazelnut crunch, this recipe turns a beloved candy bar into an elegant individual dessert.
The first time I made these, I was genuinely surprised by how quickly they came together. A simple cookie base, a silky hazelnut cheesecake filling, and a dramatic dripping topping. The hardest part is waiting for them to chill. But once you taste that first spoonful, you will understand why these little treats disappear fast at parties, family dinners, and quiet evenings on the couch.
If you love the combination of milk chocolate, roasted hazelnuts, and wafer crisp, then this recipe will become a permanent favorite in your dessert rotation.
Ingredients
This recipe makes 6 generous mini cheesecakes. You can easily double the batch if you are serving a crowd.
For the Cookie Base
- 1 cup (120 g) chocolate or hazelnut cookies, finely crushed
- 3 tbsp (45 g) unsalted butter, melted
For the Hazelnut Cheesecake Filling
- 8 oz (225 g) cream cheese, room temperature
- 1/2 cup (120 ml) heavy whipping cream, cold
- 1/3 cup (100 g) hazelnut spread
- 1/3 cup (40 g) powdered sugar
- 1 tsp vanilla extract
For the Topping
- 1/3 cup (100 g) hazelnut spread, slightly warmed
- 1/2 cup (120 ml) heavy whipping cream
- 1 tbsp powdered sugar
- Chopped hazelnuts
- 3 chocolate-filled hazelnut cookies or Kinder Bueno pieces, halved
Ingredient Tips and Substitutions
For the cookie base, chocolate sandwich cookies without the cream filling work wonderfully. Hazelnut biscotti or even chocolate graham crackers can also work. If you prefer a milder base, use plain digestive biscuits and add one tablespoon of cocoa powder.
Make sure your cream cheese is truly at room temperature. Cold cream cheese will create lumps in the filling, no matter how long you beat it.
For the hazelnut spread, use a smooth commercial brand or a natural hazelnut butter sweetened with a little extra powdered sugar if needed.
Step-by-Step Instructions
Place the crushed cookies in a medium bowl. Add the melted butter and mix until every crumb is evenly moistened and the texture resembles wet sand.
Divide the mixture evenly between 6 muffin cavities or mini cheesecake molds. Press firmly with the back of a spoon or the bottom of a small glass to create a compact, even base.
Refrigerate the bases while you prepare the filling. This helps the butter set and prevents the base from crumbling later.
In a large bowl, beat the room temperature cream cheese, powdered sugar, vanilla extract, and hazelnut spread until completely smooth and creamy. Scrape down the sides of the bowl to make sure everything is incorporated.
In a separate bowl, whip the cold heavy cream to medium peaks. The cream should hold its shape but still look soft and billowy.
Gently fold the whipped cream into the hazelnut mixture. Use a spatula and a light hand. Fold until the mixture is thick, smooth, and uniform in color.
Spoon or pipe the filling over each chilled base. Fill the molds to the top, then smooth the surface with an offset spatula or the back of a spoon.
Refrigerate for at least 4 to 6 hours, or preferably overnight, until the cheesecakes are completely firm.
Carefully remove the cheesecakes from the molds. If using a muffin tin, run a thin knife around the edges and lift them out gently.
Spoon a little warmed hazelnut spread around the top edge of each cheesecake. Let it drip naturally down the sides for that beautiful bakery look.
Whip the remaining heavy cream with the powdered sugar until thick and stable. Pipe a generous swirl on top of each cheesecake.
Drizzle with a little more hazelnut spread over the whipped cream.
Finish with chopped hazelnuts and half a chocolate-filled hazelnut cookie or Kinder Bueno piece pressed into the cream.
Serve well chilled for the creamiest texture and the cleanest layers.
Nutritional Information
These No-Bake Kinder Bueno Mini Cheesecakes are a rich dessert, so the nutritional values reflect that.
Per serving, based on 6 servings:
- Calories: approximately 410 kcal
- Protein: 5 g
- Carbohydrates: 32 g
- Fat: 29 g
- Fiber: 1 g
- Sugar: 22 g
Values will vary depending on the specific brands of cookies, hazelnut spread, and cream cheese you choose.
Preparation Time
- Prep time: 25 minutes
- Cook time: 0 minutes
- Chill time: 4 to 6 hours minimum
- Total time: 4 hours 25 minutes to 6 hours 25 minutes
Compared to a traditional baked cheesecake, this recipe saves you at least an hour of oven time plus cooling. It is ideal for warm days when turning on the oven feels like a punishment.
Healthier Alternatives
You can make a few swaps to lighten this dessert while keeping the indulgent spirit intact.
Use reduced-fat cream cheese in place of full-fat. The filling will still set well and taste creamy.
Replace half of the heavy whipping cream with plain Greek yogurt. This adds protein and a pleasant tang while lowering the overall fat content.
Choose a natural hazelnut spread with no palm oil and less sugar. You may need to add an extra tablespoon of powdered sugar to balance the flavor.
For a gluten-free version, use certified gluten-free chocolate cookies or almond flour cookies for the base. Check your hazelnut spread label to ensure it is gluten-free.
For a dairy-free version, use dairy-free cream cheese, coconut cream instead of heavy whipping cream, and a vegan hazelnut spread. The texture will be slightly softer, so freeze the cheesecakes for 30 minutes before unmolding.
For a vegan option, follow the dairy-free swaps and use a plant-based butter or coconut oil in the cookie base.
Serving Suggestions
These mini cheesecakes are stunning on a dessert board alongside fresh berries, chocolate-dipped pretzels, and small cups of espresso.
Serve them chilled on individual plates with a dusting of cocoa powder or a few extra chopped hazelnuts scattered around the plate.
For a fun presentation, place each cheesecake in a small paper liner and arrange them on a cake stand.
They pair beautifully with a strong espresso, a cold glass of milk, or a hazelnut latte.
For an adult pairing, a small glass of amaretto or a nutty dark rum complements the hazelnut flavors without overpowering them.
Common Mistakes to Avoid
One of the most common mistakes is using cold cream cheese. This leads to a lumpy filling that will not smooth out even after folding in the whipped cream. Always let the cream cheese sit at room temperature for at least 30 minutes before mixing.
Overwhipping the heavy cream is another issue. If the cream turns grainy or starts to separate, it will ruin the silky texture of the filling. Stop beating as soon as you see medium peaks.
Skipping the chill time is a big mistake. The cheesecakes need several hours to set properly. If you unmold them too early, they will collapse and lose their clean layers.
Forgetting to press the cookie base firmly can lead to a crumbly base that falls apart when you lift the cheesecake out of the mold. Use firm, even pressure.
When warming the hazelnut spread for the drip, do not overheat it. If it gets too hot, it will melt the cheesecake top and slide off unevenly. Warm it just until it reaches a pourable consistency.
Storage Tips
Refrigerate these No-Bake Kinder Bueno Mini Cheesecakes in an airtight container for up to 4 days. The texture remains best within the first 2 to 3 days.
For longer storage, freeze the cheesecakes without the whipped cream topping and cookie garnish. Place them on a parchment-lined tray and freeze until solid. Then wrap each one in plastic wrap and store in a freezer-safe container for up to 2 months.
To serve from frozen, thaw the cheesecakes in the refrigerator overnight. Add the whipped cream, hazelnut drizzle, and cookie pieces just before serving.
Do not microwave these cheesecakes. The cream cheese filling will melt and lose its structure. Always thaw slowly in the fridge.
Conclusion
These No-Bake Kinder Bueno Mini Cheesecakes deliver everything you love about the iconic candy bar in a spoonable, creamy form. The buttery cookie base, the nutty filling, and the dramatic chocolate drip make them feel far more complicated than they actually are.
Whether you make them for a birthday, a holiday dessert table, or simply because you deserve a treat, this recipe is reliable and endlessly impressive. The hardest part really is waiting for them to chill.
I would love to hear how yours turn out. Leave a comment below and share your experience. Did you use Kinder Bueno pieces or a different hazelnut chocolate cookie on top? Tag your photos so I can see your beautiful creations.
Frequently Asked Questions
Can I make these No-Bake Kinder Bueno Mini Cheesecakes in a different pan?
Yes. You can use a 6-cavity mini cheesecake pan with removable bottoms, a silicone muffin mold, or paper-lined muffin tins. Silicone molds make unmolding especially easy.
Do I have to use hazelnut spread in the filling?
The hazelnut flavor is key to the Kinder Bueno experience, but you could substitute chocolate hazelnut butter or even a smooth almond spread. The flavor profile will change slightly but will still be delicious.
Can I use whipped topping instead of heavy whipping cream?
You can, but the texture and flavor will be different. Whipped topping is sweeter and less rich. If using it, reduce the powdered sugar in the filling to avoid an overly sweet result.
How do I get clean layers when unmolding?
Chill the cheesecakes thoroughly, preferably overnight. Run a thin knife around the edge before lifting them out. If using a metal pan, dip the bottom briefly in warm water to help release the base.
Can I make a full-size cheesecake with this recipe?
Yes. Double the base and filling ingredients and press them into a 7-inch springform pan lined with parchment. Increase the chill time to at least 8 hours or overnight.
What is the best way to crush the cookies?
A food processor gives the finest, most even crumbs. If you do not have one, place the cookies in a zip-top bag and crush them with a rolling pin until no large pieces remain.
Are these mini cheesecakes suitable for kids?
Absolutely. They are a fun, kid-friendly dessert. You can let children help with pressing the cookie base, decorating with the cookie pieces, and drizzling the hazelnut spread on top.
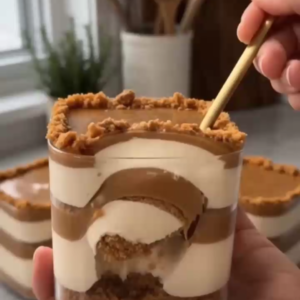
No-Bake Kinder Bueno Mini Cheesecakes

Ingredients
For the Cookie Base
- 1 cup chocolate or hazelnut cookies, finely crushed 120 g
- 3 tbsp unsalted butter, melted 45 g
For the Hazelnut Cheesecake Filling
- 8 oz cream cheese, room temperature 225 g
- 1/2 cup heavy whipping cream, cold 120 ml
- 1/3 cup hazelnut spread 100 g
- 1/3 cup powdered sugar 40 g
- 1 tsp vanilla extract
For the Topping
- 1/3 cup hazelnut spread, slightly warmed 100 g
- 1/2 cup heavy whipping cream 120 ml
- 1 tbsp powdered sugar
- Chopped hazelnuts
- 3 chocolate-filled hazelnut cookies or Kinder Bueno pieces, halved
Instructions
- Place the crushed cookies in a medium bowl. Add the melted butter and mix until every crumb is evenly moistened and the texture resembles wet sand.
- Divide the mixture evenly between 6 muffin cavities or mini cheesecake molds. Press firmly with the back of a spoon or the bottom of a small glass to create a compact, even base.
- Refrigerate the bases while you prepare the filling. This helps the butter set and prevents the base from crumbling later.
- In a large bowl, beat the room temperature cream cheese, powdered sugar, vanilla extract, and hazelnut spread until completely smooth and creamy. Scrape down the sides of the bowl to make sure everything is incorporated.
- In a separate bowl, whip the cold heavy cream to medium peaks. The cream should hold its shape but still look soft and billowy.
- Gently fold the whipped cream into the hazelnut mixture. Use a spatula and a light hand. Fold until the mixture is thick, smooth, and uniform in color.
- Spoon or pipe the filling over each chilled base. Fill the molds to the top, then smooth the surface with an offset spatula or the back of a spoon.
- Refrigerate for at least 4 to 6 hours, or preferably overnight, until the cheesecakes are completely firm.
- Carefully remove the cheesecakes from the molds. If using a muffin tin, run a thin knife around the edges and lift them out gently.
- Spoon a little warmed hazelnut spread around the top edge of each cheesecake. Let it drip naturally down the sides for that beautiful bakery look.
- Whip the remaining heavy cream with the powdered sugar until thick and stable. Pipe a generous swirl on top of each cheesecake.
- Drizzle with a little more hazelnut spread over the whipped cream.
- Finish with chopped hazelnuts and half a chocolate-filled hazelnut cookie or Kinder Bueno piece pressed into the cream.
- Serve well chilled for the creamiest texture and the cleanest layers.

