

The Ultimate Chocolate Cream Cake
Introduction
What if I told you that one of the richest, most comforting desserts you will ever make requires no fancy piping skills and no complicated layering techniques? It sounds almost too good to be true, yet this recipe delivers exactly that. If you have ever craved a dessert that combines the airy texture of sponge cake with the refreshing chill of whipped cream and the deep intensity of chocolate sauce, then this is precisely what you need.
This is The Ultimate Chocolate Cream Cake. It is a dessert designed for those moments when you want something impressive but do not want to spend hours in the kitchen. Unlike traditional layer cakes that demand precision stacking, this treat relies on a simple method: bake one soft cocoa sponge, soak it generously in milk, top it with clouds of sweetened cream, and finish with a silky, glossy chocolate glaze.
The beauty of this recipe lies in its contrasts. The cake itself is light and fluffy, thanks to properly beaten eggs. The soaking process transforms it into something almost custard-like, reminiscent of a tres leches cake but simplified. Then comes the whipped cream, which acts as a cooling contrast to the rich chocolate topping. Every bite melts in your mouth.
Because this is a chilled dessert, it is perfect for preparing ahead of time. You can assemble it in the afternoon and let the refrigerator do all the work while you relax. When it is time to serve, you simply slice and watch everyone’s eyes light up.
Whether you are planning a birthday celebration, a holiday dinner, or a simple weekend treat, this cake fits the occasion. It looks stunning in a glass baking dish, where the distinct layers are clearly visible. And the taste? It is pure indulgence.
Ingredients
To create this delicious masterpiece, you will need a handful of basic pantry staples. Each ingredient plays a specific role in building the flavor and texture.
For the Cake Base
- 4 large eggs
- 1 cup granulated sugar
- 1 cup all-purpose flour
- 3 tablespoons cocoa powder
- 1 packet baking powder (approximately 2 teaspoons)
- 1 packet vanilla sugar (or 1 teaspoon vanilla extract)
It helps to use room-temperature eggs. They whip up more easily and trap more air. The sugar dissolves into the eggs during the mixing process, creating a stable foam. Sifting the flour and cocoa prevents lumps and keeps the batter light.
For Soaking the Cake
- 1 and 1/2 cups milk
Use whole milk if possible. It adds richness and helps soften the crumb beautifully. You can also use warm milk if you prefer, but cold or room-temperature milk works just fine.
For the Whipped Cream Layer
- 2 packets whipped cream powder
- 1 and 1/2 cups cold milk
Make sure the milk is very cold. This helps the cream whip up thick and stable. If you cannot find whipped cream powder, you can substitute with 2 cups of heavy whipping cream plus 3 tablespoons of powdered sugar, whipped to stiff peaks.
For the Chocolate Sauce
- 1 packet chocolate sauce mix
- 2 and 1/2 cups milk
- 80 g dark or milk chocolate
Chocolate sauce mix often contains starch or thickeners, so it sets nicely over the cream. Adding extra chopped chocolate intensifies the flavor and gives the topping a beautiful shine. You can use semi-sweet chocolate chips if that is what you have on hand.
Optional substitutions include using gluten-free all-purpose flour for a wheat-free version and plant-based milk for a dairy-free adaptation.
Step-by-Step Instructions
Follow these steps carefully, and you will be rewarded with a spectacular dessert.
Preheat your oven to 170 degrees Celsius (340 degrees Fahrenheit). Grease a rectangular or square baking dish lightly with butter or cooking spray.
In a deep bowl, beat the eggs and sugar for approximately 4 to 5 minutes. The mixture should become pale, thick, and foamy. You should be able to see ribbons falling from the beaters when lifted.
Sift the flour, cocoa powder, baking powder, and vanilla into the egg mixture. Gently fold everything together using a spatula. Use light, sweeping motions to avoid deflating the batter.
Pour the cake batter into the prepared baking dish. Spread it evenly with a spatula. Bake for about 25 to 30 minutes, or until a toothpick inserted in the center comes out clean.
Let the cake cool for a few minutes after removing it from the oven. While it is still slightly warm, pour the milk evenly over the entire surface. Allow the cake to absorb the milk completely as it cools.
Meanwhile, prepare the whipped cream. In a clean bowl, combine the whipped cream powder with the cold milk. Beat on high speed until thick and creamy. Spread this cream evenly over the cooled, soaked cake.
Next, prepare the chocolate sauce according to the package instructions using the 2 and 1/2 cups of milk. Once it has thickened, remove it from the heat and stir in the chopped chocolate until fully melted and smooth.
Let the chocolate sauce cool to room temperature. Do not pour hot sauce over the cream, or it will melt and ruin the layers. Once cooled but still pourable, pour it over the whipped cream and smooth the top with a spatula.
Refrigerate the assembled cake for at least 3 to 4 hours, preferably overnight. Chilling allows the layers to set and the flavors to meld together.
Before serving, sprinkle grated chocolate over the top if desired. Slice into squares and enjoy cold.
Nutritional Information
The following values are approximate estimates per serving, assuming the cake is divided into 12 equal portions.
Serving size: 1 slice
Calories: 310 kcal
Protein: 7 g
Carbohydrates: 42 g
Fat: 13 g
Fiber: 2 g
These numbers can vary depending on the exact brands of whipped cream powder, chocolate sauce mix, and milk used. Using low-fat milk will reduce the fat content slightly. Choosing dark chocolate instead of milk chocolate may also add a bit less sugar and more antioxidants.
If you are watching your sugar intake, keep in mind that the cake, cream, and sauce all contribute sweetness. The total carbohydrate count reflects that combination.
Preparation Time
Prep time: 25 minutes
Cook time: 30 minutes
Chill time: 3 to 4 hours, ideally overnight
Total time: Approximately 4 hours and 55 minutes including chilling
The active preparation takes less than an hour. Most of the time is hands-off, which makes this recipe ideal for busy cooks. If you start early in the morning, the cake will be perfectly chilled by afternoon coffee or dessert time.
Compared to a traditional frosted layer cake, this recipe saves you at least 45 minutes of assembly and decorating time. There are no crumbs to brush away, no crumb coat to apply, and no piping tips to wash.
For the best texture, plan to make The Ultimate Chocolate Cream Cake the day before you plan to serve it. Overnight chilling improves both the structure and the flavor.
Healthier Alternatives
While this is undeniably a treat, there are several easy ways to lighten it up or adapt it to dietary needs.
For a lower-sugar version, replace half of the granulated sugar with a granulated sugar substitute that measures like sugar. You can also use sugar-free chocolate sauce mix and reduced-sugar chocolate.
To reduce calories and fat, use skim milk for soaking and for the sauces. Choose a whipped cream alternative made with low-fat milk if available. The texture will be slightly less rich but still enjoyable.
For a gluten-free option, swap the all-purpose flour for a high-quality gluten-free baking blend that contains xanthan gum. The cake may be slightly more delicate, so handle it gently when pouring the milk over it.
For a dairy-free or vegan version, use plant-based milk such as almond, oat, or soy milk throughout. Replace the eggs with flax eggs or a commercial egg replacer. Instead of whipped cream powder, use coconut cream whipped until thick. Make the chocolate sauce from scratch using dairy-free milk, cornstarch, cocoa powder, and dairy-free dark chocolate.
Keep in mind that these substitutions will change the final texture somewhat. However, the overall concept of a soaked, layered, chilled dessert remains wonderfully intact.
Serving Suggestions
This cake is incredibly versatile and pairs well with many accompaniments.
Serve each slice chilled, straight from the refrigerator. The cold temperature makes the layers distinct and refreshing. If desired, let the slices sit at room temperature for five minutes before serving to allow the chocolate topping to soften slightly.
Garnish ideas include a dusting of cocoa powder, curls of white chocolate, fresh raspberries, or a few mint leaves. Raspberries and strawberries cut through the richness beautifully, adding a bright, fruity note.
You can also add a dollop of lightly sweetened mascarpone or crème fraîche on the side. That might sound excessive, but the tanginess balances the sweetness surprisingly well.
When it comes to drink pairings, strong black coffee is a classic choice. The bitterness complements the chocolate without overpowering it. A cup of espresso or a latte also works nicely. For a cooler option, try a glass of cold milk or even a vanilla milkshake.
If you serve this as the finale to a dinner party, consider offering small glasses of dessert wine or a cherry liqueur alongside. The fruit notes in those drinks echo the cocoa flavors and make the experience feel extra special.
Common Mistakes to Avoid
Even simple recipes have potential pitfalls. Here are the most common issues and how to prevent them.
One frequent mistake is not beating the eggs and sugar long enough. The mixture must become visibly lighter in color and thicker in texture. This step creates the air bubbles that help the cake rise, since the amount of baking powder is relatively small. Rushing through this stage often results in a dense, flat sponge.
Another mistake is overmixing the batter after adding the dry ingredients. Folding should stop as soon as no streaks of flour remain. Vigorous stirring knocks out the air and creates tough gluten strands.
Pouring hot chocolate sauce over the whipped cream is a disaster waiting to happen. Always cool the sauce to room temperature first. If it starts to thicken too much while cooling, gently reheat it just until it becomes pourable again.
Using warm milk for the whipped cream will prevent it from thickening. Cold milk is essential for achieving that fluffy, stable consistency.
Finally, do not skip the chilling time. Cutting into the cake too early will result in runny layers and a messy presentation. Give it at least three hours, but overnight is truly best.
Storage Tips
Proper storage keeps this dessert fresh and delicious for several days.
Refrigeration is mandatory. Because of the milk-soaked cake and whipped cream layer, this dessert must remain cold. Cover the baking dish tightly with plastic wrap or transfer slices to an airtight container. Stored properly, it will last for up to four days in the refrigerator.
For longer storage, you can freeze individual slices. Place them on a parchment-lined tray and freeze until solid. Then wrap each piece in plastic wrap and place in a freezer-safe bag. Frozen slices will keep for up to two months. To serve, thaw in the refrigerator overnight.
Reheating is not recommended for this cake. The whipped cream and chocolate sauce are meant to be enjoyed cold or chilled. Reheating would cause the layers to break down and lose their appeal.
If you want a warm dessert experience, consider making a similar version without the whipped cream layer and serving it warm with a scoop of ice cream instead.
Conclusion
There is something deeply satisfying about a dessert that looks impressive but requires very little fuss. The Ultimate Chocolate Cream Cake delivers exactly that experience. With its tender soaked sponge, fluffy cream filling, and glossy chocolate topping, every slice feels like a celebration.
This cake proves that you do not need professional baking skills to create something memorable. A few simple ingredients, a little patience for chilling, and a love for chocolate are all it takes.
I hope you give this recipe a try in your own kitchen. When you do, I would love to hear about your results. Did you use dark chocolate or milk chocolate? Did you add any special toppings? Leave a comment below and share your experience. Your tips and variations might inspire someone else to bake this wonderful dessert too.
Frequently Asked Questions
Can I make this cake without whipped cream powder?
Yes. You can use 2 cups of heavy whipping cream whipped with 3 tablespoons of powdered sugar until stiff peaks form. This makes an excellent substitute.
Why did my cake turn out dense?
This usually happens when the eggs and sugar are not beaten long enough or when the flour is mixed too vigorously. Be patient during the whipping stage and fold gently.
Can I use a different type of milk?
Absolutely. Whole milk gives the richest result, but 2 percent, skim, or plant-based milk all work. Just keep in mind that lower-fat milk will produce a slightly lighter texture.
How far in advance can I make this cake?
You can make it up to two days in advance. Keep it covered in the refrigerator. The texture actually improves after a full day of chilling.
Is it possible to make this cake gluten-free?
Yes. Use a cup-for-cup gluten-free flour blend that contains xanthan gum. The result will be slightly more fragile, so handle it carefully when soaking and spreading.
What can I use instead of a packet of chocolate sauce mix?
You can make a simple homemade pudding using cocoa powder, sugar, cornstarch, and milk. Cook until thickened, then stir in the chopped chocolate. Cool before pouring over the cream.
Can I use white chocolate in the topping?
Definitely. White chocolate will make the dessert sweeter and creamier in appearance. Reduce the added sugar slightly if you want to balance the sweetness.
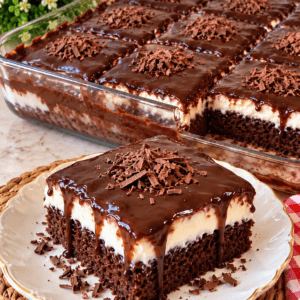
The Ultimate Chocolate Cream Cake

Ingredients
For the Cake Base
- 4 large eggs Room-temperature eggs work best.
- 1 cup granulated sugar
- 1 cup all-purpose flour
- 3 tablespoons cocoa powder
- 1 packet baking powder Approximately 2 teaspoons
- 1 packet vanilla sugar Or 1 teaspoon vanilla extract
For Soaking the Cake
- 1 1/2 cups milk Use whole milk if possible. Cold or room-temperature milk works fine.
For the Whipped Cream Layer
- 2 packets whipped cream powder
- 1 1/2 cups cold milk Make sure the milk is very cold.
For the Chocolate Sauce
- 1 packet chocolate sauce mix
- 2 1/2 cups milk
- 80 g dark or milk chocolate Chopped, or use semi-sweet chocolate chips.
Instructions
Step-by-Step Instructions
- Preheat your oven to 170 degrees Celsius (340 degrees Fahrenheit). Grease a rectangular or square baking dish lightly with butter or cooking spray.
- In a deep bowl, beat the eggs and sugar for approximately 4 to 5 minutes. The mixture should become pale, thick, and foamy. You should be able to see ribbons falling from the beaters when lifted.
- Sift the flour, cocoa powder, baking powder, and vanilla into the egg mixture. Gently fold everything together using a spatula. Use light, sweeping motions to avoid deflating the batter.
- Pour the cake batter into the prepared baking dish. Spread it evenly with a spatula. Bake for about 25 to 30 minutes, or until a toothpick inserted in the center comes out clean.
- Let the cake cool for a few minutes after removing it from the oven. While it is still slightly warm, pour the milk evenly over the entire surface. Allow the cake to absorb the milk completely as it cools.
- Meanwhile, prepare the whipped cream. In a clean bowl, combine the whipped cream powder with the cold milk. Beat on high speed until thick and creamy. Spread this cream evenly over the cooled, soaked cake.
- Next, prepare the chocolate sauce according to the package instructions using the 2 1/2 cups of milk. Once it has thickened, remove it from the heat and stir in the chopped chocolate until fully melted and smooth.
- Let the chocolate sauce cool to room temperature. Do not pour hot sauce over the cream, or it will melt and ruin the layers. Once cooled but still pourable, pour it over the whipped cream and smooth the top with a spatula.
- Refrigerate the assembled cake for at least 3 to 4 hours, preferably overnight. Chilling allows the layers to set and the flavors to meld together.
- Before serving, sprinkle grated chocolate over the top if desired. Slice into squares and enjoy cold.

