

Introduction
Have you ever tried flipping a dessert upside down for a show-stopping presentation? The Upside-Down Chocolate Chunk Cheesecake is a decadent twist on the classic cheesecake, featuring a rich chocolate-studded cream cheese layer topped with a soft, buttery cake. When inverted, the creamy cheesecake becomes the top layer, creating a stunning dessert that’s as delicious as it is beautiful.
Perfect for special occasions or when you want to impress guests, this recipe combines the best of both worlds—velvety cheesecake and tender cake, loaded with generous chunks of chocolate. Let’s dive into the details of making this indulgent treat.
Ingredients
For the Cheesecake Filling
- 16 oz cream cheese, softened
- 3/4 cup sugar
- 2 large eggs
- 1 tsp vanilla extract
- 1/2 cup heavy whipping cream
- 1 tbsp cornstarch
- 1 cup chopped milk or semi-sweet chocolate (chunky pieces)
For the Cake Layer
- 1 cup all-purpose flour
- 1 tsp baking powder
- Pinch of salt
- 1/2 cup sugar
- 1/2 cup butter, softened
- 2 eggs
- 1 tsp vanilla extract
- 1/4 cup milk
Extras
- 3/4–1 cup roughly chopped chocolate (for topping)
- Butter (for greasing the pan)
- Parchment paper (for lining the pan)
Optional Upgrades
- Add 1/2 cup mini chocolate chips + 1/2 cup chopped milk chocolate (like Hershey’s or Cadbury) for extra chocolatey bites.
Step-by-Step Instructions
- Preheat your oven to 325°F. Generously butter an 8- or 9-inch springform pan and place a parchment paper circle on the bottom.
- Prepare the cheesecake filling:
- Beat the softened cream cheese and sugar until smooth.
- Add eggs one at a time, mixing well after each addition.
- Stir in vanilla, heavy cream, and cornstarch.
- Gently fold in the chopped chocolate.
- Pour the mixture into the prepared pan and scatter extra chocolate chunks on top.
- Make the cake batter:
- Beat softened butter and sugar until fluffy.
- Mix in eggs and vanilla.
- In a separate bowl, whisk together flour, baking powder, and salt.
- Alternately add the dry ingredients and milk to the butter mixture, mixing until just combined.
- Assemble the layers:
- Spoon the cake batter gently over the cheesecake layer, spreading it evenly. Avoid mixing the two layers.
- Bake and cool:
- Bake for 55–70 minutes, until the cake is golden and the center has a slight wobble.
- Turn off the oven, crack the door, and let the cheesecake sit inside for 20 minutes.
- Cool completely, then refrigerate for at least 4 hours (preferably overnight).
- The grand reveal:
- Run a knife around the edges, release the springform pan, and place a serving plate on top.
- Carefully flip the cheesecake upside down—the creamy chocolate layer will now be the star of the show!
Pro Tip for Presentation
Swap chocolate chips for roughly chopped chocolate bars (a mix of milk and dark chocolate) to create stunning, irregular chocolate shards. Press some pieces gently into the softened cheesecake for a dramatic finish.
Nutritional Information
(Per serving, based on 12 slices)
- Calories: 380
- Protein: 6g
- Carbohydrates: 36g
- Fat: 24g
- Fiber: 1g
Preparation Time
- Prep time: 20 minutes
- Cook time: 60 minutes
- Total time: 5 hours 20 minutes (including chilling)
Healthier Alternatives
- Use reduced-fat cream cheese and Greek yogurt for a lighter cheesecake.
- Swap sugar with coconut sugar or monk fruit sweetener for lower glycemic impact.
- Choose dark chocolate (70% cocoa or higher) for less sugar and added antioxidants.
- For a gluten-free version, substitute all-purpose flour with almond or oat flour.
Serving Suggestions
- Pair with fresh berries or a drizzle of caramel sauce.
- Serve alongside a scoop of vanilla ice cream for an extra indulgent treat.
- Complement with a glass of dessert wine or a dark coffee blend.
Common Mistakes to Avoid
- Overmixing the cake batter—this can lead to a dense texture.
- Skipping the parchment paper—this makes flipping the cheesecake much easier.
- Opening the oven door too soon—temperature fluctuations can cause cracks.
- Not chilling the cheesecake long enough—it needs time to set properly.
Storage Tips
- Refrigerate leftovers in an airtight container for up to 5 days.
- Freeze slices wrapped in plastic wrap and foil for up to 2 months.
- Thaw in the fridge overnight before serving.
Conclusion
The Upside-Down Chocolate Chunk Cheesecake is a delightful fusion of textures and flavors—creamy, rich, and loaded with chocolate in every bite. Whether you’re celebrating a special occasion or simply treating yourself, this dessert is sure to leave a lasting impression.
Give it a try and share your experience in the comments! Did you use extra chocolate chunks or experiment with different toppings? Let us know how it turned out.
Frequently Asked Questions
- Can I use a regular cake pan instead of a springform pan?
A springform pan is best for easy removal. If using a regular pan, grease and line it well, and be extra careful when flipping. - Why is my cheesecake layer cracking?
Overbaking or sudden temperature changes can cause cracks. The gradual cooling process helps prevent this. - Can I make this cheesecake ahead of time?
Yes! It actually tastes better after chilling overnight, making it perfect for planning ahead. - What’s the best way to get clean slices?
Dip a sharp knife in hot water, wipe it clean, and make smooth cuts between slices. - Can I use Dutch-process cocoa in the cake batter?
Yes, but since Dutch-process cocoa is less acidic, it may alter the rise slightly. - Is there a way to make this without eggs?
Try using a flax egg (1 tbsp flaxseed meal + 3 tbsp water per egg) for a vegan version. - How do I prevent a soggy cake layer?
Ensure the cheesecake layer is evenly spread, and don’t overmix the cake batter. - Can I add nuts for extra crunch?
Yes! Fold chopped walnuts or pecans into the cake batter for added texture.
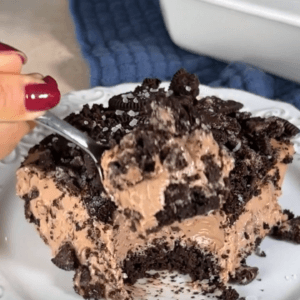
Upside-Down Chocolate Chunk Cheesecake

Ingredients
Cheesecake Filling
- 16 oz cream cheese softened
- 3/4 cup sugar
- 2 large eggs
- 1 tsp vanilla extract
- 1/2 cup heavy whipping cream
- 1 tbsp cornstarch
- 1 cup chopped milk or semi-sweet chocolate chunky pieces
Cake Layer
- 1 cup all-purpose flour
- 1 tsp baking powder
- Pinch of salt
- 1/2 cup sugar
- 1/2 cup butter softened
- 2 eggs
- 1 tsp vanilla extract
- 1/4 cup milk
Extras
- 3/4–1 cup roughly chopped chocolate for topping
- Butter for greasing the pan
- Parchment paper for lining the pan
Optional Upgrades
- 1/2 cup mini chocolate chips
- 1/2 cup chopped milk chocolate like Hershey’s or Cadbury
Instructions
Preparation
- Preheat your oven to 325°F. Generously butter an 8- or 9-inch springform pan and place a parchment paper circle on the bottom.
- Beat the softened cream cheese and sugar until smooth. Add eggs one at a time, mixing well after each addition. Stir in vanilla, heavy cream, and cornstarch. Gently fold in the chopped chocolate. Pour the mixture into the prepared pan and scatter extra chocolate chunks on top.
- Beat softened butter and sugar until fluffy. Mix in eggs and vanilla. In a separate bowl, whisk together flour, baking powder, and salt. Alternately add the dry ingredients and milk to the butter mixture, mixing until just combined.
- Spoon the cake batter gently over the cheesecake layer, spreading it evenly. Avoid mixing the two layers.
- Bake for 55–70 minutes, until the cake is golden and the center has a slight wobble. Turn off the oven, crack the door, and let the cheesecake sit inside for 20 minutes. Cool completely, then refrigerate for at least 4 hours (preferably overnight).
- Run a knife around the edges, release the springform pan, and place a serving plate on top. Carefully flip the cheesecake upside down—the creamy chocolate layer will now be the star of the show!

