

3-Layer Brownie Refrigerator Cake
Introduction
What happens when rich fudgy brownies meet creamy cheesecake and velvety pudding? You get the ultimate dessert indulgence—the 3-Layer Brownie Refrigerator Cake. This no-bake masterpiece is perfect for potlucks, family gatherings, or whenever you crave a decadent treat without spending hours in the kitchen.
With layers of chewy brownies, smooth cream cheese filling, and fluffy chocolate-vanilla pudding, this dessert is as impressive as it is easy to make. Best of all, it chills in the fridge, making it an ideal make-ahead dish. Ready to discover how simple it is to create this crowd-pleasing dessert?
Ingredients
For the Brownie Layer:
1 box brownie mix (prepared according to package instructions)
1 extra-large egg (or as required by brownie mix)
For the Cream Cheese Layer:
1 (8 oz.) package cream cheese, softened
1 cup powdered sugar
1 (8 oz.) container whipped topping
For the Pudding Layer:
1 (3 oz.) package instant chocolate pudding
1 (3 oz.) package instant vanilla pudding
3 ½ cups milk
1 (8 oz.) container whipped topping
For Topping:
1 Hershey bar (grated) or chocolate syrup for drizzling
Ingredient Tips & Substitutions
- For a homemade touch, use your favorite from-scratch brownie recipe instead of a mix.
- Low-fat cream cheese can be substituted, but full-fat delivers the creamiest texture.
- Almond milk or a dairy-free alternative works well in the pudding layer if needed.
- Sugar-free pudding mixes are a great option for reducing calories.
Step-by-Step Instructions
Prepare the Brownie Base:
- Preheat the oven as directed on the brownie mix package.
- Prepare the brownie batter according to instructions, using an extra-large egg if required.
- Bake in a 9×13-inch pan and let cool completely.
Make the Cream Cheese Layer:
- In a mixing bowl, beat the softened cream cheese and powdered sugar until smooth.
- Gently fold in one container of whipped topping until fully combined.
- Spread evenly over the cooled brownies.
Prepare the Pudding Layer:
- In a separate bowl, whisk together chocolate pudding, vanilla pudding, and milk until thickened.
- Let the mixture sit for 5 minutes to set slightly.
- Spread over the cream cheese layer.
Final Layer & Garnish:
- Spread the second container of whipped topping over the pudding layer.
- Sprinkle grated Hershey’s chocolate or drizzle with chocolate syrup for an extra touch of decadence.
Chill & Serve:
- Cover and refrigerate for at least 4 hours (overnight is best for firmer slices).
- Slice into squares and serve chilled.
Nutritional Information
(Per serving, based on 12 slices)
- Calories: 320
- Protein: 5g
- Carbohydrates: 48g
- Fat: 12g
- Fiber: 1g
Preparation Time
- Prep time: 20 minutes
- Cook time: 25 minutes (for brownies)
- Total time: 4 hours 45 minutes (including chilling)
For best results, prepare this cake the night before to allow flavors to meld.
Healthier Alternatives
- Use a sugar-free brownie mix and sugar-free pudding to cut down on sweetness.
- Substitute whipped coconut cream for traditional whipped topping for a dairy-free version.
- Opt for dark chocolate shavings instead of milk chocolate for added antioxidants.
Serving Suggestions
- Pair with a cold glass of milk or a scoop of vanilla ice cream for extra indulgence.
- Garnish with fresh berries for a pop of color and freshness.
- Serve alongside a cup of coffee for a delightful dessert pairing.
Common Mistakes to Avoid
- Not letting the brownies cool completely before adding the cream cheese layer can cause melting.
- Using cold cream cheese instead of softened will result in a lumpy texture.
- Overmixing the pudding can make it too dense—whisk just until smooth.
- Skipping the chill time may lead to a messy, less structured cake.
Storage Tips
- Refrigeration: Keeps well in an airtight container for up to 4 days.
- Freezing: While possible, the texture may soften slightly upon thawing.
- Make ahead: This cake actually tastes better the next day, making it perfect for advance prep.
Conclusion
The 3-Layer Brownie Refrigerator Cake is a dessert lover’s dream—simple to assemble yet irresistibly rich. Whether you need a show-stopping dessert for a party or just want to treat yourself, this recipe delivers. With endless variations and easy prep, it’s bound to become a staple in your dessert rotation.
Have you tried this recipe? Share your experience in the comments below, or tell us about your favorite twist on this classic treat!
Frequently Asked Questions
Can I use homemade whipped cream instead of whipped topping?
Yes, but stabilize it with a bit of sugar and vanilla for best results.How can I make this cake firmer for cleaner slices?
Extend the chill time to overnight for the best texture.Is there a gluten-free version?
Substitute a gluten-free brownie mix and ensure pudding mixes are certified gluten-free.Can I use different pudding flavors?
Absolutely—try butterscotch or pistachio for a fun variation.What if I don’t have time to bake brownies?
Use store-bought brownies as a quick shortcut.Can I add fruit to this dessert?
Fresh berries or banana slices make a great addition between layers.How do I prevent the pudding layer from becoming runny?
Measure milk precisely and allow the pudding to set fully before spreading.Can this cake be made vegan?
Use dairy-free cream cheese, plant-based milk, and vegan chocolate for a fully plant-based version.
Enjoy making and indulging in this delightful 3-Layer Brownie Refrigerator Cake!
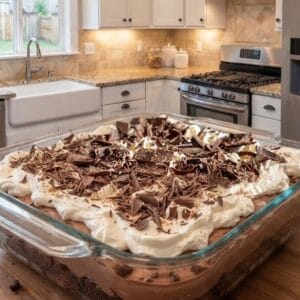
3-Layer Brownie Refrigerator Cake

Ingredients
For the Brownie Layer:
- 1 box brownie mix (prepared according to package instructions)
- 1 extra-large egg (or as required by brownie mix)
For the Cream Cheese Layer:
- 1 8 oz. package cream cheese, softened
- 1 cup powdered sugar
- 1 8 oz. container whipped topping
For the Pudding Layer:
- 1 3 oz. package instant chocolate pudding
- 1 3 oz. package instant vanilla pudding
- 3 ½ cups milk
- 1 8 oz. container whipped topping
For Topping:
- 1 Hershey bar grated or chocolate syrup for drizzling
Instructions
Prepare the Brownie Base:
- Preheat the oven as directed on the brownie mix package.
- Prepare the brownie batter according to instructions, using an extra-large egg if required.
- Bake in a 9×13-inch pan and let cool completely.
Make the Cream Cheese Layer:
- In a mixing bowl, beat the softened cream cheese and powdered sugar until smooth.
- Gently fold in one container of whipped topping until fully combined.
- Spread evenly over the cooled brownies.
Prepare the Pudding Layer:
- In a separate bowl, whisk together chocolate pudding, vanilla pudding, and milk until thickened.
- Let the mixture sit for 5 minutes to set slightly.
- Spread over the cream cheese layer.
Final Layer & Garnish:
- Spread the second container of whipped topping over the pudding layer.
- Sprinkle grated Hershey’s chocolate or drizzle with chocolate syrup for an extra touch of decadence.
Chill & Serve:
- Cover and refrigerate for at least 4 hours (overnight is best for firmer slices).
- Slice into squares and serve chilled.

