

# No-Bake Oreo Mousse Cups

## Introduction

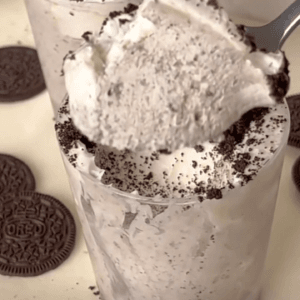
Are you craving a delicious dessert but don’t want to turn on the oven? These No-Bake Oreo Mousse Cups are the perfect solution. With layers of creamy mousse, crunchy Oreo crumbs, and a fluffy whipped topping, this dessert is as easy to make as it is irresistible. Whether you're hosting a dinner party or just treating yourself, this recipe will satisfy your sweet tooth without the hassle of baking. Let’s dive into how you can whip up these delightful treats in minutes.

## Ingredients

### Mousse Layer:
- 1 cup heavy whipping cream
- 1/2 cup powdered sugar
- 1 teaspoon vanilla extract
- 3 oz bag of Oreo cookies, crushed into fine crumbs

### Topping:
- 1 cup heavy whipping cream
- 1/2 cup powdered sugar
- 1/4 teaspoon vanilla extract
- Extra Oreo crumbs & whole Oreos for garnish

### Optional Substitutions:
- For a gluten-free version, use gluten-free chocolate sandwich cookies.
- Swap heavy cream with coconut cream for a dairy-free alternative.
- Reduce the sugar or use a sugar substitute for a lighter option.

### Ingredient Tips:
- Chill the mixing bowl and beaters before whipping the cream for better volume.
- Use a food processor for evenly fine Oreo crumbs, or place cookies in a ziplock bag and crush with a rolling pin.

## Step-by-Step Instructions

1. Crush the Oreos: Using a food processor or a ziplock bag and a rolling pin, crush the Oreos into fine crumbs. Set aside half for the mousse and reserve the rest for layering.

2. Make the Mousse: In a stand mixer or with a hand mixer, beat the heavy whipping cream, powdered sugar, and vanilla extract until soft peaks form. Gently fold in half of the crushed Oreo crumbs until well combined.

3. Assemble the Cups: Divide the remaining Oreo crumbs between two serving cups, pressing lightly to form a base. Spoon or pipe the mousse mixture over the crumbs, smoothing the top.

4. Make the Topping: Clean the mixer, then whip the second batch of heavy whipping cream with powdered sugar and vanilla extract until soft peaks form. Pipe or spoon this layer over the mousse.

5. Garnish & Enjoy: Sprinkle extra Oreo crumbs on top and add a whole Oreo for decoration. Serve immediately or refrigerate for a chilled treat.

## Nutritional Information

- Serving Size: 1 cup
- Calories: 450
- Protein: 4g
- Carbohydrates: 45g
- Fat: 28g
- Fiber: 1g

## Preparation Time

- Prep Time: 15 minutes
- Cook Time: 0 minutes
- Total Time: 15 minutes

Faster than ordering dessert at a restaurant, these No-Bake Oreo Mousse Cups are ready in just 15 minutes with no cooking required.

## Healthier Alternatives

- Swap regular Oreos for reduced-fat or sugar-free cookies.
- Use light whipped topping instead of heavy cream for fewer calories.
- Opt for a vegan cream substitute and dairy-free cookies if avoiding animal products.

## Serving Suggestions

- Serve in mini mason jars for a cute presentation.
- Pair with a cold glass of milk or a hot cup of coffee.
- Add a drizzle of chocolate syrup or caramel for extra decadence.

## Common Mistakes to Avoid

- Overbeating the cream can make it grainy. Stop mixing once soft peaks form.
- Skipping the chilling step for the mixing bowl can result in less fluffy whipped cream.
- Using large Oreo chunks instead of fine crumbs can make the texture uneven.

## Storage Tips

- Refrigerate for up to 2 days in an airtight container.
- These treats are best enjoyed fresh but can be stored in the freezer for up to a week. Thaw in the fridge before serving.
- Avoid leaving them at room temperature for extended periods, as the whipped cream may deflate.

## Conclusion

These No-Bake Oreo Mousse Cups are a dream come true for anyone who loves quick, effortless desserts. With their rich layers and delightful crunch, they’re sure to become a favorite. Give this recipe a try, and don’t forget to share your creations in the comments below. We’d love to hear how yours turned out!

## Frequently Asked Questions

1. Can I make these Oreo mousse cups ahead of time?
   Yes, you can prepare them a few hours in advance and store them in the fridge.

2. Can I use Cool Whip instead of heavy cream?
   Absolutely. Substitute whipped topping for the heavy cream if you prefer.

3. How do I prevent the whipped cream from deflating?
   Ensure your bowl and beaters are chilled, and avoid overmixing.

4. Can I make this dessert vegan?
   Yes, use dairy-free cookies and coconut cream instead of heavy cream.

5. Can I freeze these mousse cups?
   They can be frozen for up to a week. Thaw in the fridge before serving.

6. What other cookies can I use besides Oreos?
   Try vanilla sandwich cookies or chocolate graham crackers for a twist.

7. How do I pipe the whipped cream for a prettier presentation?
   Use a piping bag with a star tip for professional-looking swirls.

8. Can I add chocolate to this recipe?
   Melted chocolate folded into the mousse or drizzled on top adds extra flavor.
No-Bake Oreo Mousse Cups

Are you craving a delicious dessert but don’t want to turn on the oven? These No-Bake Oreo Mousse Cups are the perfect solution. With layers of creamy mousse, crunchy Oreo crumbs, and a fluffy whipped topping, this dessert is as easy to make as it is irresistible.
Ingredients
Mousse Layer
- 1 cup heavy whipping cream
- 1/2 cup powdered sugar
- 1 teaspoon vanilla extract
- 3 oz bag Oreo cookies, crushed into fine crumbs
Topping
- 1 cup heavy whipping cream
- 1/2 cup powdered sugar
- 1/4 teaspoon vanilla extract
- Extra Oreo crumbs & whole Oreos for garnish
Instructions
- Crush the Oreos: Using a food processor or a ziplock bag and a rolling pin, crush the Oreos into fine crumbs. Set aside half for the mousse and reserve the rest for layering.
- Make the Mousse: In a stand mixer or with a hand mixer, beat the heavy whipping cream, powdered sugar, and vanilla extract until soft peaks form. Gently fold in half of the crushed Oreo crumbs until well combined.
- Assemble the Cups: Divide the remaining Oreo crumbs between two serving cups, pressing lightly to form a base. Spoon or pipe the mousse mixture over the crumbs, smoothing the top.
- Make the Topping: Clean the mixer, then whip the second batch of heavy whipping cream with powdered sugar and vanilla extract until soft peaks form. Pipe or spoon this layer over the mousse.
- Garnish & Enjoy: Sprinkle extra Oreo crumbs on top and add a whole Oreo for decoration. Serve immediately or refrigerate for a chilled treat.
Notes
Storage Tips:
- Refrigerate for up to 2 days in an airtight container.
- These treats are best enjoyed fresh but can be stored in the freezer for up to a week. Thaw in the fridge before serving.
- Avoid leaving them at room temperature for extended periods, as the whipped cream may deflate.
- Refrigerate for up to 2 days in an airtight container.
- These treats are best enjoyed fresh but can be stored in the freezer for up to a week. Thaw in the fridge before serving.
- Avoid leaving them at room temperature for extended periods, as the whipped cream may deflate.

