

No-Bake Bounty Bar Cake
Introduction
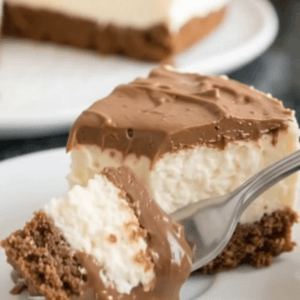
What if you could enjoy the coconut and chocolate magic of a Bounty bar without ever switching on your oven? This No-Bake Bounty Bar Cake makes that dream completely possible. It has a buttery chocolate biscuit base, a thick and chewy coconut filling, and a glossy chocolate topping that cracks softly when you slice it. The dessert feels impressive, but the process is wonderfully simple. You do not need baking skills, special equipment, or a long list of complicated steps. The fridge does most of the work. If you love coconut chocolate treats and easy chilled desserts, this recipe belongs in your collection. It is ideal for warm days, last-minute gatherings, and whenever a serious chocolate craving hits. Best of all, the No-Bake Bounty Bar Cake uses everyday ingredients that are easy to find.
Why You Will Love This No-Bake Bounty Bar Cake
This dessert is a coconut lover’s dream. The filling is dense, sweet, and packed with shredded coconut, while the chocolate layers balance the richness. Because there is no oven involved, the kitchen stays cool and the recipe stays forgiving. You can make it ahead of time and keep it in the fridge until you are ready to serve. The texture is a beautiful contrast between the crisp base, the chewy coconut center, and the firm chocolate top. It also slices cleanly once fully chilled. If you are looking for a no-bake coconut chocolate cake that looks like it came from a patisserie but tastes like a childhood candy bar, this is it.
Ingredients for No-Bake Bounty Bar Cake
Chocolate Biscuit Base
- 2 cups chocolate biscuits or chocolate cookies, crushed (about 200 g)
- 2/3 cup unsalted butter, melted (150 g)
Coconut Filling
- 2 1/2 cups unsweetened shredded coconut (200 g)
- 1 can sweetened condensed milk, 14 oz (397 g)
Chocolate Topping
- 7 oz milk or semi-sweet chocolate (200 g)
- 1 tbsp vegetable or coconut oil
Ingredient tips: Use crisp chocolate biscuits for the best base. Digestive biscuits with a cocoa flavor or chocolate wafers both work well. If you use salted butter, reduce any extra salt. Unsweetened shredded coconut is recommended because the condensed milk already adds plenty of sweetness. If you only have sweetened shredded coconut, the filling may become too sugary. For the topping, choose a chocolate you enjoy eating on its own. Semi-sweet chocolate gives a darker contrast, while milk chocolate creates a sweeter finish.
Step-by-Step Instructions for No-Bake Bounty Bar Cake
Crush the chocolate biscuits into fine crumbs. You can use a food processor or place the biscuits in a sealed bag and crush them with a rolling pin. The crumbs should be even and sandy.
Mix the crumbs with the melted butter until every crumb is evenly coated. The mixture should look like wet sand and hold together when squeezed.
Press the mixture firmly into the bottom of an 8-inch round cake ring or springform pan. Use the back of a spoon or the bottom of a flat glass to compact it tightly. Chill for 15 to 20 minutes.
Prepare the coconut layer by mixing the shredded coconut with the sweetened condensed milk. Stir until the mixture becomes thick and sticky. It should clump together easily.
Spread the coconut mixture evenly over the chilled biscuit base. Press it down gently with a spatula or your fingertips. Take care not to press so hard that the base cracks.
Refrigerate the cake for about 30 minutes so the layers become firm. The coconut filling should feel set before the chocolate goes on top.
Melt the chocolate for the topping in a heatproof bowl. You can melt it in the microwave in short bursts or over a pot of gently simmering water. Add the oil and stir until the chocolate is smooth and glossy.
Carefully remove the cake ring or the sides of the springform pan. If the cake feels too soft, chill it for another 10 minutes before unmolding.
Pour the melted chocolate over the coconut layer. Spread it evenly with a spoon and let it drip slightly down the sides if you like. Create soft swirls on top while the chocolate is still warm.
Refrigerate for 1 to 2 hours, or until the chocolate and coconut layers are completely firm.
Pro tip: For the cleanest slices, run a sharp knife under hot water and wipe it dry between cuts. This prevents the chocolate from cracking too much.
Nutritional Information
The values below are approximate and based on 12 servings.
- Calories: 480 per serving
- Protein: 6 g
- Carbohydrates: 50 g
- Fat: 30 g
- Fiber: 4 g
- Serving size: 1 slice
This is a rich dessert, so a small slice goes a long way. The combination of butter, coconut, condensed milk, and chocolate makes it indulgent and satisfying. You can adjust the slicing size to make smaller portions if you prefer a lighter treat.
Preparation Time
- Prep time: 30 minutes
- Chill time: 2 hours
- Cook time: 0 minutes
- Total time: 2 hours 30 minutes
Compared to many layered cakes, this recipe is quick. Most of the total time is hands-off chilling. It is a great option when you need a make-ahead dessert. You can prepare it in the morning and serve it after dinner, or make it a day ahead. The flavor and texture often improve after an overnight rest in the fridge.
Healthier Alternatives for No-Bake Bounty Bar Cake
There are several easy swaps if you want a lighter or more diet-friendly version. Use reduced-fat sweetened condensed milk to lower the calories. Choose dark chocolate with at least 70 percent cocoa for less sugar and a more intense flavor. You can also replace half of the butter in the base with coconut oil, though the texture may change slightly.
For a gluten-free version, use certified gluten-free chocolate cookies. The coconut filling is naturally gluten-free, but always check the condensed milk label. For a dairy-free or vegan option, use vegan condensed milk, dairy-free butter, and vegan chocolate. Unsweetened shredded coconut keeps the sugar content lower than sweetened varieties. You can also reduce the amount of chocolate topping slightly or use a thinner layer to cut richness.
Serving Suggestions
Serve this No-Bake Bounty Bar Cake chilled straight from the fridge. A simple dusting of cocoa powder or a few coconut flakes on top adds a pretty finish. You can also serve each slice with fresh raspberries, strawberries, or a spoonful of whipped coconut cream to brighten the richness.
For drinks, strong espresso or dark roast coffee pairs beautifully with the chocolate and coconut flavors. Black tea, especially Earl Grey, also works well. If you want a more dessert-like experience, serve it with a small glass of cold milk or a coconut latte. For parties, cut the cake into small squares and serve them as bite-sized treats. They hold their shape well and are easy to eat with your hands.
Common Mistakes to Avoid When Making No-Bake Bounty Bar Cake
One common mistake is not pressing the biscuit base firmly enough. A loose base will crumble when you slice the cake. Use a flat-bottomed glass to compact the crumbs evenly.
Another issue is using sweetened shredded coconut by accident. The condensed milk is already very sweet, so sweetened coconut can make the filling cloying. Unsweetened coconut gives the best balance.
Rushing the chilling process is another problem. If the coconut layer is too soft when you pour the chocolate, the layers can mix or sag. Give the cake enough time to firm up between steps.
Overheating the chocolate can make it grainy and dull. Melt it gently and remove it from the heat as soon as it is smooth. Adding oil helps create a glossy finish, but too much oil can prevent the topping from setting firmly.
Finally, do not slice the cake too early. The chocolate needs time to set completely. If you cut it while warm or soft, the layers may slide and the slices will look messy.
Storage Tips
Refrigerate the cake in an airtight container for up to 5 days. The base will soften slightly over time, but the flavor stays excellent. If you do not have an airtight container, cover the cake loosely with plastic wrap or foil. Be careful not to press the wrap directly onto the chocolate swirls.
You can freeze this No-Bake Bounty Bar Cake for up to 3 months. Slice it first and place pieces of parchment paper between the slices. Freeze them in a single layer until solid, then transfer to a freezer bag or container. To serve, thaw the slices in the refrigerator for a few hours or overnight. Do not microwave or reheat the cake, as the chocolate and coconut layers are best enjoyed chilled or at cool room temperature.
Conclusion
This No-Bake Bounty Bar Cake brings together everything people love about the classic coconut chocolate candy bar, but in a homemade chilled dessert. The buttery chocolate base, the thick coconut layer, and the smooth chocolate topping create a truly satisfying treat. It requires no oven, comes together quickly, and can be made ahead for any occasion. Whether you serve it at a summer dinner, a holiday table, or just as a weekend project, it is sure to impress. I hope you try this recipe and make it your own. Leave a comment below and share how your cake turned out. I would love to hear about your favorite toppings, swaps, or serving ideas.
Frequently Asked Questions
Can I use desiccated coconut instead of shredded coconut?
Yes. Desiccated coconut is finer and drier than shredded coconut. It will create a slightly denser filling. The texture will still be delicious, but you may need to mix it a little longer to combine fully with the condensed milk.
Can I make this recipe in a square pan?
Yes. An 8-inch square pan works well. The layers will be slightly thinner, but the recipe holds up. Line the pan with parchment paper so you can lift the cake out easily.
How do I prevent the chocolate topping from cracking when I slice?
Let the cake sit at room temperature for about 10 minutes before slicing. Use a hot, dry knife and wipe it clean between cuts. This softens the chocolate just enough to create neat slices.
Can I use white chocolate for the topping?
Yes. White chocolate creates a sweeter, creamier finish. Use the same amount and melt it gently. The cake will look different but taste just as good. Coconut lovers may enjoy the double coconut effect.
Is this recipe suitable for kids?
Yes. It is a fun no-bake recipe to make with children. They can help crush the biscuits, mix the coconut filling, and spread the chocolate. Adult supervision is only needed when melting the butter and chocolate.
Can I reduce the sweetness?
You can use semi-sweet or dark chocolate instead of milk chocolate. You can also choose a lower-sugar condensed milk if available. These small changes help balance the sweetness without changing the structure of the cake.
How long does the cake need to chill before serving?
The minimum chilling time is about 2 hours total. For the best texture and cleanest slices, refrigerate for at least 4 hours or overnight. The extra time helps the layers set firmly and the flavors meld together.
No-Bake Bounty Bar Cake

Ingredients
Chocolate Biscuit Base
- 2 cups chocolate biscuits or chocolate cookies, crushed about 200 g
- 2/3 cup unsalted butter, melted 150 g
Coconut Filling
- 2 1/2 cups unsweetened shredded coconut 200 g
- 1 can sweetened condensed milk 14 oz (397 g)
Chocolate Topping
- 7 oz milk or semi-sweet chocolate 200 g
- 1 tbsp vegetable or coconut oil
Instructions
Step-by-Step Instructions
- Crush the chocolate biscuits into fine crumbs. You can use a food processor or place the biscuits in a sealed bag and crush them with a rolling pin. The crumbs should be even and sandy.
- Mix the crumbs with the melted butter until every crumb is evenly coated. The mixture should look like wet sand and hold together when squeezed.
- Press the mixture firmly into the bottom of an 8-inch round cake ring or springform pan. Use the back of a spoon or the bottom of a flat glass to compact it tightly. Chill for 15 to 20 minutes.
- Prepare the coconut layer by mixing the shredded coconut with the sweetened condensed milk. Stir until the mixture becomes thick and sticky. It should clump together easily.
- Spread the coconut mixture evenly over the chilled biscuit base. Press it down gently with a spatula or your fingertips. Take care not to press so hard that the base cracks.
- Refrigerate the cake for about 30 minutes so the layers become firm. The coconut filling should feel set before the chocolate goes on top.
- Melt the chocolate for the topping in a heatproof bowl. You can melt it in the microwave in short bursts or over a pot of gently simmering water. Add the oil and stir until the chocolate is smooth and glossy.
- Carefully remove the cake ring or the sides of the springform pan. If the cake feels too soft, chill it for another 10 minutes before unmolding.
- Pour the melted chocolate over the coconut layer. Spread it evenly with a spoon and let it drip slightly down the sides if you like. Create soft swirls on top while the chocolate is still warm.
- Refrigerate for 1 to 2 hours, or until the chocolate and coconut layers are completely firm.

