

Nutter Butter Ice Box Cake Recipe
Introduction
Is there anything more nostalgic than biting into a Nutter Butter cookie? Now imagine those iconic peanut butter treats transformed into a luscious, no-bake dessert that requires minimal effort. This Nutter Butter Ice Box Cake Recipe is the perfect solution for peanut butter lovers who crave a simple yet impressive dessert.
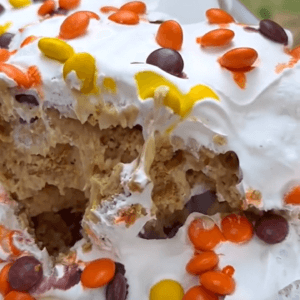
With layers of creamy peanut butter pudding, soft Nutter Butter cookies, and fluffy Cool Whip, this icebox cake is a crowd-pleaser. Best of all, it requires no oven time—just a few hours in the fridge to set. Whether you're hosting a party or simply indulging in a sweet treat, this recipe delivers big flavors with little work.
Ingredients
For this Nutter Butter Ice Box Cake Recipe, you'll need the following:
- 2 boxes Nutter Butter cookies
- 1 ¾ cups milk
- 3.4 ounces vanilla instant pudding mix
- ½ cup smooth peanut butter
- 8 ounces Cool Whip
- ½ cup Reese's Pieces
Optional Substitutions:
- Replace vanilla pudding with chocolate or butterscotch pudding for a different flavor.
- Use almond or cashew butter instead of peanut butter if preferred.
- Swap Reese's Pieces with chopped peanuts or mini chocolate chips.
Ingredient Tips:
- For a richer taste, use whole milk.
- Ensure the peanut butter is well-stirred before measuring.
- Thaw Cool Whip completely before mixing for a smoother texture.
Step-by-Step Instructions
Follow these easy steps to make your Nutter Butter Ice Box Cake:
In a large bowl, combine the vanilla instant pudding mix with 1 ¼ cups of milk using a hand mixer. Let the mixture firm up for about five minutes.
Gently stir in the peanut butter and half of the Cool Whip until everything is evenly combined.
Pour the remaining milk into a separate cup. Briefly dunk each Nutter Butter cookie into the milk for 1-2 seconds—just enough to soften them slightly.
Arrange the milk-dunked cookies in a single layer at the bottom of an 8”x 8” serving dish.
Spread half of the peanut butter mixture over the cookie layer, smoothing it evenly.
Add another layer of milk-dunked cookies on top of the peanut butter mixture.
Spread the remaining peanut butter mixture over the second cookie layer.
Finish with a final layer of milk-dunked Nutter Butter cookies.
Top with the rest of the Cool Whip, spreading it evenly.
Sprinkle Reese’s Pieces on top for a crunchy texture and vibrant color.
Refrigerate for at least two hours before serving. The longer it chills, the softer the cookies become.
Nutritional Information
Serving Size: 1 slice (based on 9 servings)
- Calories: 380
- Protein: 7g
- Carbohydrates: 48g
- Fat: 18g
- Fiber: 2g
While this dessert is indulgent, you can reduce calories by using sugar-free pudding and light Cool Whip.
Preparation Time
- Prep Time: 15 minutes
- Chill Time: 2 hours
- Total Time: 2 hours 15 minutes
No-bake desserts like this Nutter Butter Ice Box Cake are ideal for busy schedules. The hands-on time is minimal, and the fridge does the rest of the work.
Healthier Alternatives
For those looking for lighter or allergy-friendly options, consider these swaps:
- Use almond milk or coconut milk instead of dairy milk.
- Choose a dairy-free whipped topping instead of Cool Whip.
- Opt for gluten-free peanut butter sandwich cookies if needed.
- Substitute sugar-free pudding and natural peanut butter for a lower-sugar version.
Serving Suggestions
This dessert pairs beautifully with:
- A cold glass of milk or iced coffee.
- Fresh berries for a fruity contrast.
- A scoop of vanilla ice cream for an extra-decadent treat.
For a party, cut the cake into small squares and serve as bite-sized desserts.
Common Mistakes to Avoid
Over-soaking the cookies: Dunking them too long can cause the cake to become mushy. A quick dip is all you need.
Skipping the chill time: The cake needs time to set properly. Serve it too soon, and it won’t slice neatly.
Uneven layering: Spread each peanut butter layer smoothly for the best texture.
Using frozen Cool Whip: Thaw it completely so it blends easily with the pudding.
Storage Tips
- Refrigeration: Store covered in the fridge for up to 3 days.
- Freezing: While possible, the texture may change. If freezing, wrap tightly and thaw in the fridge before serving.
- Avoid reheating: This dessert is meant to be served cold.
Conclusion
This Nutter Butter Ice Box Cake Recipe is a dream come true for peanut butter enthusiasts. It’s effortless to make, looks delightful, and tastes even better. Whether you're sharing it with family or keeping it all to yourself, it's guaranteed to be a hit.
Have you tried this recipe? Share your experience in the comments below!
Frequently Asked Questions
Can I use homemade whipped cream instead of Cool Whip?
Yes, but the texture might be lighter. Stabilized whipped cream works best.How long can I keep this dessert in the fridge?
It stays fresh for up to 3 days when properly stored.Can I make this cake in advance?
Absolutely! It actually tastes better after chilling overnight.What other cookies can I use instead of Nutter Butter?
Try Oreos or graham crackers for a different variation.Is this recipe freezer-friendly?
Yes, but the texture may soften slightly upon thawing.Can I add banana slices between the layers?
Yes, just be mindful of extra moisture from the fruit.How do I prevent the cake from sticking to the dish?
Lightly grease the dish or line it with parchment paper.Can I use crunchy peanut butter instead of smooth?
Yes, but smooth peanut butter gives a creamier consistency.
Enjoy making and savoring every bite of this delightful Nutter Butter Ice Box Cake Recipe!
Nutter Butter Ice Box Cake Recipe

Ingredients
- 2 boxes Nutter Butter cookies
- 1 ¾ cups milk For a richer taste, use whole milk.
- 3.4 ounces vanilla instant pudding mix Can be replaced with chocolate or butterscotch pudding for a different flavor.
- ½ cup smooth peanut butter Ensure the peanut butter is well-stirred before measuring. Can use almond or cashew butter instead.
- 8 ounces Cool Whip Thaw completely before mixing for a smoother texture.
- ½ cup Reese's Pieces Can be swapped with chopped peanuts or mini chocolate chips.
Instructions
- In a large bowl, combine the vanilla instant pudding mix with 1 ¼ cups of milk using a hand mixer. Let the mixture firm up for about five minutes.
- Gently stir in the peanut butter and half of the Cool Whip until everything is evenly combined.
- Pour the remaining milk into a separate cup. Briefly dunk each Nutter Butter cookie into the milk for 1-2 seconds—just enough to soften them slightly.
- Arrange the milk-dunked cookies in a single layer at the bottom of an 8”x 8” serving dish.
- Spread half of the peanut butter mixture over the cookie layer, smoothing it evenly.
- Add another layer of milk-dunked cookies on top of the peanut butter mixture.
- Spread the remaining peanut butter mixture over the second cookie layer.
- Finish with a final layer of milk-dunked Nutter Butter cookies.
- Top with the rest of the Cool Whip, spreading it evenly.
- Sprinkle Reese’s Pieces on top for a crunchy texture and vibrant color.
- Refrigerate for at least two hours before serving. The longer it chills, the softer the cookies become.

