

Triple-Layer Chocolate Ganache Fudge Cake
Introduction
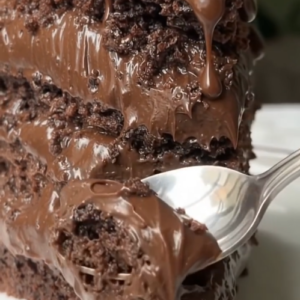
Have you ever sliced into a cake and watched the layers hold their shape while a river of chocolate ganache slowly oozes between each one? That is the magic of a Triple-Layer Chocolate Ganache Fudge Cake. This is not a light, airy sponge designed to disappear under a scoop of ice cream. It is dense, fudgy, and deeply indulgent. The crumb is nearly black with cocoa, the center stays gooey, and the top gleams like a polished mirror.
This recipe breaks the usual three-layer rule by taking two baked cakes and splitting them into four thinner layers. Each layer gets a generous spread of warm ganache before the whole creation is smothered in a glossy sheet of the same mixture. The result is a baker’s dream: tall, dramatic, and shockingly simple to assemble. If you have ever wanted a bakery-worthy dessert without fondant, piping bags, or hours of stacking, this is your new go-to.
Ingredients
For the Chocolate Cake
- 2 cups all-purpose flour, spooned and leveled
- 2 cups granulated sugar
- 3/4 cup Dutch-process cocoa powder
- 2 teaspoons baking soda
- 1 teaspoon baking powder
- 1 teaspoon salt
- 1 cup buttermilk, room temperature
- 1/2 cup vegetable oil
- 2 large eggs, room temperature
- 1 tablespoon vanilla extract
- 1 cup hot coffee
For the Ganache
- 24 ounces semi-sweet chocolate, finely chopped, about 4 cups
- 2 cups heavy cream
- 4 tablespoons unsalted butter
- Pinch of salt
A note on ingredients: Dutch-process cocoa powder strips away the acid, leaving a darker, smoother chocolate taste. You can use regular unsweetened cocoa in a pinch, but the color will be lighter and the crumb slightly less tender. The hot coffee amplifies the chocolate without making the cake taste like a morning brew. Buttermilk adds tang and softness while reacting with the soda for rise, so do not swap it for plain milk unless you add a teaspoon of vinegar.
Step-by-Step Instructions
Heat the oven to 350°F. Grease two 8-inch round cake pans and line the bottoms with parchment paper. Grease the parchment too, because this cake loves to stick.
In a large bowl, whisk together the flour, sugar, cocoa powder, baking soda, baking powder, and salt. Take your time breaking up cocoa clumps. A sifter is not required, but if your cocoa powder is lumpy, sift it.
In a separate bowl, whisk the buttermilk, vegetable oil, eggs, and vanilla until smooth. The oil keeps the cake tender and will prevent it from hardening in the fridge.
Pour the wet ingredients into the dry ingredients and stir just until almost combined. Do not use a mixer. A hand whisk is enough.
Add the hot coffee and stir gently. The batter will be thin, almost like a slightly thickened chocolate sauce. That is exactly what you want. Do not panic. The thin batter creates a moist crumb and an elegant flat top.
Divide the batter evenly between the two prepared pans. Tap each pan on the counter twice to release large air bubbles.
Bake for 32 to 35 minutes. The top should spring back gently when touched, and a toothpick inserted into the center should have a few moist crumbs. Do not over-bake. A slightly underbaked center means a fudgier final slice.
Cool the cakes in their pans for 15 minutes. Run a thin knife around the edges and invert onto a wire rack. Let them cool completely, at least 1 hour, before slicing. Warm cakes will melt the ganache and collapse the layers.
Make the ganache while the cakes cool. Place the chopped chocolate, butter, and salt in a heatproof bowl. Heat the heavy cream in a saucepan over on medium emergent heat until small bubbles form at the edges. Do not let it boil over.
Pour the hot cream over the chocolate and butter. Let it sit without stirring for 2 minutes. Then whisk from the center outward until the mixture becomes dark, shiny, and utterly smooth. The ganache will look glossy, not grainy. If you see unmelted chocolate pieces, gently warm the bowl over a double boiler.
Cool the ganache for about 20 minutes. It should thicken enough to spread but still flow slowly from a spoon. If it is too hot, it will slide off the cake. If it becomes too cool, warm it gently in a pan with a touch of gentle heat.
Level each cooled cake with a long serrated knife if the domes are tall. Then slice each cake in half horizontally, giving you four cake layers total.
Place one layer on a serving plate or cake board. Spread about 3/4 cup of warm ganache over the top, pushing it slightly toward the edge so it oozes over. Do not make it neat. The more casual, the more beautiful it looks.
Repeat with the remaining layers, stacking straight and gently pressing on each new layer so the ganache spreads evenly. Do not press hard enough to squish the cake.
Pour the remaining ganache over the top. Let it run down the sides in thick waves. Be gentle as you spoon it over the edge. If you try to perfect the sides with a spatula, you will lose the dripping effect. Let gravity do the work.
Refrigerate the cake for 30 minutes. This sets the ganache and holds the shape. Then remove it and let it sit at room temperature for 20 minutes before slicing. A room temperature cake cuts smoothly and the middle stays gooey.
Nutritional Information
This cake is a celebration, not a healthy snack. Serving size is one big chunky slice, about one twelfth of the cake. Keep in mind that the numbers vary depending on the exact chocolate brand and how thick you spread the ganache.
- Calories: 607 per serving
- Protein: 7 grams
- Carbohydrates: 68 grams
- Fat: 36 grams
- Saturated fat: 19 grams
- Fiber: 5 grams
- Sugar: 48 grams
- Sodium: 320 milligrams
- Serving size: 1 slice
Preparation Time
This cake is a project, not a quick weeknight treat. The active work is relatively short, but the assembly and cooling time add up. Here is the breakdown:
- Prep time: 35 minutes
- Cook time: 35 minutes
- Cooling time: 90 minutes
- Assembly time: 20 minutes
- Chill time: 30 minutes
- Total time: close to 3 hours, considering rest periods and room temperature
If you need a faster route, bake the cake layers a day ahead, wrap them in cling film, and make the ganache on the day you plan to serve. It turns a 3-hour kitchen marathon into an easy 45 minute finish.
Healthier Alternatives
Yes, you can trim the calories without losing the soul of the dessert. One simple swap is to use dark chocolate with 70% cocoa or higher in the ganache. It cuts some sweetness and wants to use less. Then use a lower amount for the center layers and pour only a thin glaze over the top with the milk.
For a lower-fat crumb, replace half of the oil with unsweetened store-bought applesauce. The texture stays moist but less rich. For a reduced whole sugar, you can use 1 cup of white sugar plus 1 cup of granulated monk fruit sweetener that works 1-to-1.
If you need a gluten-free this cake, use a good brand of 1-to-1 gluten-free flour blend in the same amount. Do not use coconut flour or almond flour, which become heavy and dry. For dairy-free, use full-fat canned coconut milk in place of the cream and use vegan butter. For eggs, use flax eggs with 2 tablespoons ground flax in 6 tablespoons water and let it stand for 10 minutes. A vegan version will make sure the ganache still sets because the chocolate does most of the work.
Serving Suggestions
This cake needs little else, but a few thought about add-ons can make it shine. Dust a little flaky sea salt over each slice just before serving. The salt hits the top of the mirror and wakes up the chocolate. A few fresh raspberries on the side add a bright, sharp contrast to the fudge. If you want to be indulgent, serve with a scoop of vanilla bean ice cream and a few candied nuts.
For a party, place the whole cake on a stand in the middle of the table and let people cut their own generous slices. It is a centerpiece that causes quiet. For drinks, strong black coffee or espresso balances the richness with bitter notes. For an after-dinner treat, serve with small glasses of port or stout beer. The dark caramel and roast notes match beautifully with the Dutch cocoa.
Common Mistakes to Avoid
Do not open the oven too early. The center will fall if you open the door before 27 minutes. The cake has a lot of moisture from the buttermilk and coffee, so the structure needs time. Use a toothpick near the end, not at the start.
Do not mix the cake batter for more than a minute after the dry ingredients. Overmixing makes the layers tough and as in cupcake, like biting a sponge. Stir until there no dry streaks, then stop. The dough will look turned. That is okay.
Do not make the ganache with cold cream. Cold cream does not melt the chocolate and will turn into a scenario. Use barely simmering cream and cover the bowl with plastic wrap for two minutes. This traps the heat and melts the chocolate evenly.
Do not slice the cake layers while warm. It will crumble and drag. The layers must be at room temperature or slightly cool. A chilled cake slices even more cleanly, but the ganache also spreads easier on warm cakes, so make sure the layers are not cold. Room temperature is the sweet spot.
Do not smooth the sides with a palette. This dessert is about the drip. If you smooth the sides, the cake looks too neat and loses the glossy flow. Be bold. Let the ganache fair.
Storage Tips
Refrigerator: Store the cake in an airtight container in the fridge for up to 5 days. The middle will set and stay slightly gooey, not hard. Bring the slice to room temperature for 15 minutes before you eat it. This brings back the shiny glaze and the soft texture.
Freezing: This whole cake freezes nicely up to 2 months. First, refrigerate it until the ganache is firm. Then wrap the cake or individual slices in plastic wrap, then foil. Thaw slices in the refrigerator overnight. Do not thaw at room temperature, as condensation will make the ganache sweat and lose its shiny finish.
Reheating: A gentle 10 to 15 second in the microwave brings the ganache back to a soft flow. But do it slowly. The center will soften and the chocolate will turn into a hot fudge pulse. Only reheat the slice you plan to eat, then pour your coffee and enjoy.
Conclusion
A Triple-Layer Chocolate Ganache Fudge Cake is more than a dessert. It is a statement. The deep cocoa cake, the saturated centers, and the drip of ganache that never quite stops moving. It tastes like the inside of a chocolate truffle and outs like a bakery showpiece. Best of all, you do not need a piping bag or any professional tools. A knife, a bowl, and a strong whisk are enough.
Follow the steps, let gravity do the dripping, and do not be scared of the cool. This cake rewards patience with tall slices that look like a magazine spread and eat like a rich chocolate fudge bar. When you make it, leave a comment below and tell how many slices disappeared in the first night. I would love to hear about your ganache pour and any tips you discovered to make it even easier.
Frequently Asked Questions
Can I use milk chocolate instead of semi-sweet in the ganache?
You can, but the ganache will be sweeter and softer. Milk chocolate has more sugar and less cocoa, so the coating may not set as firmly. Use a ratio like 28 ounces of milk chocolate for the same amount of cream, or replace one cup of the cream with heavy cream that is slightly warm from the room. For a darker, less sweet cake, semisweet or bitter chocolate works best.
How do I slice the cake layers evenly without cracking?
Use a long serrated bread knife and a gently sawing motion, not pressing down. Place the cake on a turntable if you have one. Mark the middle of the cake with toothpicks all the way around, then slice through with the knife lying flat and parallel to the counter. Rotate the cake as you cut. If the layers are still sticky, refrigerate for 20 minutes before slicing.
Why is my ganache not shiny?
Ganache becomes shiny when the cream is just hot enough to melt the chocolate and the mixture is not whipping too much air into it. If your ganache looks dull, it may be because the chocolate was old or the cream boiled. Overstirring also introduced air. Next time, stir slowly in a tight circle, let the cream sit on the chocolate longer, and don't boil the cream past the first bubbles at the edges.
Can I make this cake without a stand mixer?
That is actually the preferred way. This cake has oil, not butter, so it does not need creaming. A good bowl and a strong whisk are all you need. The key is to stir the wet into the dry just until no flour shows. A mixer can overmix and create a tight crumb. Use elbow grease and you'll get a better result.
Why do I need hot coffee if I don’t like coffee?
You will not taste coffee in the final cake. The hot coffee dissolves the cocoa powder and wakes up the chocolate flavor. The animal also heats the liquids, which helps the leavening in the center. If you truly want to avoid coffee, use hot water heated to the same temperature. The cake will still be delicious, though the depth in the crumb won’t be as deep.
How can I get clean cake slices for photos?
Use a long, sharp knife. Run the knife under hot water, wipe it dry, then make one cut directly downward without sawing. Pull the knife up and away. Wipe the knife after each slice. The heat from the blade makes a tidy cut, and the ganache won’t drag. Let the cake sit at room temperature for about 30 minutes to make the slice easier, not hot.
Can I make this cake ahead of time for a party?
You can make it up to two days in advance. Store it in the fridge in an airtight cake, then remove the container. Let it sit on the kitchen counter for 40 minutes before serving. This lets the ganache soften and sides gloss. Do not wait to make it the same morning, because the layers get a chance to settle and the flavor notices in a good way.
Triple-Layer Chocolate Ganache Fudge Cake

Ingredients
For the Chocolate Cake
- 2 cups all-purpose flour spooned and leveled
- 2 cups granulated sugar
- 3/4 cup Dutch-process cocoa powder
- 2 teaspoons baking soda
- 1 teaspoon baking powder
- 1 teaspoon salt
- 1 cup buttermilk room temperature
- 1/2 cup vegetable oil
- 2 large eggs room temperature
- 1 tablespoon vanilla extract
- 1 cup hot coffee
For the Ganache
- 24 ounces semi-sweet chocolate finely chopped, about 4 cups
- 2 cups heavy cream
- 4 tablespoons unsalted butter
- Pinch salt
Instructions
Step-by-Step Instructions
- Heat the oven to 350°F. Grease two 8-inch round cake pans and line the bottoms with parchment paper. Grease the parchment too, because this cake loves to stick.
- In a large bowl, whisk together the flour, sugar, cocoa powder, baking soda, baking powder, and salt. Take your time breaking up cocoa clumps. A sifter is not required, but if your cocoa powder is lumpy, sift it.
- In a separate bowl, whisk the buttermilk, vegetable oil, eggs, and vanilla until smooth. The oil keeps the cake tender and will prevent it from hardening in the fridge.
- Pour the wet ingredients into the dry ingredients and stir just until almost combined. Do not use a mixer. A hand whisk is enough.
- Add the hot coffee and stir gently. The batter will be thin, almost like a slightly thickened chocolate sauce. That is exactly what you want. Do not panic. The thin batter creates a moist crumb and an elegant flat top.
- Divide the batter evenly between the two prepared pans. Tap each pan on the counter twice to release large air bubbles.
- Bake for 32 to 35 minutes. The top should spring back gently when touched, and a toothpick inserted into the center should have a few moist crumbs. Do not over-bake. A slightly underbaked center means a fudgier final slice.
- Cool the cakes in their pans for 15 minutes. Run a thin knife around the edges and invert onto a wire rack. Let them cool completely, at least 1 hour, before slicing. Warm cakes will melt the ganache and collapse the layers.
- Make the ganache while the cakes cool. Place the chopped chocolate, butter, and salt in a heatproof bowl. Heat the heavy cream in a saucepan over on medium emergent heat until small bubbles form at the edges. Do not let it boil over.
- Pour the hot cream over the chocolate and butter. Let it sit without stirring for 2 minutes. Then whisk from the center outward until the mixture becomes dark, shiny, and utterly smooth. The ganache will look glossy, not grainy. If you see unmelted chocolate pieces, gently warm the bowl over a double boiler.
- Cool the ganache for about 20 minutes. It should thicken enough to spread but still flow slowly from a spoon. If it is too hot, it will slide off the cake. If it becomes too cool, warm it gently in a pan with a touch of gentle heat.
- Level each cooled cake with a long serrated knife if the domes are tall. Then slice each cake in half horizontally, giving you four cake layers total.
- Place one layer on a serving plate or cake board. Spread about 3/4 cup of warm ganache over the top, pushing it slightly toward the edge so it oozes over. Do not make it neat. The more casual, the more beautiful it looks.
- Repeat with the remaining layers, stacking straight and gently pressing on each new layer so the ganache spreads evenly. Do not press hard enough to squish the cake.
- Pour the remaining ganache over the top. Let it run down the sides in thick waves. Be gentle as you spoon it over the edge. If you try to perfect the sides with a spatula, you will lose the dripping effect. Let gravity do the work.
- Refrigerate the cake for 30 minutes. This sets the ganache and holds the shape. Then remove it and let it sit at room temperature for 20 minutes before slicing. A room temperature cake cuts smoothly and the middle stays gooey.

