
Introduction
There are certain desserts that earn a permanent place in your recipe rotation after the very first time you make them. These no-bake Oreo cheesecake bars are exactly that kind of recipe. They are rich without being heavy, creamy without being complicated, and assembled in minutes with ingredients that are easy to find and even easier to love.
The foundation is a firmly pressed crust made from crushed Oreo cookies and melted butter — deeply chocolatey, slightly crunchy, and the perfect contrast to what comes next. The filling is a light yet indulgent no-bake cheesecake made from smooth cream cheese and freshly whipped cream, folded together and loaded with chunks of chopped Oreos that add texture and that unmistakable cookies-and-cream flavor in every single bite. On top, a silky milk chocolate ganache drizzled generously over the surface, finished with whole and halved Oreo cookies for a presentation that looks far more effortful than it actually is.
No oven. No water bath. No springform pan. Just one square pan, a handful of simple ingredients, and a few hours of chilling time standing between you and one of the best desserts you will ever serve.
Prep and Serving Details
- Prep Time: 25 minutes
- Chill Time: 4 to 6 hours (overnight recommended)
- Total Time: Approximately 5 to 7 hours
- Servings: 9 to 12 bars
- Difficulty: Easy
- Method: No-Bake
- Pan Size: 8×8 inch square pan
Ingredients
For the Oreo Crust
- 18 Oreo cookies, cream filling removed
- 4 tablespoons unsalted butter, melted
For the Cheesecake Filling
- 300 g (approximately 10½ oz) cream cheese, softened to room temperature
- 70 g (⅓ cup) granulated sugar
- 150 g (⅔ cup) heavy whipping cream
- 10 Oreo cookies, roughly chopped
For the Chocolate Topping
- 150 g (5¼ oz) milk chocolate, finely chopped
- 50 g (3½ tablespoons) heavy whipping cream
- 3 whole Oreo cookies, for garnish
- 3 Oreo cookies, halved, for garnish
Instructions
Step 1: Prepare the Pan
Line an 8×8 inch square pan with parchment paper, leaving an overhang on two sides. This makes it easy to lift the finished bars out of the pan cleanly for slicing. Set aside.
Step 2: Make the Oreo Crust
Carefully twist apart the 18 Oreo cookies and scrape out the cream filling — the filling adds excess fat to the crust and prevents it from setting as firmly. Place the chocolate wafers in a food processor and pulse until you have fine, even crumbs. Alternatively, place the cookies in a zip-top bag and crush them with a rolling pin. Transfer the crumbs to a bowl, pour in the melted butter, and stir until every crumb is evenly coated and the mixture clumps together when pressed. Press the mixture firmly and evenly into the bottom of the prepared pan, using the flat bottom of a glass or measuring cup for a compact, level layer. Refrigerate while you prepare the filling.
Step 3: Make the Cheesecake Filling
In a large bowl, beat the softened cream cheese with an electric mixer on medium speed until completely smooth and fluffy, with no lumps remaining. Add the granulated sugar and continue beating until fully incorporated and the mixture is creamy and uniform. In a separate clean, cold bowl, beat the heavy whipping cream with an electric mixer until stiff peaks form — the cream should hold its shape firmly when the beaters are lifted. Gently fold the whipped cream into the cream cheese mixture in two or three additions, using a spatula and slow, deliberate strokes to keep the mixture as light and airy as possible. Fold in the chopped Oreo cookies until evenly distributed throughout the filling.
Step 4: Fill and Chill
Remove the chilled crust from the refrigerator. Spoon the cheesecake filling over the crust and spread it into an even, smooth layer using a spatula. Tap the pan gently on the counter a couple of times to eliminate any air pockets. Cover with plastic wrap and refrigerate for 4 to 6 hours, or overnight, until the filling is fully set and firm to the touch.
Step 5: Make the Chocolate Topping
Place the finely chopped milk chocolate in a heatproof bowl. Heat the 50 g of heavy cream in a small saucepan over medium heat until it just begins to simmer. Pour the hot cream over the chocolate and let it sit undisturbed for 2 minutes. Stir slowly from the center outward until the ganache is completely smooth and glossy. Allow it to cool for 5 to 10 minutes until it thickens slightly but remains pourable.
Step 6: Top and Garnish
Drizzle or spread the milk chocolate ganache evenly over the fully set cheesecake layer. Arrange the 3 whole Oreo cookies and 6 Oreo halves across the surface in a pattern of your choice. Return the pan to the refrigerator for 15 to 20 minutes to allow the chocolate topping to set.
Step 7: Slice and Serve
Use the parchment paper overhang to lift the entire dessert out of the pan and onto a cutting board. Slice into 9 to 12 bars using a sharp knife. For the cleanest cuts, run the knife blade under hot water and wipe it dry between each slice. Serve immediately or keep refrigerated until ready to serve.
Pro Tips for the Best Results
- Remove the cream filling from the crust cookies. The cream adds unnecessary fat to the crust and prevents it from setting into a firm, sliceable base. The chocolate wafers alone, combined with butter, produce a much cleaner result.
- Soften the cream cheese fully. Cold cream cheese will not beat smoothly and leaves lumps that cannot be corrected once the whipped cream is folded in. Leave it at room temperature for at least 45 minutes before starting.
- Use a cold bowl for whipping cream. Place your mixing bowl and beaters in the freezer for 10 minutes before whipping. Cold equipment helps the cream reach stiff peaks faster and hold them more reliably.
- Fold, do not stir. Once the whipped cream meets the cream cheese mixture, fold gently with a spatula. Stirring aggressively deflates the whipped cream and produces a denser, heavier filling.
- Chill overnight for the cleanest bars. While 4 hours is the minimum, overnight chilling produces a significantly firmer filling that slices cleanly and holds its shape beautifully once cut.
- Let the ganache cool before applying. Pouring hot ganache directly onto the cheesecake filling can cause the surface to soften and shift. Allow it to cool to a thick but pourable consistency before spreading.
Variations and Substitutions
- Golden Oreo crust: Swap the chocolate Oreos for Golden Oreos in the crust for a vanilla cookie base that offers a sweeter, less intense contrast to the cheesecake filling.
- Dark chocolate topping: Replace the milk chocolate in the ganache with dark chocolate (60 to 70% cocoa) for a more intense, less sweet topping that balances the richness of the filling beautifully.
- Peanut butter swirl: Drop small spoonfuls of peanut butter over the cheesecake filling before refrigerating and swirl lightly with a toothpick for a peanut butter and cookies flavor combination.
- Mint Oreo version: Use Mint Oreos in both the crust and the filling, and add a drop of peppermint extract to the cream cheese mixture for a refreshing chocolate mint variation.
- Strawberry topping: Replace the chocolate ganache with a fresh strawberry sauce — simply simmer diced strawberries with a tablespoon of sugar and a squeeze of lemon juice until thickened — for a fruity, lighter alternative.
- Individual servings: Press the crust mixture into the bases of individual ramekins or glasses, top with filling and ganache, and chill as normal for single-serve presentations that require no slicing.
Storage Instructions
Store the bars in an airtight container in the refrigerator for up to 4 days. Keep them in a single layer or separate layers with parchment paper between them to prevent the chocolate topping from sticking. The bars taste best when served cold directly from the refrigerator.
Freezing is possible for longer storage. Place the fully set, untopped bars on a parchment-lined tray and freeze until solid, then transfer to a freezer-safe container for up to 2 months. Thaw overnight in the refrigerator and add the chocolate ganache and cookie garnish fresh after thawing for the best presentation and texture. Do not freeze the bars once the whipped cream-based filling has been topped with ganache and garnishes, as the texture may suffer upon thawing.
Frequently Asked Questions
Do I need to remove the cream filling from the Oreos for the crust? Yes, and it makes a noticeable difference. The cream filling adds fat that prevents the crust from binding and setting firmly. Using only the chocolate wafers combined with melted butter produces a compact, cleanly sliceable base that holds together without crumbling.
Can I use a different size pan? Yes. A 9×9 inch pan produces slightly thinner bars with more portions. A loaf pan (9×5 inch) produces thicker, taller bars with fewer portions. Chilling time remains the same regardless of pan size.
My filling is too soft even after chilling — what went wrong? The two most common causes are under-whipped cream and insufficient chilling time. The heavy cream must be whipped to stiff peaks — not just soft or medium peaks — before folding into the cream cheese. If the cream was not stiff enough, the filling will remain soft. If the cream was whipped correctly, simply return the pan to the refrigerator for a few more hours.
Can I use store-bought whipped topping instead of whipping cream? Yes. Cool Whip or an equivalent store-bought whipped topping can be folded directly into the cream cheese mixture in place of freshly whipped cream. The texture will be slightly lighter and less rich, but the bars will still set well and taste excellent.
Can I make these bars a day in advance? Absolutely — and it is recommended. The filling firms up further overnight and the bars become easier to slice cleanly. Add the chocolate ganache topping and Oreo garnishes the morning of serving for the freshest presentation.
Can I use white chocolate for the topping instead of milk chocolate? Yes. White chocolate ganache (using the same ratio of chocolate to cream) works beautifully and creates a striking visual contrast against the dark Oreo cookie garnish. Reduce the cream by 10 g as white chocolate is softer and melts more readily.
Nutrition Estimate
Per bar (1 of 9): Calories: approximately 430 kcal | Carbohydrates: 38g | Protein: 5g | Fat: 29g | Saturated Fat: 16g | Sugar: 27g | Fiber: 1g | Cholesterol: 70mg | Sodium: 210mg
Values are approximate and will vary based on specific brands and portion sizes used.
Print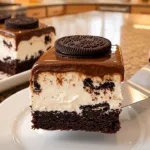
No-Bake Oreo Cheesecake Bars
Ingredients
For the Oreo Crust
- 18 Oreo cookies, cream filling removed
- 4 tablespoons unsalted butter, melted
For the Cheesecake Filling
- 300 g (approximately 10½ oz) cream cheese, softened to room temperature
- 70 g (⅓ cup) granulated sugar
- 150 g (⅔ cup) heavy whipping cream
- 10 Oreo cookies, roughly chopped
For the Chocolate Topping
- 150 g (5¼ oz) milk chocolate, finely chopped
- 50 g (3½ tablespoons) heavy whipping cream
- 3 whole Oreo cookies, for garnish
- 3 Oreo cookies, halved, for garnish
Instructions
Line an 8×8 inch square pan with parchment paper, leaving an overhang on two sides. This makes it easy to lift the finished bars out of the pan cleanly for slicing. Set aside.
Carefully twist apart the 18 Oreo cookies and scrape out the cream filling — the filling adds excess fat to the crust and prevents it from setting as firmly. Place the chocolate wafers in a food processor and pulse until you have fine, even crumbs. Alternatively, place the cookies in a zip-top bag and crush them with a rolling pin. Transfer the crumbs to a bowl, pour in the melted butter, and stir until every crumb is evenly coated and the mixture clumps together when pressed. Press the mixture firmly and evenly into the bottom of the prepared pan, using the flat bottom of a glass or measuring cup for a compact, level layer. Refrigerate while you prepare the filling.
In a large bowl, beat the softened cream cheese with an electric mixer on medium speed until completely smooth and fluffy, with no lumps remaining. Add the granulated sugar and continue beating until fully incorporated and the mixture is creamy and uniform. In a separate clean, cold bowl, beat the heavy whipping cream with an electric mixer until stiff peaks form — the cream should hold its shape firmly when the beaters are lifted. Gently fold the whipped cream into the cream cheese mixture in two or three additions, using a spatula and slow, deliberate strokes to keep the mixture as light and airy as possible. Fold in the chopped Oreo cookies until evenly distributed throughout the filling.
Remove the chilled crust from the refrigerator. Spoon the cheesecake filling over the crust and spread it into an even, smooth layer using a spatula. Tap the pan gently on the counter a couple of times to eliminate any air pockets. Cover with plastic wrap and refrigerate for 4 to 6 hours, or overnight, until the filling is fully set and firm to the touch.
Place the finely chopped milk chocolate in a heatproof bowl. Heat the 50 g of heavy cream in a small saucepan over medium heat until it just begins to simmer. Pour the hot cream over the chocolate and let it sit undisturbed for 2 minutes. Stir slowly from the center outward until the ganache is completely smooth and glossy. Allow it to cool for 5 to 10 minutes until it thickens slightly but remains pourable.
Drizzle or spread the milk chocolate ganache evenly over the fully set cheesecake layer. Arrange the 3 whole Oreo cookies and 6 Oreo halves across the surface in a pattern of your choice. Return the pan to the refrigerator for 15 to 20 minutes to allow the chocolate topping to set.
Use the parchment paper overhang to lift the entire dessert out of the pan and onto a cutting board. Slice into 9 to 12 bars using a sharp knife. For the cleanest cuts, run the knife blade under hot water and wipe it dry between each slice. Serve immediately or keep refrigerated until ready to serve.
Notes
Prep and Serving Details
- Prep Time: 25 minutes
- Chill Time: 4 to 6 hours (overnight recommended)
- Total Time: Approximately 5 to 7 hours
- Servings: 9 to 12 bars
- Difficulty: Easy
- Method: No-Bake
- Pan Size: 8×8 inch square pan