
Introduction
If you have ever brought a dish to a potluck and come home with an empty pan, you know exactly what it feels like to have a truly great recipe. This Creamy No-Bake Banana Pudding Lush is that recipe. It is the one that gets people hovering near the dessert table for seconds, the one that earns recipe requests before the gathering is even over, and the one you will find yourself making again and again for every occasion that calls for something special.
Four distinct layers work together in perfect harmony here. A golden, buttery crust made from crushed vanilla wafers provides the crunch that anchors everything above it. A smooth, lightly sweetened cream cheese layer adds a subtle tang and richness that elevates this well beyond basic pudding. Thick, creamy vanilla pudding folded over fresh banana slices delivers that nostalgic banana pudding flavor that never goes out of style. And a generous cloud of whipped topping, finished with a shower of crushed vanilla wafers, brings the whole thing together in a dessert that looks as impressive as it tastes.
No oven. No complicated technique. Just simple, beautiful layers and a few hours in the refrigerator turning good ingredients into something truly unforgettable.
Prep and Serving Details
- Prep Time: 25 minutes
- Chill Time: 4 hours (overnight strongly recommended)
- Total Time: 4 hours 25 minutes
- Servings: 12
- Difficulty: Easy
- Method: No-Bake
- Pan Size: 9×13 inch baking dish
Ingredients
For the Vanilla Wafer Crust
- 2 cups crushed vanilla wafers
- ½ cup unsalted butter, melted
- 2 tablespoons granulated sugar
For the Cream Cheese Layer
- 8 oz (225 g) cream cheese, softened to room temperature
- ½ cup powdered sugar
- 1 teaspoon vanilla extract
- 1 cup whipped topping (such as Cool Whip), thawed
For the Banana Pudding Layer
- 2 packages (3.4 oz / 96 g each) instant vanilla pudding mix
- 3 cups cold whole milk
- 2 ripe bananas, sliced
- 1 teaspoon banana extract (optional, for a stronger banana flavor)
For the Topping
- 2½ cups whipped topping, thawed
- Crushed vanilla wafers for sprinkling
- Extra banana slices for garnish (optional)
Instructions
Step 1: Make the Vanilla Wafer Crust
In a medium bowl, combine the crushed vanilla wafers, melted butter, and granulated sugar. Stir until every crumb is evenly coated and the mixture holds together when pressed. Transfer to a 9×13 inch baking dish and press firmly into a compact, even layer using the flat bottom of a glass or measuring cup — pay particular attention to the corners and edges. Refrigerate for 15 minutes while you prepare the next layer.
Step 2: Make the Cream Cheese Layer
In a large bowl, beat the softened cream cheese with an electric mixer on medium speed until completely smooth and fluffy, with no lumps remaining. Add the powdered sugar and vanilla extract and continue beating until fully incorporated and the mixture is light and creamy. Gently fold in the 1 cup of whipped topping using a spatula, working in slow strokes to keep the mixture airy. Spread this layer evenly over the chilled crust, smoothing it all the way to the edges.
Step 3: Make the Banana Pudding Layer
In a large bowl, whisk together both packages of instant vanilla pudding mix and the cold whole milk for approximately 2 minutes, until the pudding thickens noticeably. If using banana extract, fold it in now for a more pronounced banana flavor throughout the pudding layer. Allow the pudding to sit for 2 minutes to firm up slightly. Arrange the sliced bananas in an even layer directly over the cream cheese layer, covering the surface as fully as possible. Spread the pudding evenly over the banana slices, smoothing it gently so it covers every banana without disturbing the layer beneath.
Step 4: Add the Whipped Topping
Spread the remaining 2½ cups of whipped topping evenly over the pudding layer, covering it completely from edge to edge. Smooth the surface with a spatula for a clean, even finish. Sprinkle generously with crushed vanilla wafers across the top. If using, add a few fresh banana slices as garnish just before serving rather than during assembly, to prevent browning.
Step 5: Chill
Cover the dish tightly with plastic wrap and refrigerate for at least 4 hours. Overnight chilling is strongly recommended — it allows the crust to firm further, the layers to meld beautifully, and the dessert to set into clean, sliceable squares. This is the step that separates a good banana pudding lush from a great one.
Step 6: Slice and Serve
When ready to serve, use a sharp knife to cut into squares. For the cleanest, sharpest slices, place the dish in the freezer for 20 minutes just before slicing, then run the knife under hot water and wipe it dry between each cut. Serve immediately, straight from the refrigerator.
Pro Tips for the Best Results
- Chill overnight without exception. Four hours is the minimum, but the dessert improves dramatically after a full night of chilling. The layers meld, the crust firms up, and every slice comes out cleaner and more cohesive.
- Toss banana slices in lemon juice. A quick toss in a small amount of fresh lemon juice before layering slows the browning process significantly without affecting the flavor of the finished dessert.
- Use full-fat cream cheese and whole milk. Both contribute to a richer, more stable texture in their respective layers. Low-fat substitutes produce a noticeably softer, less indulgent result.
- Freeze for 20 minutes before slicing. This brief freezing firms up all four layers simultaneously and produces beautifully sharp, restaurant-quality squares with clean edges.
- Thaw the Cool Whip properly. Move it from the freezer to the refrigerator the night before you plan to bake. Properly thawed Cool Whip folds more smoothly and spreads more evenly than partially thawed whipped topping.
- Add banana garnish at the last minute. Fresh banana slices placed on top as garnish should be added right before serving, not during assembly, to keep them looking fresh and avoid browning on the surface.
Variations and Substitutions
- Chocolate crust: Replace the vanilla wafers with crushed chocolate graham crackers or Oreo wafers for a chocolate base that contrasts beautifully with the banana pudding layers above.
- Peanut butter layer: Add a thin layer of creamy peanut butter spread between the crust and the cream cheese layer. The combination of peanut butter and banana is a classic for good reason.
- Chocolate drizzle: Drizzle warm chocolate ganache or melted chocolate chips over the whipped topping before the final chill for an elegant finishing touch and an extra flavor dimension.
- Fresh whipped cream: Replace the store-bought whipped topping with freshly whipped heavy cream (approximately 2 cups, whipped to stiff peaks with 2 tablespoons of powdered sugar) for a richer, more homemade flavor throughout.
- Coconut banana version: Add ½ cup of toasted shredded coconut to the crust mixture and sprinkle toasted coconut over the finished topping alongside the crushed wafers for a tropical twist.
- Individual cups: Layer the components in individual mason jars or dessert glasses for single-serve portions that are perfect for parties and require no slicing.
- Stronger banana flavor: The optional banana extract makes a noticeable difference if you want a more pronounced banana flavor in the pudding layer. Start with half a teaspoon and adjust to taste.
Storage Instructions
Cover the dish tightly with plastic wrap or transfer portions to an airtight container and refrigerate for up to 3 days. The vanilla wafer topping will soften over time as it absorbs moisture from the whipped topping, which many people actually prefer — it takes on a texture similar to the softened cookies in a traditional banana pudding.
This dessert is not recommended for freezing once fully assembled. The pudding layer becomes watery and grainy upon thawing, and the banana slices lose their texture entirely. If you need to prepare in advance, the crust can be pressed into the dish and refrigerated up to 2 days ahead, and the cream cheese layer can be made and spread over the crust up to 1 day ahead. Add the pudding, bananas, and topping on the day of serving for the freshest result.
Frequently Asked Questions
Can I use homemade pudding instead of instant? Yes, but the pudding must be completely cooled before spreading over the banana layer to avoid melting the cream cheese layer beneath it. Spread cooked pudding onto a plate, press plastic wrap directly onto the surface, and refrigerate until fully cooled before assembling.
Can I use a different cookie for the crust? Absolutely. Nilla wafers are the traditional choice and complement the banana flavor naturally, but graham crackers, digestive biscuits, or shortbread cookies all work well. For a chocolate variation, Oreo wafers or chocolate graham crackers are excellent alternatives.
My cream cheese layer has lumps — how do I fix it? Lumps in the cream cheese layer are almost always caused by cream cheese that was not fully softened before beating. Unfortunately, lumps cannot be fully removed once the other ingredients are added. For future batches, leave the cream cheese at room temperature for at least 45 minutes to 1 hour before mixing.
Can I make this dessert gluten-free? Yes. Substitute certified gluten-free vanilla wafers for the crust and topping, and verify that your pudding mix and whipped topping are also gluten-free certified. The filling layers are naturally gluten-free.
How do I prevent the bananas from browning inside the dessert? Tossing the banana slices in a small amount of fresh lemon juice before layering them is the most effective method. The acidity slows the oxidation process without imparting a noticeable lemon flavor to the finished dessert. Keeping the bananas fully covered by the pudding layer also helps, as exposure to air accelerates browning.
Can I make individual portions instead of a large dish? Yes. Layer the crust, cream cheese, pudding, banana, and topping in individual glasses, ramekins, or mason jars for single-serve presentations. Chilling time and ingredient quantities remain the same. This format is particularly convenient for parties and eliminates the need for slicing and plating.
Nutrition Estimate
Per serving (1 of 12): Calories: approximately 380 kcal | Carbohydrates: 44g | Protein: 4g | Fat: 21g | Saturated Fat: 13g | Sugar: 30g | Fiber: 1g | Cholesterol: 45mg | Sodium: 280mg
Values are approximate and will vary based on specific brands, portion sizes, and optional add-ins used.
Print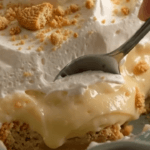
Creamy No-Bake Banana Pudding Lush
Ingredients
For the Vanilla Wafer Crust
- 2 cups crushed vanilla wafers
- ½ cup unsalted butter, melted
- 2 tablespoons granulated sugar
For the Cream Cheese Layer
- 8 oz (225 g) cream cheese, softened to room temperature
- ½ cup powdered sugar
- 1 teaspoon vanilla extract
- 1 cup whipped topping (such as Cool Whip), thawed
For the Banana Pudding Layer
- 2 packages (3.4 oz / 96 g each) instant vanilla pudding mix
- 3 cups cold whole milk
- 2 ripe bananas, sliced
- 1 teaspoon banana extract (optional, for a stronger banana flavor)
For the Topping
- 2½ cups whipped topping, thawed
- Crushed vanilla wafers for sprinkling
- Extra banana slices for garnish (optional)
Instructions
In a medium bowl, combine the crushed vanilla wafers, melted butter, and granulated sugar. Stir until every crumb is evenly coated and the mixture holds together when pressed. Transfer to a 9×13 inch baking dish and press firmly into a compact, even layer using the flat bottom of a glass or measuring cup — pay particular attention to the corners and edges. Refrigerate for 15 minutes while you prepare the next layer.
In a large bowl, beat the softened cream cheese with an electric mixer on medium speed until completely smooth and fluffy, with no lumps remaining. Add the powdered sugar and vanilla extract and continue beating until fully incorporated and the mixture is light and creamy. Gently fold in the 1 cup of whipped topping using a spatula, working in slow strokes to keep the mixture airy. Spread this layer evenly over the chilled crust, smoothing it all the way to the edges.
In a large bowl, whisk together both packages of instant vanilla pudding mix and the cold whole milk for approximately 2 minutes, until the pudding thickens noticeably. If using banana extract, fold it in now for a more pronounced banana flavor throughout the pudding layer. Allow the pudding to sit for 2 minutes to firm up slightly. Arrange the sliced bananas in an even layer directly over the cream cheese layer, covering the surface as fully as possible. Spread the pudding evenly over the banana slices, smoothing it gently so it covers every banana without disturbing the layer beneath.
Spread the remaining 2½ cups of whipped topping evenly over the pudding layer, covering it completely from edge to edge. Smooth the surface with a spatula for a clean, even finish. Sprinkle generously with crushed vanilla wafers across the top. If using, add a few fresh banana slices as garnish just before serving rather than during assembly, to prevent browning.
Cover the dish tightly with plastic wrap and refrigerate for at least 4 hours. Overnight chilling is strongly recommended — it allows the crust to firm further, the layers to meld beautifully, and the dessert to set into clean, sliceable squares. This is the step that separates a good banana pudding lush from a great one.
When ready to serve, use a sharp knife to cut into squares. For the cleanest, sharpest slices, place the dish in the freezer for 20 minutes just before slicing, then run the knife under hot water and wipe it dry between each cut. Serve immediately, straight from the refrigerator.
Notes
Prep and Serving Details
- Prep Time: 25 minutes
- Chill Time: 4 hours (overnight strongly recommended)
- Total Time: 4 hours 25 minutes
- Servings: 12
- Difficulty: Easy
- Method: No-Bake
- Pan Size: 9×13 inch baking dish