
Introduction
There is something about a cake with swirls of deep raspberry red running through clouds of white buttercream that stops people in their tracks. The Raspberry Swirl Buttercream Cake is one of those desserts that looks like it came from a professional bakery window — and yet every element of it is completely achievable at home, even if you have never decorated a layer cake before.
The base is a classic, tender vanilla butter cake with a fine, soft crumb that holds up beautifully under frosting and slices cleanly every time. The buttercream is light, fluffy, and rich in the best possible way — the kind that pipes into perfect rosettes and spreads smoothly with an offset spatula. And threaded through everything is the raspberry swirl: a simple, three-ingredient sauce made from fresh or frozen raspberries simmered down into a glossy, jewel-bright coulis that delivers a tartness and freshness that cuts through the richness of the buttercream in exactly the right way.
Between the layers, draped across the sides, piped on top, and finished with fresh raspberries and a dusting of powdered sugar — this sauce does more decorative work than any other element of the cake, turning what would already be a beautiful dessert into something truly spectacular. It is the cake for birthdays, anniversaries, dinner party finales, or any occasion that deserves a centerpiece worth remembering.
Prep and Serving Details
- Prep Time: 30 minutes
- Bake Time: 25 to 30 minutes
- Cooling Time: 1 hour
- Total Time: Approximately 2 hours
- Servings: 12 to 16 slices
- Difficulty: Intermediate
- Method: Baking
- Oven Temperature: 350°F (175°C)
- Pan Size: Two 9-inch round cake pans
Ingredients
For the Vanilla Cake Layers
- 2½ cups all-purpose flour
- 2½ teaspoons baking powder
- ½ teaspoon salt
- ¾ cup unsalted butter, softened to room temperature
- 2 cups granulated sugar
- 4 large eggs, room temperature
- 2 teaspoons pure vanilla extract
- 1 cup whole milk, room temperature
For the Vanilla Buttercream
- 1 cup unsalted butter, softened to room temperature
- 4 cups powdered sugar
- 2 teaspoons pure vanilla extract
- 3 to 4 tablespoons heavy cream
For the Raspberry Swirl Sauce
- 1 cup fresh or frozen raspberries
- 3 tablespoons granulated sugar
- 1 teaspoon fresh lemon juice
For Decoration
- Fresh raspberries
- Powdered sugar for dusting
- Piping bag fitted with a star tip
Instructions
Step 1: Preheat and Prepare the Pans
Preheat your oven to 350°F (175°C). Grease two 9-inch round cake pans thoroughly with butter or cooking spray, then line the bottoms with parchment paper circles. Greasing and lining ensures clean, effortless release from both pans.
Step 2: Mix the Dry Ingredients
Sift together the flour, baking powder, and salt into a medium bowl. Sifting removes lumps and aerates the flour, contributing to a lighter, more even crumb in the finished cake. Set aside.
Step 3: Cream the Butter and Sugar
In a large mixing bowl, beat the softened butter and granulated sugar together with an electric mixer on medium-high speed for 3 to 4 minutes, until the mixture is noticeably pale, light, and fluffy. This step is more important than it might seem — properly creamed butter and sugar incorporate air into the batter, which is what gives the cake its tender, fine-grained texture.
Step 4: Add Eggs and Vanilla
Add the eggs one at a time, beating well after each addition and scraping down the sides of the bowl between each egg. Add the vanilla extract with the final egg and mix until fully incorporated. The mixture may look slightly curdled at this point — this is normal and will resolve once the dry ingredients are added.
Step 5: Alternate Dry Ingredients and Milk
With the mixer on low speed, add the dry ingredients and milk in alternating additions — beginning and ending with the flour mixture. Add approximately one third of the flour, then half the milk, then another third of the flour, then the remaining milk, then the final third of the flour. Mix only until just combined after each addition. Overmixing at this stage develops gluten and produces a tough, dense crumb rather than the light, tender texture you are working toward.
Step 6: Bake the Cake Layers
Divide the batter evenly between the two prepared pans, smoothing the tops with a spatula. Bake for 25 to 30 minutes, until a toothpick inserted into the center of each layer comes out clean or with just a few moist crumbs. Do not open the oven door before the 22-minute mark. Allow the layers to cool in their pans for 10 minutes, then turn them out onto wire racks and cool completely — at least 1 hour — before frosting.
Step 7: Make the Raspberry Swirl Sauce
Combine the raspberries, sugar, and lemon juice in a small saucepan over medium heat. Stir gently as the raspberries begin to break down and release their juice. Simmer for 8 to 10 minutes, stirring occasionally, until the sauce has thickened enough to coat the back of a spoon. Pour the sauce through a fine mesh strainer into a bowl, pressing it through with the back of a spoon to remove all the seeds. What remains is a smooth, glossy, intensely flavored raspberry coulis. Allow it to cool completely to room temperature — or refrigerate briefly — before using. A warm sauce will melt the buttercream on contact.
Step 8: Make the Vanilla Buttercream
Beat the softened butter with an electric mixer on medium-high speed for 2 to 3 minutes until very pale, light, and creamy. Reduce to low speed and gradually add the powdered sugar one cup at a time, beating well between each addition. Add the vanilla extract and 3 tablespoons of heavy cream, then increase to high speed and beat for a final 2 to 3 minutes until the buttercream is exceptionally light, fluffy, and smooth. If the buttercream is too stiff, add the fourth tablespoon of heavy cream. If too soft, add powdered sugar a tablespoon at a time until it reaches a firm, pipeable consistency.
Step 9: Assemble the Cake
Place the first cooled cake layer on a serving plate or cake stand. Spread a generous, even layer of buttercream across the top surface. Drizzle a layer of the cooled raspberry sauce over the buttercream and spread it lightly with the back of a spoon — do not fully mix the two together. The contrast between the white buttercream and the raspberry swirl is part of what makes the interior of this cake so visually striking when sliced. Place the second cake layer on top, pressing gently to level it.
Step 10: Apply the Crumb Coat
Spread a very thin layer of buttercream over the entire surface of the assembled cake — top and sides — using an offset spatula. This crumb coat traps any loose cake crumbs and seals the surface before the final frosting layer is applied. Refrigerate the crumb-coated cake for 15 minutes until the coating is firm to the touch.
Step 11: Frost the Cake
Remove the cake from the refrigerator and apply the remaining buttercream in a generous, even layer over the top and sides. Smooth the top with the offset spatula. For the raspberry swirl effect on the sides, drizzle or spoon the raspberry sauce in irregular streaks across the frosted surface, then use the offset spatula or a cake scraper to pull the sauce lightly into the buttercream with one smooth pass around the cake — creating a beautiful, organic swirl pattern that looks effortlessly elegant.
Step 12: Decorate
Transfer the remaining buttercream to a piping bag fitted with a star tip. Pipe rosettes, swirls, or shell borders around the top edge of the cake. Place a fresh raspberry on top of each piped rosette. Drizzle any remaining raspberry sauce decoratively over the top, and finish with a light dusting of powdered sugar over the fresh raspberries for an elegant, polished presentation.
Pro Tips for the Best Results
- Use room temperature ingredients throughout. Butter, eggs, and milk at room temperature combine more smoothly and evenly than cold ingredients, producing a batter without dense spots and a crumb that is consistently tender from edge to center.
- Cream the butter and sugar properly. Three to four minutes of creaming is not excessive — it is necessary. The pale, fluffy, almost doubled volume you are aiming for is what incorporates air and creates a light cake.
- Cool the raspberry sauce completely before using. Even slightly warm sauce will cause the buttercream to melt on contact, making spreading and swirling impossible. If you are short on time, spread the sauce in a shallow dish and refrigerate for 15 minutes to cool it rapidly.
- Apply a crumb coat and chill before the final frost. This professional step is what separates a clean, polished finish from a crumby, uneven one. The 15-minute chill is all it takes.
- Use an offset spatula for the swirl. A long offset spatula gives you the control and reach needed to pull the raspberry sauce into the buttercream in one smooth, confident motion. Work quickly and decisively — tentative strokes produce a smeared look rather than a clean swirl.
- Beat the buttercream longer than you think necessary. An extra minute or two of beating on high speed makes a visible difference in how light and white the buttercream becomes, which makes the raspberry swirl contrast even more striking against it.
Variations and Substitutions
- Strawberry swirl: Replace the raspberries with an equal quantity of fresh or frozen strawberries for a slightly sweeter, milder berry sauce that works beautifully in the same way.
- Mixed berry swirl: Combine raspberries, blackberries, and blueberries in equal parts for a deeper, more complex berry sauce with a gorgeous dark purple-red color.
- Lemon buttercream: Add 2 teaspoons of fresh lemon zest and replace the vanilla extract in the buttercream with 1 tablespoon of fresh lemon juice. The citrus brightens the buttercream and pairs extraordinarily well with the raspberry.
- Chocolate layers: Replace ¼ cup of the flour with ¼ cup of Hershey’s unsweetened cocoa powder in the cake batter for chocolate cake layers. Chocolate and raspberry is one of the great classic flavor pairings.
- Three-layer cake: Divide the batter between three 8-inch round pans instead of two 9-inch pans and reduce the bake time to 20 to 24 minutes. Increase the buttercream by 50% to cover the additional surface area.
- Cupcakes: This batter produces approximately 24 standard cupcakes. Fill lined muffin tins two-thirds full and bake at 350°F for 18 to 20 minutes. Core the center of each cupcake and fill with raspberry sauce before piping the buttercream on top.
- Gluten-free: Substitute the all-purpose flour with a certified gluten-free 1:1 baking flour blend. The texture and flavor remain very close to the original.
Storage Instructions
Store the finished cake covered at room temperature for up to 2 days, or refrigerate in an airtight cake container for up to 5 days. If refrigerating, remove the cake 30 minutes before serving to allow the buttercream to soften to its ideal, creamy texture — cold buttercream can feel dense and waxy rather than light and smooth.
Unfrosted cake layers can be wrapped tightly in plastic wrap and stored at room temperature for 1 day, or refrigerated for up to 3 days, or frozen for up to 3 months. Thaw overnight in the refrigerator before frosting. The raspberry sauce can be made up to 1 week in advance and stored in a sealed jar in the refrigerator. The assembled, frosted cake can be frozen for up to 1 month — freeze uncovered for 1 hour until the buttercream and decoration are firm, then wrap carefully in plastic wrap and foil. Thaw overnight in the refrigerator and bring to room temperature before serving.
Frequently Asked Questions
Can I use frozen raspberries for the sauce? Yes, frozen raspberries work perfectly and are often more economical and consistent in flavor than fresh, particularly outside of raspberry season. Use them directly from frozen — no need to thaw first. The sauce will simply take a minute or two longer to come to a simmer.
My buttercream is too sweet — how do I balance it? Add a small pinch of fine salt to the buttercream and beat it in thoroughly. Salt reduces the perception of sweetness without adding any detectable salty flavor. A teaspoon of fresh lemon juice also helps balance sweetness and adds a brightness that complements the raspberry element beautifully.
Why did my cake layers dome in the center? Doming is caused by the outer edges of the cake setting and firming before the center, which forces the remaining batter to rise upward rather than outward. To minimize doming, wrap the outside of the cake pans with damp baking strips before putting them in the oven, which slows the baking of the outer edge and encourages a more even rise. Alternatively, simply level the domed tops with a serrated knife once the layers are fully cooled.
Can I make the cake layers in advance? Yes — and it is recommended for a stress-free assembly day. Bake the layers up to 2 days ahead, cool completely, wrap each layer tightly in plastic wrap, and refrigerate. Make the raspberry sauce up to a week ahead. Prepare the buttercream and assemble the cake on the day of serving for the freshest appearance and best presentation.
How do I get sharp, clean rosettes when piping? Start with buttercream that is at room temperature — too cold and it will not flow smoothly through the tip. Hold the piping bag completely vertical, apply steady, even pressure, and release the pressure before lifting the tip at the end of each rosette. Practice a few on a piece of parchment paper first if this is your first time piping rosettes — the technique clicks quickly with a little repetition.
Can I use salted butter instead of unsalted? For the cake layers, using salted butter will work but reduces your control over the salt level in the batter. For the buttercream, salted butter can make the frosting taste noticeably salty given the large quantity used. Unsalted butter is recommended for both, with salt added deliberately and in measured amounts.
Nutrition Estimate
Per slice (1 of 12): Calories: approximately 520 kcal | Carbohydrates: 72g | Protein: 5g | Fat: 25g | Saturated Fat: 15g | Sugar: 56g | Fiber: 1g | Cholesterol: 115mg | Sodium: 185mg
Print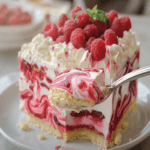
Raspberry Swirl Buttercream Cake
Description
Prep and Serving Details
- Prep Time: 20 minutes
- Chill Time: 6 hours (overnight strongly recommended)
- Total Time: Approximately 6 hours 20 minutes
- Servings: 10 to 12
- Difficulty: Easy
- Method: No-Bake
- Dish Size: 9×13 inch dish or similar deep serving dish
Ingredients
For the Vanilla Cake Layers
- 2½ cups all-purpose flour
- 2½ teaspoons baking powder
- ½ teaspoon salt
- ¾ cup unsalted butter, softened to room temperature
- 2 cups granulated sugar
- 4 large eggs, room temperature
- 2 teaspoons pure vanilla extract
- 1 cup whole milk, room temperature
For the Vanilla Buttercream
- 1 cup unsalted butter, softened to room temperature
- 4 cups powdered sugar
- 2 teaspoons pure vanilla extract
- 3 to 4 tablespoons heavy cream
For the Raspberry Swirl Sauce
- 1 cup fresh or frozen raspberries
- 3 tablespoons granulated sugar
- 1 teaspoon fresh lemon juice
For Decoration
- Fresh raspberries
- Powdered sugar for dusting
- Piping bag fitted with a star tip
Instructions
Preheat your oven to 350°F (175°C). Grease two 9-inch round cake pans thoroughly with butter or cooking spray, then line the bottoms with parchment paper circles. Greasing and lining ensures clean, effortless release from both pans.
Sift together the flour, baking powder, and salt into a medium bowl. Sifting removes lumps and aerates the flour, contributing to a lighter, more even crumb in the finished cake. Set aside.
In a large mixing bowl, beat the softened butter and granulated sugar together with an electric mixer on medium-high speed for 3 to 4 minutes, until the mixture is noticeably pale, light, and fluffy. This step is more important than it might seem — properly creamed butter and sugar incorporate air into the batter, which is what gives the cake its tender, fine-grained texture.
Add the eggs one at a time, beating well after each addition and scraping down the sides of the bowl between each egg. Add the vanilla extract with the final egg and mix until fully incorporated. The mixture may look slightly curdled at this point — this is normal and will resolve once the dry ingredients are added.
With the mixer on low speed, add the dry ingredients and milk in alternating additions — beginning and ending with the flour mixture. Add approximately one third of the flour, then half the milk, then another third of the flour, then the remaining milk, then the final third of the flour. Mix only until just combined after each addition. Overmixing at this stage develops gluten and produces a tough, dense crumb rather than the light, tender texture you are working toward.
Divide the batter evenly between the two prepared pans, smoothing the tops with a spatula. Bake for 25 to 30 minutes, until a toothpick inserted into the center of each layer comes out clean or with just a few moist crumbs. Do not open the oven door before the 22-minute mark. Allow the layers to cool in their pans for 10 minutes, then turn them out onto wire racks and cool completely — at least 1 hour — before frosting.
Combine the raspberries, sugar, and lemon juice in a small saucepan over medium heat. Stir gently as the raspberries begin to break down and release their juice. Simmer for 8 to 10 minutes, stirring occasionally, until the sauce has thickened enough to coat the back of a spoon. Pour the sauce through a fine mesh strainer into a bowl, pressing it through with the back of a spoon to remove all the seeds. What remains is a smooth, glossy, intensely flavored raspberry coulis. Allow it to cool completely to room temperature — or refrigerate briefly — before using. A warm sauce will melt the buttercream on contact.
Beat the softened butter with an electric mixer on medium-high speed for 2 to 3 minutes until very pale, light, and creamy. Reduce to low speed and gradually add the powdered sugar one cup at a time, beating well between each addition. Add the vanilla extract and 3 tablespoons of heavy cream, then increase to high speed and beat for a final 2 to 3 minutes until the buttercream is exceptionally light, fluffy, and smooth. If the buttercream is too stiff, add the fourth tablespoon of heavy cream. If too soft, add powdered sugar a tablespoon at a time until it reaches a firm, pipeable consistency.
Place the first cooled cake layer on a serving plate or cake stand. Spread a generous, even layer of buttercream across the top surface. Drizzle a layer of the cooled raspberry sauce over the buttercream and spread it lightly with the back of a spoon — do not fully mix the two together. The contrast between the white buttercream and the raspberry swirl is part of what makes the interior of this cake so visually striking when sliced. Place the second cake layer on top, pressing gently to level it.
Spread a very thin layer of buttercream over the entire surface of the assembled cake — top and sides — using an offset spatula. This crumb coat traps any loose cake crumbs and seals the surface before the final frosting layer is applied. Refrigerate the crumb-coated cake for 15 minutes until the coating is firm to the touch.
Notes
- Use room temperature ingredients throughout. Butter, eggs, and milk at room temperature combine more smoothly and evenly than cold ingredients, producing a batter without dense spots and a crumb that is consistently tender from edge to center.
- Cream the butter and sugar properly. Three to four minutes of creaming is not excessive — it is necessary. The pale, fluffy, almost doubled volume you are aiming for is what incorporates air and creates a light cake.
- Cool the raspberry sauce completely before using. Even slightly warm sauce will cause the buttercream to melt on contact, making spreading and swirling impossible. If you are short on time, spread the sauce in a shallow dish and refrigerate for 15 minutes to cool it rapidly.