
Introduction
Tiramisu is one of the most beloved desserts in the world — and this version takes everything that makes it so irresistible and gives it a bright, summery strawberry shortcake makeover. Gone is the espresso and cocoa of the classic Italian original. In their place: milk-dipped ladyfingers, a thick and fluffy strawberry cream cheese filling packed with fresh diced strawberries and the concentrated punch of freeze-dried strawberry powder, and a cloud of whipped cream finished with crushed vanilla wafers and more freeze-dried strawberry on top.
The result is a dessert that manages to be simultaneously light and indulgent, fresh and rich, simple and completely showstopping. Every layer has a distinct role — the soft, milk-soaked ladyfingers provide structure and a delicate base, the strawberry cream cheese filling is luscious and deeply flavored, and the whipped cream topping keeps everything airy and balanced. The vanilla wafer crumble on top adds just the right amount of texture to tie the whole thing together.
No oven required. No complicated technique. Just a handful of ingredients, a few minutes of assembly, and several hours of chilling time producing one of the most impressive desserts you will ever pull out of the refrigerator.
Prep and Serving Details
- Prep Time: 25 minutes
- Chill Time: 4 to 6 hours (overnight strongly recommended)
- Total Time: Approximately 5 to 7 hours
- Servings: 10 to 12
- Difficulty: Easy
- Method: No-Bake
- Dish Size: 7×10 inch baking dish
Ingredients
For the Ladyfinger Base
- 1 batch homemade ladyfingers or 1 package store-bought ladyfingers
- 1 cup whole milk (or milk substitute)
For the Strawberry Cream Cheese Filling
- 16 oz (450 g) cream cheese, softened to room temperature
- 1 cup powdered sugar
- 2 teaspoons vanilla extract
- 2 tablespoons freeze-dried strawberries, finely crushed
- 2 cups heavy whipping cream
- 1 cup fresh strawberries, diced
For the Whipped Cream Topping
- 8 oz whipped cream (homemade or store-bought)
For the Finishing Topping
- ¼ cup vanilla wafer cookies, crushed
- 2 tablespoons freeze-dried strawberries, crushed
Instructions
Step 1: Set Up the Dipping Station
Pour the milk into a shallow bowl wide enough to fit a ladyfinger lengthwise. Set it aside and have it ready before you begin assembling — you want to work quickly once the dipping starts to prevent the ladyfingers from becoming too saturated.
Step 2: Make the Strawberry Cream Cheese Filling
In a large mixing bowl, combine the softened cream cheese, powdered sugar, vanilla extract, and 2 tablespoons of finely crushed freeze-dried strawberries. Beat with an electric mixer on medium speed until the mixture is completely smooth, fluffy, and free of any lumps. The freeze-dried strawberry powder dissolves into the cream cheese, infusing it with an intensely concentrated strawberry flavor and a beautiful natural pink color.
Step 3: Add the Heavy Cream
With the mixer running on low speed, slowly pour the heavy whipping cream into the cream cheese mixture in a steady stream. Once all the cream is incorporated, increase the speed to high and beat until the filling is thick, fluffy, and holds its shape firmly when the beaters are lifted — similar to stiff peaks. This step transforms the dense cream cheese base into a light, mousse-like filling that is the heart of the entire dessert.
Step 4: Fold in the Fresh Strawberries
Using a spatula, gently fold the diced fresh strawberries into the filling, distributing them evenly throughout. Work with slow, deliberate strokes to avoid deflating the airy texture you just created. Set the filling aside.
Step 5: Dip and Layer the Ladyfingers — First Layer
Working one at a time, briefly dip each ladyfinger into the milk — a quick one-second dip on each side is all that is needed. Do not soak them. Over-soaked ladyfingers become mushy and collapse under the weight of the filling, ruining the structure of the finished dessert. Arrange the dipped ladyfingers in a single, even layer across the bottom of a 7×10 inch baking dish, fitting them closely together and breaking pieces as needed to fill any gaps.
Step 6: Add the First Filling Layer
Spread exactly half of the strawberry cream cheese filling evenly over the first layer of ladyfingers, smoothing it all the way to the edges with a spatula. Work gently to avoid disturbing the ladyfinger layer beneath.
Step 7: Add the Second Ladyfinger Layer
Dip the remaining ladyfingers in the milk the same way — briefly, without soaking — and arrange them in an even layer directly on top of the filling, just as you did with the first layer.
Step 8: Add the Second Filling Layer
Spread the remaining strawberry cream cheese filling evenly over the second layer of ladyfingers, smoothing the surface completely flat.
Step 9: Add the Whipped Cream Topping
Spread the whipped cream in an even, generous layer over the top of the filling, covering it completely from edge to edge. Smooth it with a spatula for a clean finish.
Step 10: Add the Finishing Topping
Sprinkle the crushed vanilla wafers and the remaining 2 tablespoons of crushed freeze-dried strawberries evenly across the whipped cream surface. The vanilla wafer crumble adds a delicate crunch that echoes the texture of classic strawberry shortcake, while the freeze-dried strawberry dust adds a final burst of concentrated flavor and a beautiful pink finish.
Step 11: Chill
Cover the dish tightly with plastic wrap and refrigerate for a minimum of 4 hours — 6 hours or overnight is strongly recommended. During chilling, the ladyfingers absorb moisture from the filling and soften into a tender, cake-like layer that holds the dessert together and makes every slice clean and cohesive. This transformation is what defines the finished dessert.
Step 12: Slice and Serve
Remove from the refrigerator, uncover, and slice into portions with a sharp knife. For the cleanest cuts, dip the knife in hot water and wipe it dry between each slice. Serve immediately, straight from the refrigerator.
Pro Tips for the Best Results
- Do not over-soak the ladyfingers. A one-second dip on each side in milk is all they need. Over-soaking creates a soggy, structureless dessert that will not hold its shape when sliced. The ladyfingers continue absorbing moisture from the filling during the chilling period, so they will be perfectly soft by serving time.
- Use fully softened cream cheese. Cold cream cheese will not beat smoothly and leaves lumps that cannot be corrected once the heavy cream is added. Leave it at room temperature for at least 45 minutes to 1 hour before starting.
- Crush the freeze-dried strawberries to a fine powder. Larger pieces will not dissolve evenly into the cream cheese mixture. A food processor, spice grinder, or zip-top bag and rolling pin all work well for achieving a fine, even powder.
- Beat the filling to stiff peaks. The filling needs to be thick and firm enough to support the second layer of ladyfingers without collapsing. Under-whipped filling will be too soft and the layers will merge together rather than remaining distinct.
- Chill overnight for the best result. The difference between a 4-hour chill and an overnight chill is significant. Overnight chilling produces firmer, more cohesive layers, a more deeply developed flavor, and slices that hold their shape beautifully.
- Add the vanilla wafer topping just before serving if you prefer more crunch. Applied during assembly, the crumble softens slightly overnight — which is still delicious, but if you want maximum texture, sprinkle it fresh before bringing the dish to the table.
Variations and Substitutions
- Lemon strawberry version: Add 1 teaspoon of fresh lemon zest to the cream cheese filling alongside the vanilla extract. The brightness of the lemon lifts the strawberry flavor and adds a sophisticated citrus note throughout.
- Mixed berry version: Replace the diced fresh strawberries in the filling with a combination of diced strawberries, blueberries, and raspberries for a more complex berry flavor profile.
- Chocolate drizzle: Drizzle warm chocolate ganache or melted dark chocolate over the whipped cream topping before the final chill for a chocolate-strawberry shortcake variation.
- Coconut milk dip: Replace the whole milk dipping liquid with coconut milk for a subtle tropical flavor that pairs beautifully with the strawberry filling.
- Vanilla wafer crust: Instead of layering with ladyfingers, press a mixture of crushed vanilla wafers and melted butter into the base of the dish as a firmer crust layer, then add the filling and topping as directed.
- Individual servings: Assemble the tiramisu in individual glasses or mason jars, layering broken ladyfinger pieces with the filling and topping. Chill as normal for single-serve portions perfect for dinner parties.
- Strawberry sauce layer: Add a thin drizzle of fresh strawberry sauce — made by simmering diced strawberries with a tablespoon of sugar until syrupy — between the ladyfinger layers for an extra burst of fruit flavor.
Storage Instructions
Cover the dish tightly with plastic wrap or transfer portions to an airtight container and refrigerate for up to 3 days. The flavors deepen and the layers meld further on the second day, making leftovers genuinely exceptional. The vanilla wafer topping will soften slightly over time as it absorbs moisture from the whipped cream, becoming more cookie-like in texture — which many people prefer.
This dessert is not recommended for freezing. The cream cheese filling and whipped cream topping do not freeze and thaw well, and the fresh strawberry pieces inside the filling will become watery and lose their texture upon thawing. For the best experience, make this dessert fresh within 3 days of serving.
If preparing in advance, the strawberry cream cheese filling can be made up to 1 day ahead and stored in the refrigerator — bring it to room temperature for 10 minutes and give it a gentle stir before spreading. Assemble the full dessert the day before serving for the most convenient preparation timeline.
Frequently Asked Questions
Can I use store-bought ladyfingers instead of homemade? Absolutely, and store-bought ladyfingers are used just as successfully as homemade in this recipe. Look for the crisp, dry Italian-style savoiardi ladyfingers rather than the softer, spongier variety — the crisp type holds up better during dipping and produces a better final texture after chilling.
What can I use instead of freeze-dried strawberries? Freeze-dried strawberries provide an intensely concentrated strawberry flavor and natural pink color without adding moisture to the filling. If unavailable, strawberry extract (start with ½ teaspoon and adjust to taste) is the best substitute. Fresh strawberry puree can also work but will make the filling slightly softer — reduce the heavy cream by 2 tablespoons to compensate.
Can I use a different milk for dipping? Yes. Any milk — whole, 2%, oat, almond, or coconut — works for dipping. The milk flavor is subtle in the finished dessert, so the choice primarily comes down to dietary preference. For a slightly sweeter dipping liquid, add a teaspoon of vanilla extract or a tablespoon of strawberry syrup to the milk.
My filling is not thick enough to spread without sinking — what went wrong? This is almost always caused by under-whipping the filling after the heavy cream is added. The mixture needs to reach a genuinely thick, stiff consistency — similar to a firm whipped cream — before it will hold the weight of the second ladyfinger layer. Return to the mixer and beat on high speed for another minute or two until it firms up significantly.
Can I make this dessert without cream cheese? The cream cheese is what gives the filling its structure, tang, and thickness. Replacing it entirely is not straightforward. For a lighter, more traditional tiramisu texture, you could substitute an equal weight of full-fat mascarpone, which is the classic Italian choice and produces a slightly richer, less tangy filling.
How do I know when the dessert is ready to slice? The dessert is ready when the filling feels firm to a light touch through the plastic wrap and the ladyfinger layers have visibly softened. After a full overnight chill, the dessert will slice cleanly with a sharp knife and hold its layered shape on the plate.
Nutrition Estimate
Per serving (1 of 10): Calories: approximately 420 kcal | Carbohydrates: 32g | Protein: 5g | Fat: 31g | Saturated Fat: 19g | Sugar: 22g | Fiber: 1g | Cholesterol: 105mg | Sodium: 195mg
Values are approximate and will vary based on specific brands, ladyfinger type, and portion sizes used.
Print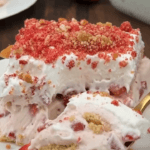
Strawberry Shortcake Tiramisu
Ingredients
For the Ladyfinger Base
- 1 batch homemade ladyfingers or 1 package store-bought ladyfingers
- 1 cup whole milk (or milk substitute)
For the Strawberry Cream Cheese Filling
- 16 oz (450 g) cream cheese, softened to room temperature
- 1 cup powdered sugar
- 2 teaspoons vanilla extract
- 2 tablespoons freeze-dried strawberries, finely crushed
- 2 cups heavy whipping cream
- 1 cup fresh strawberries, diced
For the Whipped Cream Topping
- 8 oz whipped cream (homemade or store-bought)
For the Finishing Topping
- ¼ cup vanilla wafer cookies, crushed
- 2 tablespoons freeze-dried strawberries, crushed
Instructions
Pour the milk into a shallow bowl wide enough to fit a ladyfinger lengthwise. Set it aside and have it ready before you begin assembling — you want to work quickly once the dipping starts to prevent the ladyfingers from becoming too saturated.
In a large mixing bowl, combine the softened cream cheese, powdered sugar, vanilla extract, and 2 tablespoons of finely crushed freeze-dried strawberries. Beat with an electric mixer on medium speed until the mixture is completely smooth, fluffy, and free of any lumps. The freeze-dried strawberry powder dissolves into the cream cheese, infusing it with an intensely concentrated strawberry flavor and a beautiful natural pink color.
With the mixer running on low speed, slowly pour the heavy whipping cream into the cream cheese mixture in a steady stream. Once all the cream is incorporated, increase the speed to high and beat until the filling is thick, fluffy, and holds its shape firmly when the beaters are lifted — similar to stiff peaks. This step transforms the dense cream cheese base into a light, mousse-like filling that is the heart of the entire dessert.
Using a spatula, gently fold the diced fresh strawberries into the filling, distributing them evenly throughout. Work with slow, deliberate strokes to avoid deflating the airy texture you just created. Set the filling aside.
Working one at a time, briefly dip each ladyfinger into the milk — a quick one-second dip on each side is all that is needed. Do not soak them. Over-soaked ladyfingers become mushy and collapse under the weight of the filling, ruining the structure of the finished dessert. Arrange the dipped ladyfingers in a single, even layer across the bottom of a 7×10 inch baking dish, fitting them closely together and breaking pieces as needed to fill any gaps.
Spread exactly half of the strawberry cream cheese filling evenly over the first layer of ladyfingers, smoothing it all the way to the edges with a spatula. Work gently to avoid disturbing the ladyfinger layer beneath.
Dip the remaining ladyfingers in the milk the same way — briefly, without soaking — and arrange them in an even layer directly on top of the filling, just as you did with the first layer.
Spread the remaining strawberry cream cheese filling evenly over the second layer of ladyfingers, smoothing the surface completely flat.
Spread the whipped cream in an even, generous layer over the top of the filling, covering it completely from edge to edge. Smooth it with a spatula for a clean finish.
Sprinkle the crushed vanilla wafers and the remaining 2 tablespoons of crushed freeze-dried strawberries evenly across the whipped cream surface. The vanilla wafer crumble adds a delicate crunch that echoes the texture of classic strawberry shortcake, while the freeze-dried strawberry dust adds a final burst of concentrated flavor and a beautiful pink finish.
Cover the dish tightly with plastic wrap and refrigerate for a minimum of 4 hours — 6 hours or overnight is strongly recommended. During chilling, the ladyfingers absorb moisture from the filling and soften into a tender, cake-like layer that holds the dessert together and makes every slice clean and cohesive. This transformation is what defines the finished dessert.
Remove from the refrigerator, uncover, and slice into portions with a sharp knife. For the cleanest cuts, dip the knife in hot water and wipe it dry between each slice. Serve immediately, straight from the refrigerator.
Notes
- Prep Time: 25 minutes
- Chill Time: 4 to 6 hours (overnight strongly recommended)
- Total Time: Approximately 5 to 7 hours
- Servings: 10 to 12
- Difficulty: Easy
- Method: No-Bake
- Dish Size: 7×10 inch baking dish