
Introduction
Some of the most impressive desserts are also the easiest ones to make — and this Caramel Pecan Ice Cream Sandwich Cake is the ultimate proof of that. Built entirely from store-bought ice cream sandwiches, a jar of caramel sauce, a bag of pecans, and a container of whipped topping, this frozen showstopper comes together in minutes with zero baking, zero cooking, and almost zero effort. Yet when you pull it out of the freezer and slice through those clean, defined layers, it looks like something that took hours to create.
What makes this cake so irresistible is the combination of textures and flavors working together in perfect harmony. The ice cream sandwiches form two dense, fudgy, ice-cream-filled layers that freeze into a cohesive, sliceable base. Between and above them, rivers of rich caramel sauce and crunchy toasted pecans add sweetness, depth, and that satisfying crunch that keeps everyone coming back for another piece. The cloud of whipped topping on top keeps everything light and balanced, and the final drizzle of caramel and scatter of pecans makes the presentation as good as the flavor.
This is the dessert for summer cookouts, birthday parties, holiday gatherings, and every occasion where you want something genuinely impressive without spending your afternoon in the kitchen. Make it ahead, keep it in the freezer, and pull it out when the moment calls for something spectacular.
Prep and Serving Details
- Prep Time: 15 minutes
- Freeze Time: 1 hour minimum (overnight recommended)
- Total Time: 1 hour 15 minutes
- Servings: 12 to 16
- Difficulty: Easy
- Method: No-Bake, Frozen
- Pan Size: 9×13 inch baking dish
Ingredients
- 24 store-bought ice cream sandwiches
- 1 cup caramel sauce, divided into thirds
- 1 cup chopped pecans, divided into thirds
- 1 container (8 oz) frozen whipped topping, thawed overnight in the refrigerator
Instructions
Step 1: Prepare the Pan
Spray a 9×13 inch baking dish with non-stick cooking spray. This makes it easier to serve clean portions directly from the dish without the base sticking.
Step 2: Build the First Ice Cream Sandwich Layer
Arrange 11 to 12 ice cream sandwiches in a single, even layer across the bottom of the prepared dish. Cut sandwiches as needed with a sharp knife to fill any gaps and create a level, fully covered layer — corners and edges included. A complete, even first layer is what gives the finished cake its structural integrity when sliced.
Step 3: Add the First Caramel and Pecan Layer
Drizzle ⅓ cup of the caramel sauce evenly over the ice cream sandwich layer, reaching all the way to the edges. Sprinkle ⅓ cup of the chopped pecans evenly over the caramel. The caramel will begin to soak slightly into the sandwiches as you work — this is exactly what you want, as it binds the layers together and adds flavor throughout.
Step 4: Build the Second Ice Cream Sandwich Layer
Arrange the remaining ice cream sandwiches in an even layer directly over the pecan and caramel layer, again cutting pieces as needed to ensure complete, edge-to-edge coverage. Press down gently to level the layer.
Step 5: Add the Second Caramel and Pecan Layer
Drizzle another ⅓ cup of caramel sauce evenly over the second layer of ice cream sandwiches and sprinkle with another ⅓ cup of chopped pecans.
Step 6: Add the Whipped Topping
Spread the thawed whipped topping evenly and generously over the second pecan layer, smoothing it all the way to the edges with a spatula for a clean, level finish.
Step 7: Finish the Top
Drizzle the remaining ⅓ cup of caramel sauce decoratively over the whipped topping surface. Scatter the remaining ⅓ cup of chopped pecans across the top. For the most attractive presentation, drizzle the caramel in a zigzag or circular pattern rather than randomly — it takes seconds and makes the finished cake look considerably more polished.
Step 8: Freeze
Cover the dish tightly with aluminum foil and place it in the freezer for at least 1 hour before serving. Overnight freezing is strongly recommended — it allows all the layers to freeze together into a completely unified, perfectly sliceable cake. A cake frozen for only 1 hour will be somewhat soft and harder to cut cleanly.
Step 9: Slice and Serve
When ready to serve, remove the cake from the freezer and let it sit at room temperature for 3 to 5 minutes to soften just enough for easy cutting. Slice with a sharp knife into squares or rectangles, wiping the blade between cuts for the cleanest portions. Serve immediately and return any leftovers to the freezer promptly.
Pro Tips for the Best Results
- Freeze overnight for the best result. One hour produces a serviceable cake, but overnight freezing produces a completely unified, firm cake that slices cleanly and holds its shape on the plate. The difference is significant and worth planning ahead for.
- Cut the ice cream sandwiches with a sharp knife. A clean, decisive cut rather than a sawing motion keeps the sandwiches intact and prevents them from compressing or tearing at the edges when fitting them into the pan.
- Thaw the whipped topping properly. Move it from the freezer to the refrigerator the night before assembly. Properly thawed Cool Whip spreads smoothly and evenly. Partially thawed whipped topping is stiff, difficult to spread, and tears the layers beneath it.
- Use room-temperature caramel sauce. Cold caramel sauce is thick and difficult to drizzle evenly. If your caramel sauce has been refrigerated, warm it briefly in the microwave for 15 to 20 seconds before drizzling for an effortless, even distribution.
- Toast the pecans for deeper flavor. Spread the chopped pecans in a dry pan over medium heat and stir for 2 to 3 minutes until golden and fragrant before using. Toasted pecans have a significantly deeper, nuttier flavor that elevates the entire cake.
- Let it sit before slicing. Three to five minutes at room temperature after removing from the freezer makes a noticeable difference in how easily and cleanly the cake slices. Any longer and it begins to soften too much for clean portions.
Variations and Substitutions
- Different ice cream sandwich flavors: Vanilla is the classic choice, but chocolate, strawberry, or neapolitan ice cream sandwiches all work beautifully and add a different flavor dimension to the finished cake.
- Different nuts: Walnuts, almonds, or cashews can replace the pecans for a different nutty flavor and texture. For a nut-free version, substitute mini chocolate chips, toffee bits, or crushed graham crackers for the same satisfying crunch.
- Chocolate drizzle: Add a drizzle of warm chocolate ganache or melted chocolate chips alongside the caramel for a turtle-inspired chocolate-caramel-pecan combination that is deeply indulgent.
- Hot fudge layer: Replace the caramel sauce with hot fudge sauce for a richer, more intensely chocolate flavor profile throughout every layer.
- Oreo crumble layer: Sprinkle a layer of crushed Oreo cookies alongside or in place of the pecans for a cookies-and-cream variation that is particularly popular with younger guests.
- Salted caramel: Use a salted caramel sauce in place of regular caramel for a sophisticated sweet-salty balance that makes every layer more complex and interesting.
- Mini version: Use a standard loaf pan and scale the recipe down proportionally for a smaller, more intimate version that serves 4 to 6 people.
Storage Instructions
Store the finished cake covered tightly with aluminum foil in the freezer for up to 2 weeks. The ice cream sandwiches, caramel, and whipped topping all freeze and maintain their texture well over this period. For longer storage, individual portions can be wrapped tightly in plastic wrap and then foil and frozen for up to 1 month.
Do not refrigerate this cake — the ice cream layers will soften and lose their structure at refrigerator temperature. Always keep it in the freezer and remove it only a few minutes before serving. If you are transporting the cake to a gathering, keep it in a cooler with ice packs and slice it as close to serving time as possible for the cleanest presentation.
Frequently Asked Questions
Can I use homemade ice cream sandwiches instead of store-bought? Yes, homemade ice cream sandwiches work beautifully and allow you to customize the ice cream flavor and cookie type to your preference. Make sure they are fully frozen before assembling the cake, otherwise they will compress and lose their structure as you build the layers.
Do I need to remove the ice cream sandwich wrappers before layering? Yes — always remove the wrappers before assembling. This seems obvious but is worth mentioning, as the individual wrappers can be easy to miss in a rush.
My cake is difficult to slice cleanly — what should I do? This is almost always caused by the cake being too frozen and hard. Let it sit at room temperature for 3 to 5 minutes before slicing, run your knife under hot water and wipe it dry, and slice with a firm, single downward motion rather than a sawing motion. If the cake is still too hard after 5 minutes, wait another 2 minutes and try again.
Can I add a layer of fresh fruit? Yes. Sliced bananas, strawberries, or raspberries placed between the ice cream sandwich layers add a fresh, fruity element that works particularly well with caramel. Pat the fruit dry with paper towels before layering to minimize excess moisture, and be aware that fruit may affect how cleanly the layers hold together after extended freezing.
How far in advance can I make this cake? This cake can be made up to 2 weeks in advance and kept in the freezer. In fact, making it a day or two ahead is recommended — the layers bond completely and the cake slices much more cleanly than one that has only been frozen for an hour.
Can I use light whipped topping instead of regular? Yes. Light whipped topping works identically in terms of spreading and freezing. The finished cake will be very slightly less rich but otherwise indistinguishable from the full-fat version.
Nutrition Estimate
Per serving (1 of 12): Calories: approximately 420 kcal | Carbohydrates: 55g | Protein: 5g | Fat: 20g | Saturated Fat: 8g | Sugar: 38g | Fiber: 1g | Cholesterol: 25mg | Sodium: 220mg
Values are approximate and will vary based on specific ice cream sandwich brands, caramel sauce, and portion sizes used.
Print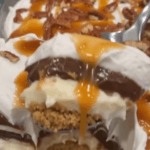
Caramel Pecan Ice Cream Sandwich Cake
Description
Prep and Serving Details
- Prep Time: 15 minutes
- Freeze Time: 1 hour minimum (overnight recommended)
- Total Time: 1 hour 15 minutes
- Servings: 12 to 16
- Difficulty: Easy
- Method: No-Bake, Frozen
- Pan Size: 9×13 inch baking dish
Ingredients
- 24 store-bought ice cream sandwiches
- 1 cup caramel sauce, divided into thirds
- 1 cup chopped pecans, divided into thirds
- 1 container (8 oz) frozen whipped topping, thawed overnight in the refrigerator
Instructions
Spray a 9×13 inch baking dish with non-stick cooking spray. This makes it easier to serve clean portions directly from the dish without the base sticking.
Arrange 11 to 12 ice cream sandwiches in a single, even layer across the bottom of the prepared dish. Cut sandwiches as needed with a sharp knife to fill any gaps and create a level, fully covered layer — corners and edges included. A complete, even first layer is what gives the finished cake its structural integrity when sliced.
Drizzle ⅓ cup of the caramel sauce evenly over the ice cream sandwich layer, reaching all the way to the edges. Sprinkle ⅓ cup of the chopped pecans evenly over the caramel. The caramel will begin to soak slightly into the sandwiches as you work — this is exactly what you want, as it binds the layers together and adds flavor throughout.
Arrange the remaining ice cream sandwiches in an even layer directly over the pecan and caramel layer, again cutting pieces as needed to ensure complete, edge-to-edge coverage. Press down gently to level the layer.
Drizzle another ⅓ cup of caramel sauce evenly over the second layer of ice cream sandwiches and sprinkle with another ⅓ cup of chopped pecans.
Spread the thawed whipped topping evenly and generously over the second pecan layer, smoothing it all the way to the edges with a spatula for a clean, level finish.
Drizzle the remaining ⅓ cup of caramel sauce decoratively over the whipped topping surface. Scatter the remaining ⅓ cup of chopped pecans across the top. For the most attractive presentation, drizzle the caramel in a zigzag or circular pattern rather than randomly — it takes seconds and makes the finished cake look considerably more polished.
Cover the dish tightly with aluminum foil and place it in the freezer for at least 1 hour before serving. Overnight freezing is strongly recommended — it allows all the layers to freeze together into a completely unified, perfectly sliceable cake. A cake frozen for only 1 hour will be somewhat soft and harder to cut cleanly.
When ready to serve, remove the cake from the freezer and let it sit at room temperature for 3 to 5 minutes to soften just enough for easy cutting. Slice with a sharp knife into squares or rectangles, wiping the blade between cuts for the cleanest portions. Serve immediately and return any leftovers to the freezer promptly.